
Home Servers
ZimaBlade Review: Is This Tiny Home Server Worth It?
The ZimaBlade 7700 fits in one hand but includes two SATA ports, PCIe expansion, up to 16GB of RAM, and pre-installed CasaOS. I used it to build my first real home server, beginning with AdGuard Home and a 3D-printed microRACK before planning a Jellyfin and Quadro transcoding experiment.
By worth-the-cart
•
•
7 min read

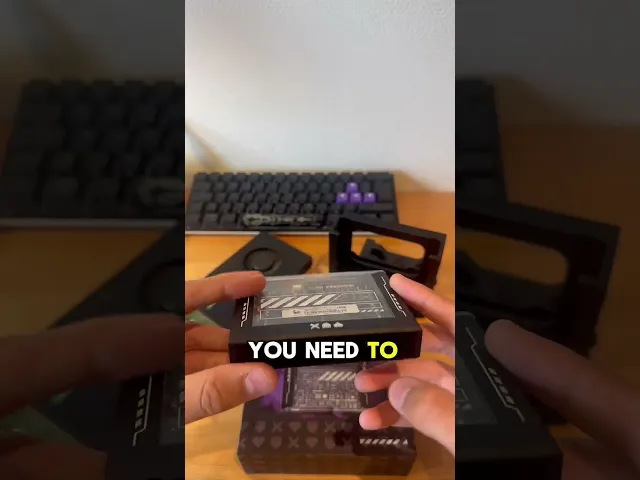
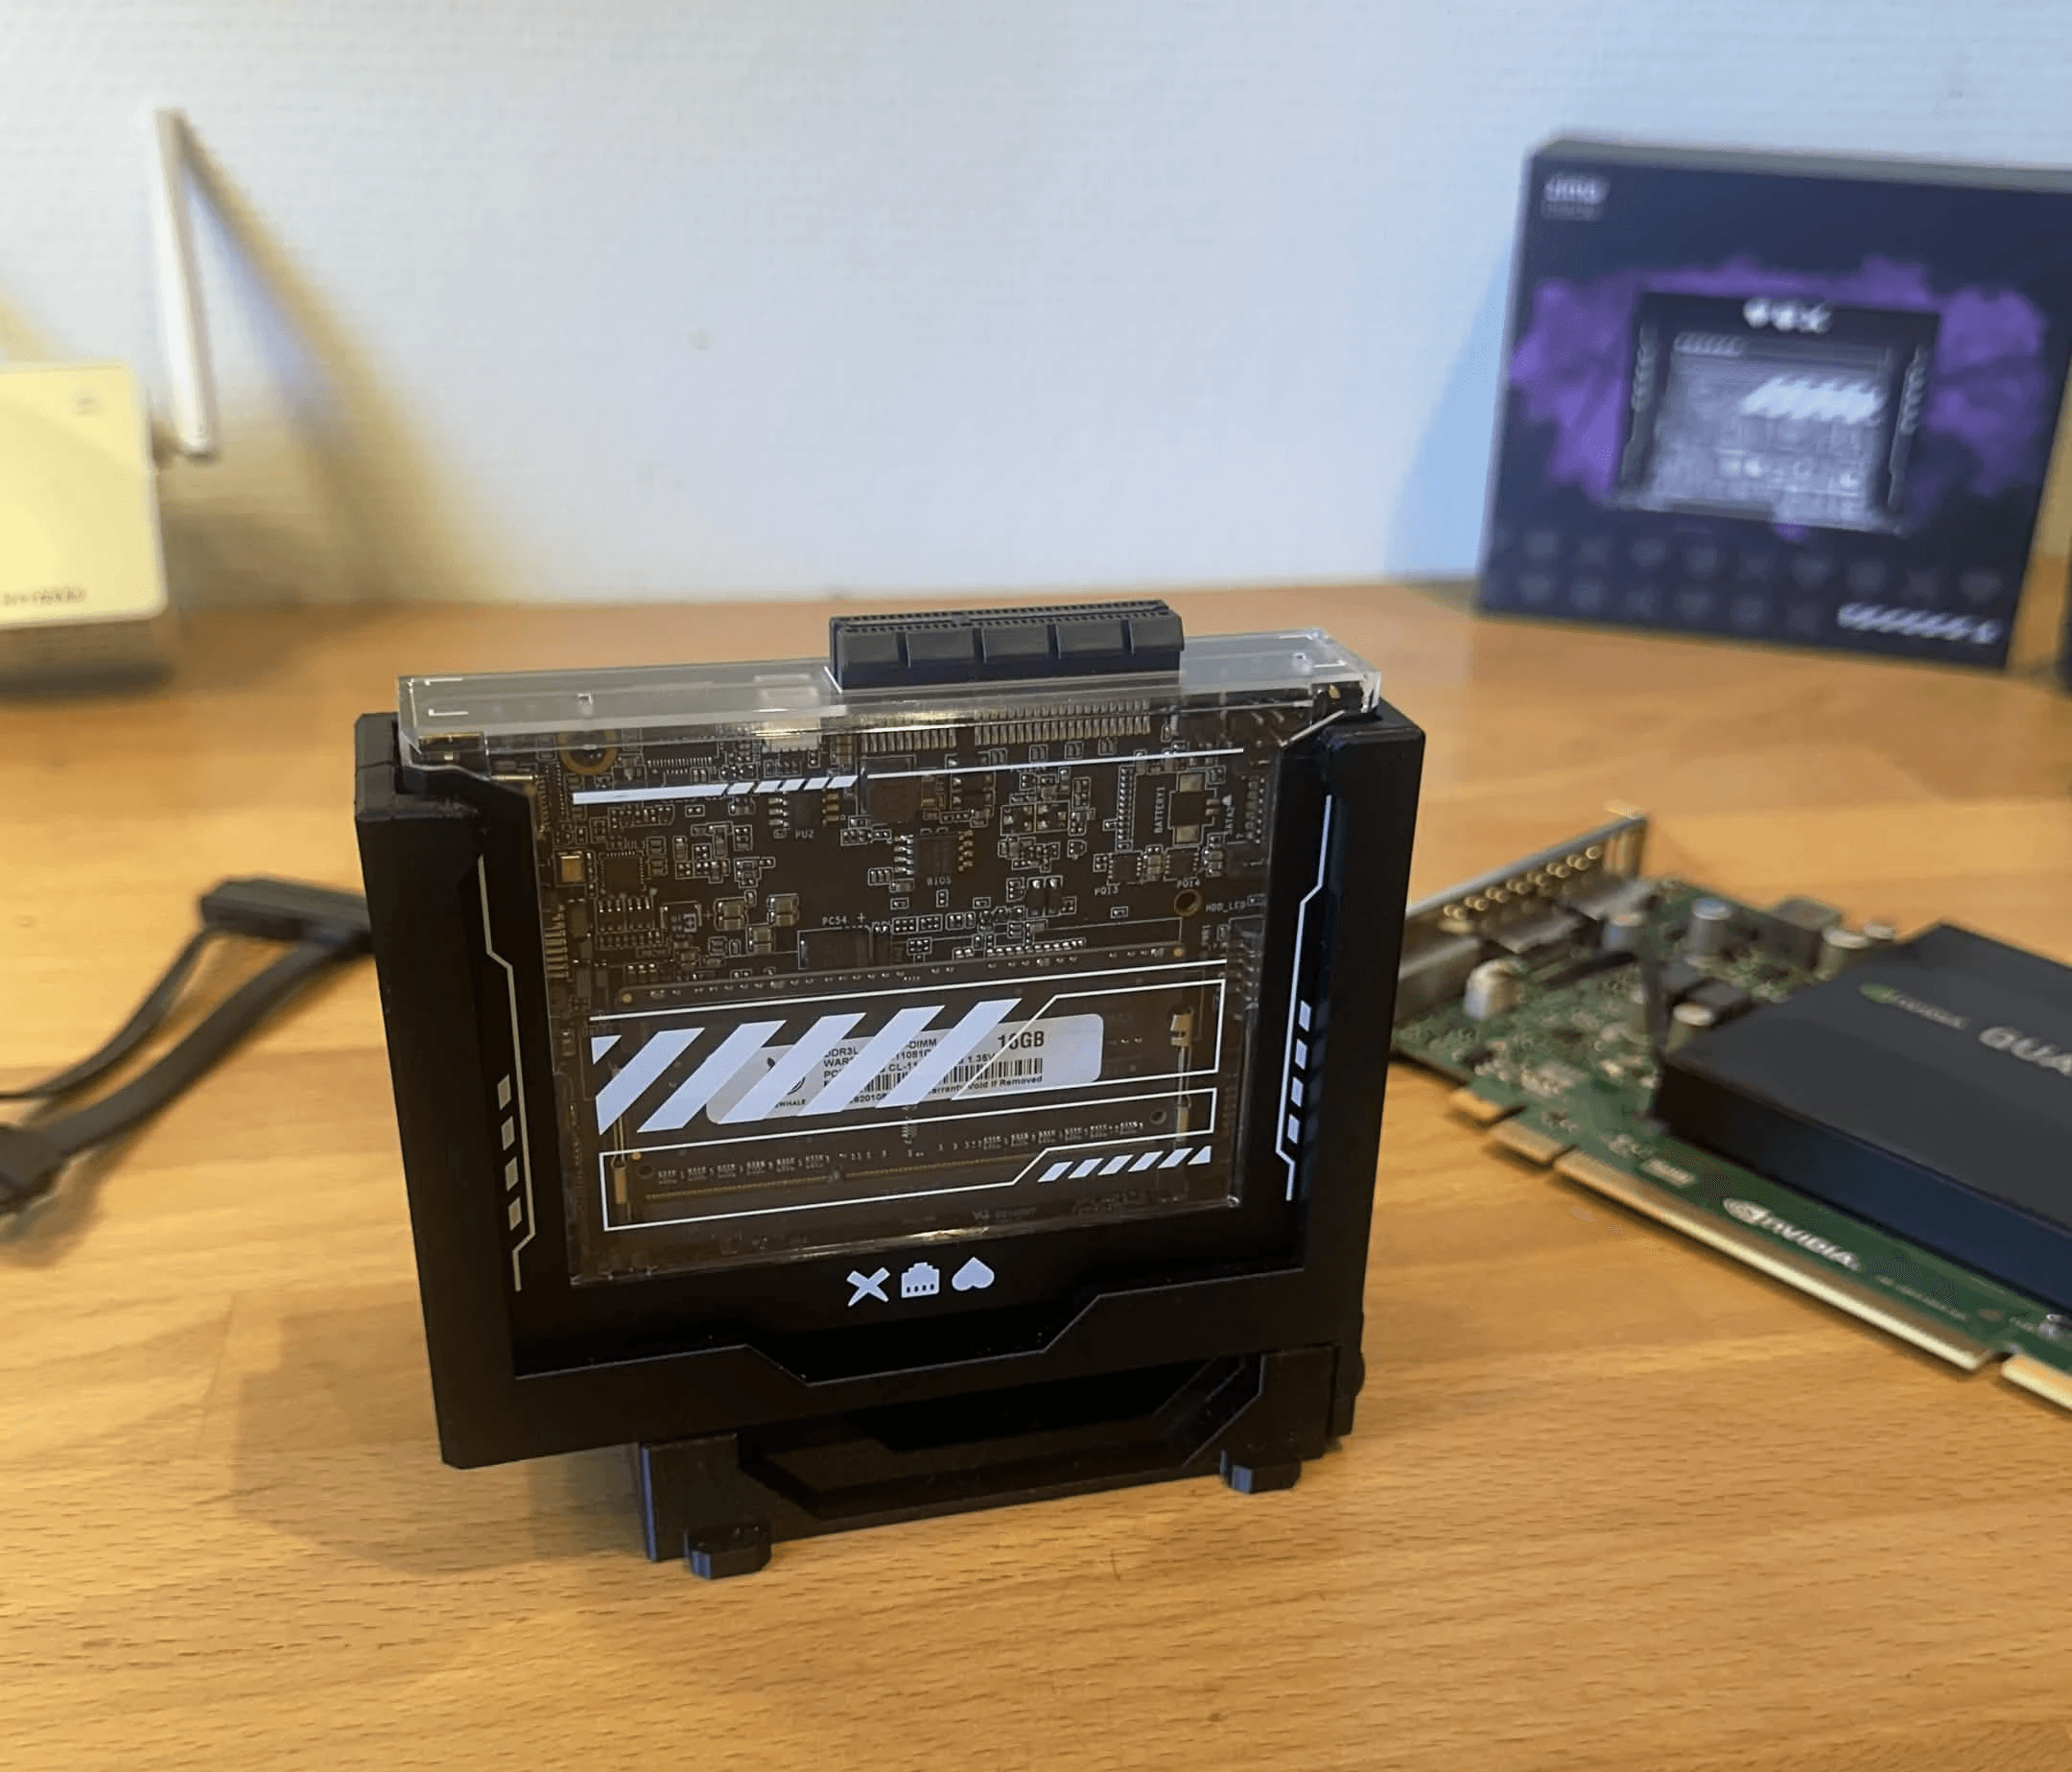
The ZimaBlade 7700 looks less like a traditional server and more like someone compressed a desktop PC until it could fit in one hand. It has visible memory, a transparent Case, two native SATA ports, and a PCIe slot sticking out of the top, yet the complete system is barely larger than a typical single-board computer. That combination immediately makes it more interesting than another sealed mini PC or a basic board intended mainly for small electronics projects.
Before using the ZimaBlade, I thought of a home server as little more than a place to store files. I knew that local storage could be useful, but I had not realized how many applications and services could run from one small machine. A home server can stream a personal movie library, block advertising and tracking requests, back up several devices, host a private cloud, run a VPN, or become the center of a smart-home setup and much more! The part that appealed to me most was having more control over the services and data inside my own home.
That is exactly where the ZimaBlade positions itself. It is an affordable x86 server designed for people who want the flexibility of a small PC without building a complete desktop or buying an expensive ready made NAS. For this ZimaBlade review, I installed 16GB of RAM, mounted the Zimablade in a 3D-printed micro server rack, started using the pre-installed CasaOS, and set up AdGuard Home as my first self-hosted application. I am also preparing a Jellyfin media server and an NVIDIA Quadro GPU experiment, although those parts will remain clearly labeled as untested until the hardware and transcoding setup are actually running. I need a little more storage before I can continue my jellyfin project.
What Is the ZimaBlade?
The ZimaBlade is a compact x86 single-board server from Zima. In simple terms, it is a small computer built to run continuously and provide services to other devices in your home. It is managed primarily through a web browser, so it does not need its own monitor, keyboard, and mouse during normal use. The server itself connects through Gigabit Ethernet, while a laptop or desktop on the same network can access its dashboard over Wi-Fi.
Using x86 hardware is important because it gives the ZimaBlade broader compatibility with familiar PC operating systems and server software than many ARM-based boards. CasaOS comes pre-installed, but the hardware can also run other compatible systems such as ZimaOS, Linux distributions, Windows, OpenWrt, pfSense, and Proxmox. That makes it approachable for a first project without locking more experienced users into a single software environment.
The ZimaBlade also has a different focus from something like a Raspberry Pi. A Raspberry Pi is an extremely flexible general-purpose board with GPIO pins for electronics projects, while the ZimaBlade gives up that maker-focused connection in favor of hardware that is more directly useful in a server: two SATA ports, a full PCIe interface, Gigabit Ethernet, x86 software compatibility, onboard eMMC storage, and a protective enclosure. It is not automatically better for every project, but it makes far more sense when storage, Docker applications, networking, and self-hosting are the priorities.
ZimaBlade 3760 vs. ZimaBlade 7700
Zima currently sells two versions through the official ZimaBlade product page. The Blade 3760 Board Only starts at $69, while the Blade 7700 Board Only costs $119 at the time of writing. Both models share the same basic dimensions, enclosure, 32GB of onboard eMMC storage, memory format, SATA connections, networking, and expansion layout. The main difference is processing power.
Specification | ZimaBlade 3760 | ZimaBlade 7700 |
|---|---|---|
Processor | Intel Celeron N3350, 2 cores | Intel Apollo Lake, 4 cores |
Maximum memory | 16GB DDR3L SO-DIMM | 16GB DDR3L SO-DIMM |
Onboard storage | 32GB eMMC 5.1 | 32GB eMMC 5.1 |
SATA | 2 × SATA 6Gbps | 2 × SATA 6Gbps |
Expansion | PCIe 2.0 x4 | PCIe 2.0 x4 |
Networking | Gigabit Ethernet | Gigabit Ethernet |
Cooling | Passive | Passive |
Board-only price | $69 | $119 |
The 3760 is the sensible choice for lighter jobs such as AdGuard Home, Home Assistant, basic file sharing, and a few simple Docker services. The 7700 has four CPU cores and is the more flexible option for multitasking, media applications, a small DIY NAS, or anyone who expects the server to grow beyond one basic service. My unit is the 7700, which Zima lists with an N3450, J3455, or E3950 processor depending on the specific production unit.
What makes the 7700 appealing is the complete platform around that processor. It remains compact and silent, supports the same 16GB memory capacity, and offers direct storage and PCIe connections that are often missing from small computers in this price range. The extra two cores also provide more breathing room once several services begin running at the same time. For a first home server that may eventually handle media, backups, network tools, and experiments, the additional $50 makes the 7700 the model I would choose.
ZimaBlade 7700 Specifications
My configuration uses a single 16GB Zima DDR3L SO-DIMM and the integrated 32GB eMMC for CasaOS. The memory capacity is generous for the type of services this processor is likely to run, although the board has only one SO-DIMM slot. Anyone buying the Board Only version should therefore choose the desired capacity from the start; there is no second slot for adding more ram later.
Component | ZimaBlade 7700 specification |
CPU | Quad-core Intel Apollo Lake processor |
Integrated graphics | Intel HD Graphics 500 or 505 |
Memory | 1 × DDR3L SO-DIMM, up to 16GB |
Built-in storage | 32GB eMMC 5.1 |
Drive connections | 2 × SATA 6Gbps |
Expansion slot | PCIe 2.0 x4 |
Networking | 1 × Gigabit Ethernet |
USB | 1 × USB 3.0 plus USB-C |
Display output | Mini DisplayPort 1.2, up to 4K at 60Hz |
Power | USB-C PD, 12V/3A |
Cooling | Passive, fanless |
Dimensions | 107 × 80 × 23mm |
Weight | Approximately 175g |
Pre-installed software | CasaOS |
The specification sheet has some clear limitations. Gigabit Ethernet is perfectly adequate for normal backups and home media streaming, but it is slower than the 2.5GbE connections found on newer home-server hardware. There is also only one USB 3.0 port, and Wi-Fi is not built in. However, the ZimaBlade is not trying to win through the newest processor or fastest networking. Its strongest feature is how much useful server expansion is available in such a small and affordable system.
Design and Build Quality
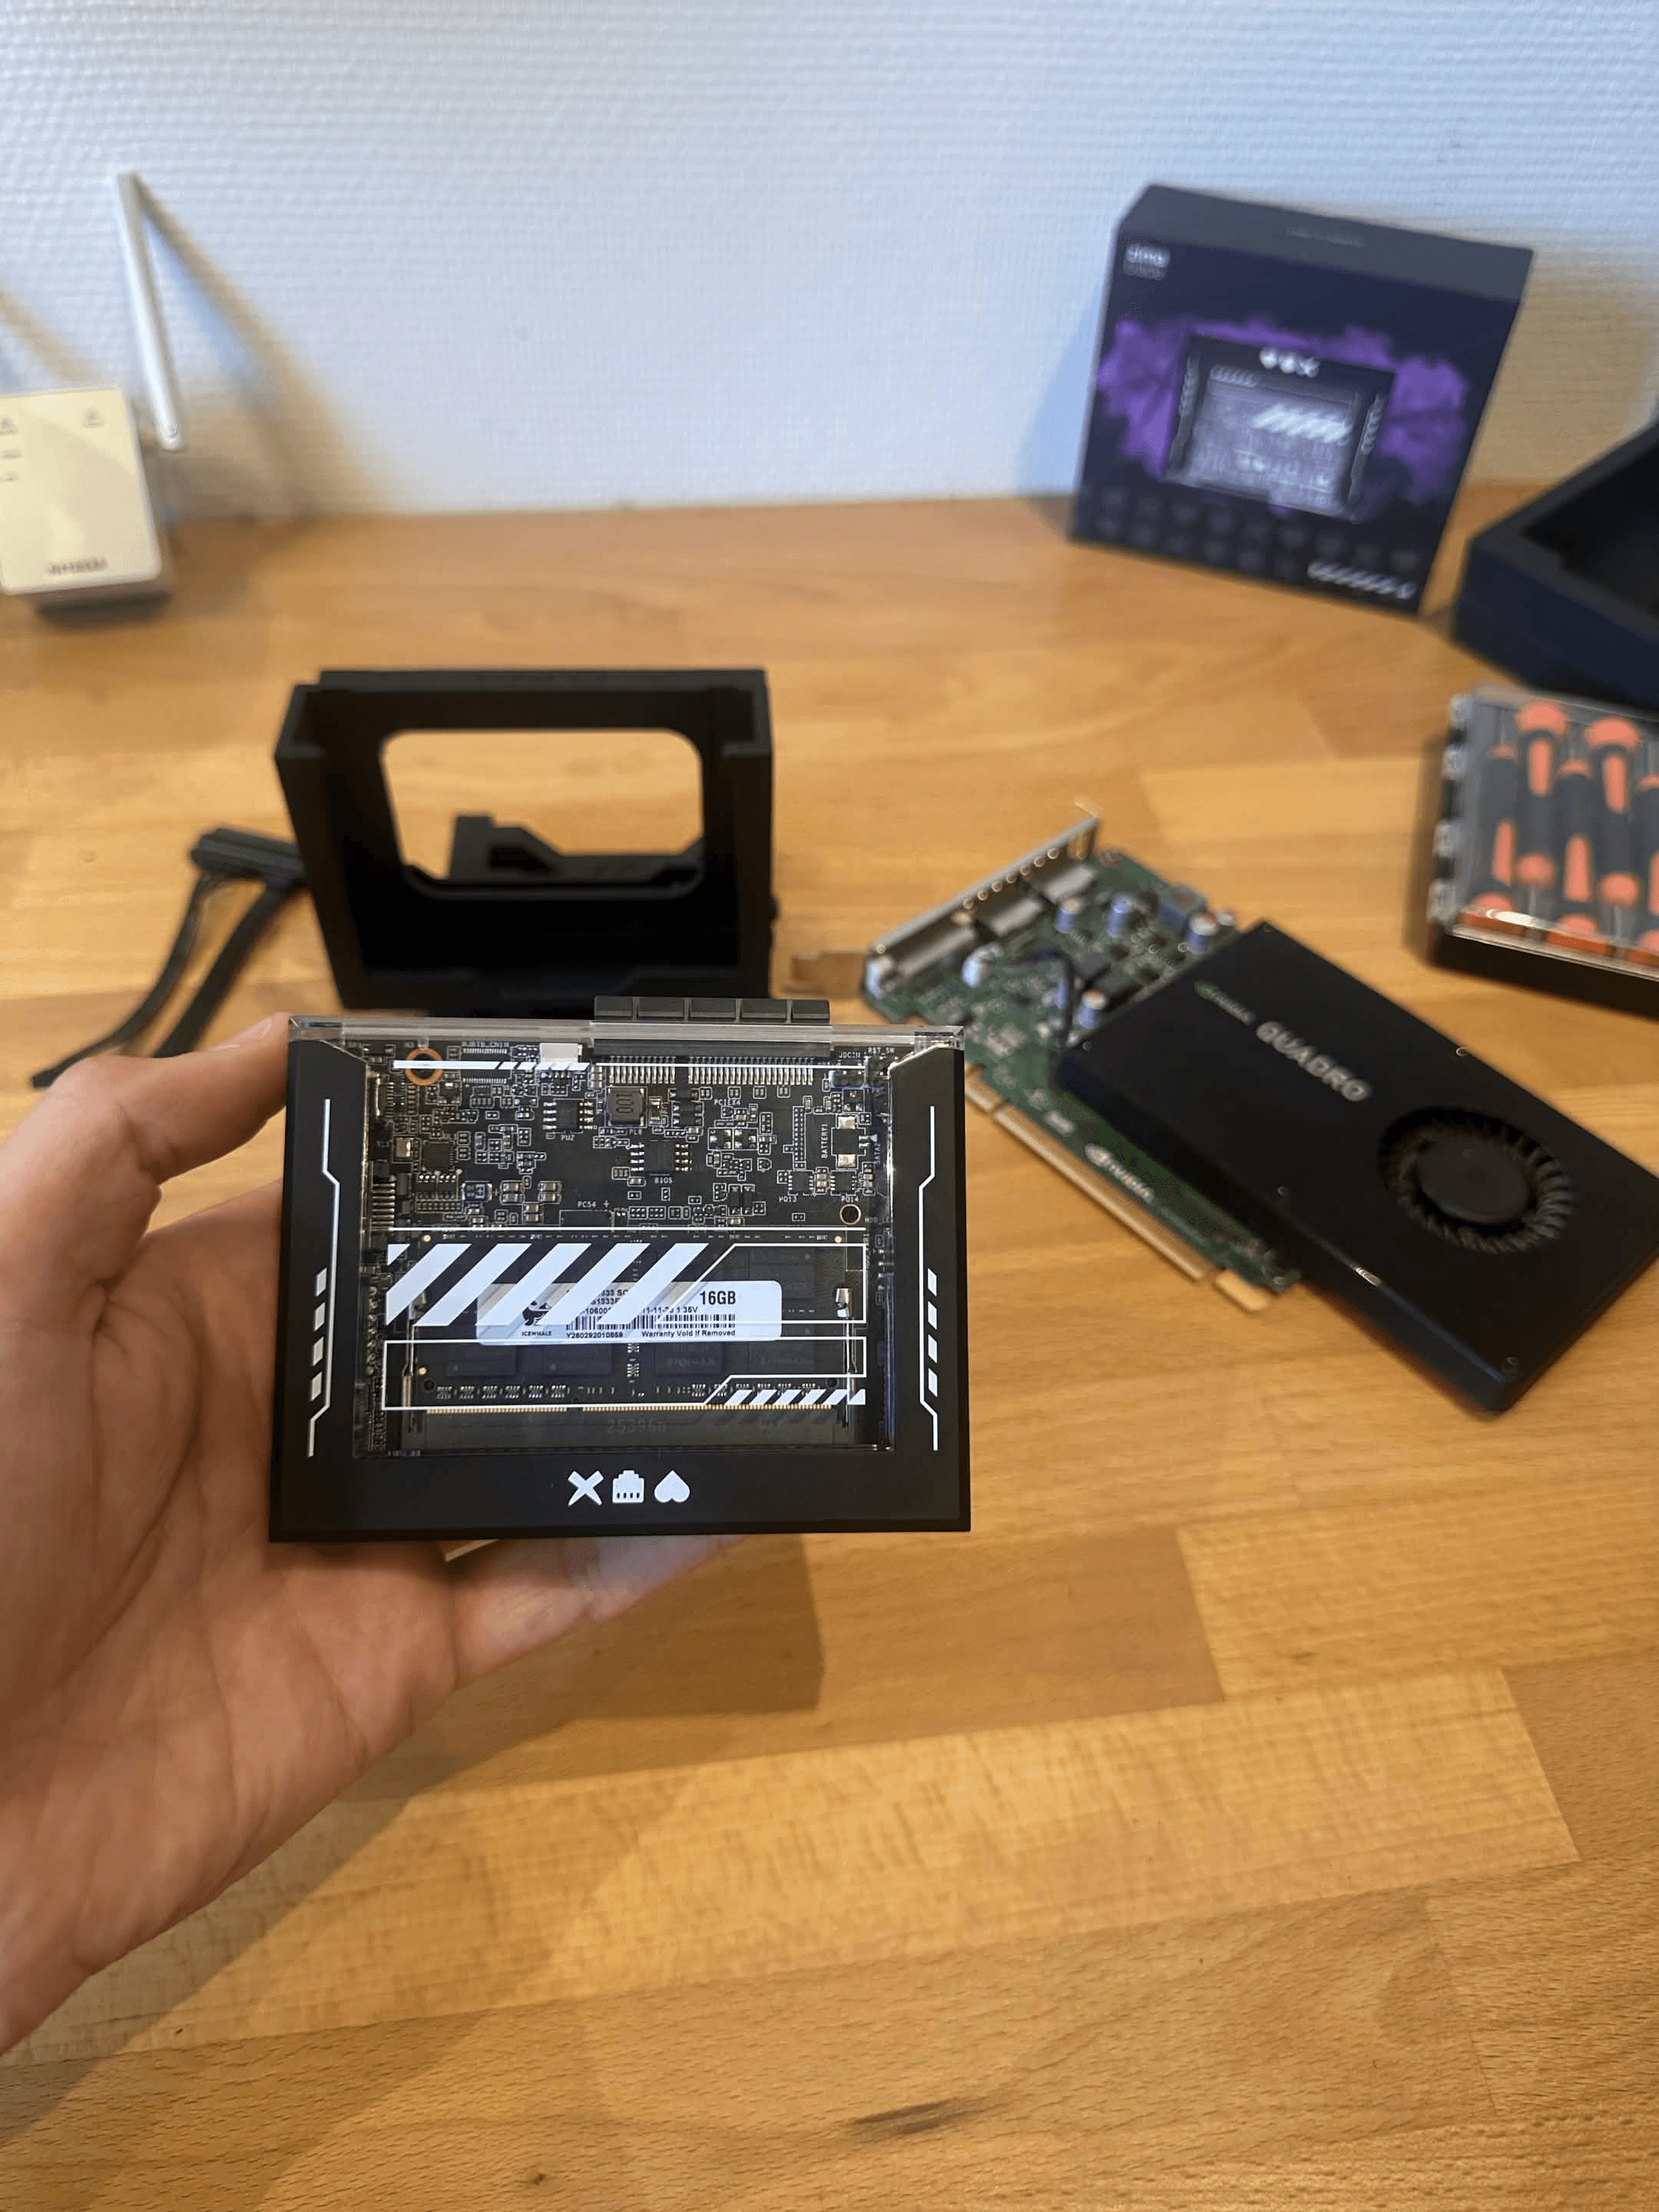
My first impression was that the ZimaBlade looked and felt far more professional than I expected. Even though the hardware is visible, it does not feel like an unfinished development board. The black frame protects the edges, while the transparent top lets you see the motherboard and installed memory without leaving the components completely exposed. It feels like a tiny PC rather than a loose collection of parts.
The transparent design also suits the purpose of the product. The ZimaBlade is meant to be upgraded, connected to storage, and used for unusual DIY projects, so hiding everything behind a sealed plastic shell would make less sense. The visible RAM and PCIe slot make that expandability part of the appearance. I especially liked seeing a real PCIe connector on a device this small, because it immediately suggested possibilities beyond basic storage. With actual screws to unscrew which made the experience a little more PC like.
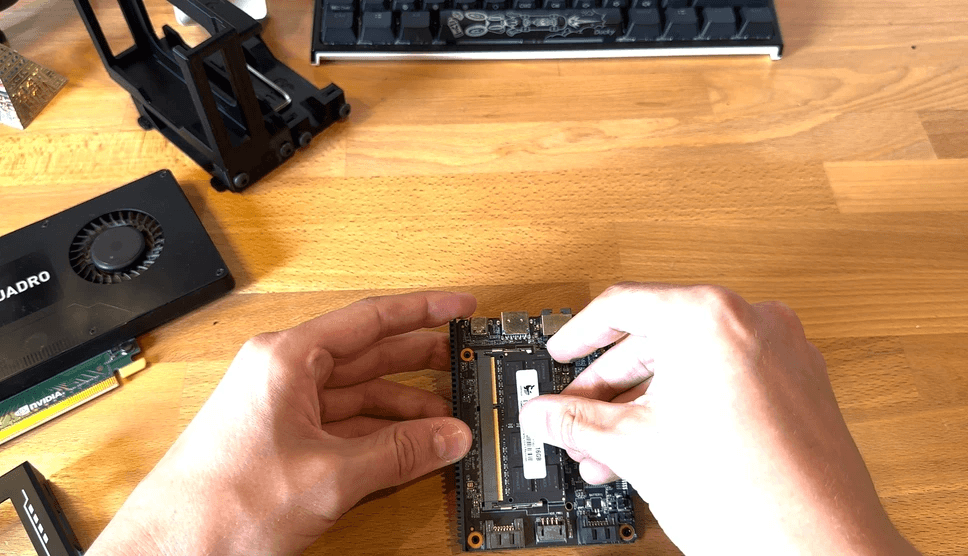
Installing the memory was extremely simple. The process is similar to installing RAM in a laptop: align the notch, insert the SO-DIMM at an angle, and press it into place and it makes a satisfying click sound when it snaps into place.. I understood the layout immediately and did not need to stop for a separate guide. CasaOS later reported approximately 15.5GB of usable memory, confirming that the 16GB of ram had been detected correctly.
The ZimaBlade uses passive cooling, so the base system has no fan or moving parts. Mine has been completely silent, which is ideal for a server that will sit beside my PC rather than in a separate equipment room. After it had been running for a while with almost no CPU load, CasaOS reported a temperature of around 34°C. That is only an early idle observation rather than a full thermal test, but it is a promising starting point for a compact fanless system.
Ports and Expansion: The ZimaBlade’s Biggest Advantage
The two SATA 6Gbps connections are central to the ZimaBlade’s identity. Instead of depending entirely on USB enclosures, they allow 2.5-inch or 3.5-inch storage drives to be connected directly with the appropriate data and power cables. For my own setup, these ports will eventually hold multiple drives used for movies and backups. The integrated eMMC is enough for CasaOS and initial applications, while the SATA drives can handle the larger files that make a home server useful.
The PCIe 2.0 x4 slot is even more unusual at this size. It can support compatible network adapters, NVMe storage cards, SATA controllers, and other PCIe devices. The slot is open-ended, so a longer card can physically connect while operating with four lanes, although size, power delivery, driver compatibility, and physical support still need to be considered for every device. My planned Quadro K2200 build is a good example: the card is dramatically larger than the entire ZimaBlade, and connecting it physically is only the beginning of making the experiment work properly.
The remaining ports are practical but limited. Gigabit Ethernet provides the wired network connection, USB 3.0 can handle an external drive or peripheral, Mini DisplayPort allows a local display to be attached, and USB-C supplies power. A second USB 3.0 port and faster Ethernet would make the system easier to expand without adapters, but including those features would also affect the size and price. For the ZimaBlade’s intended role, SATA and PCIe are the connections that matter most.
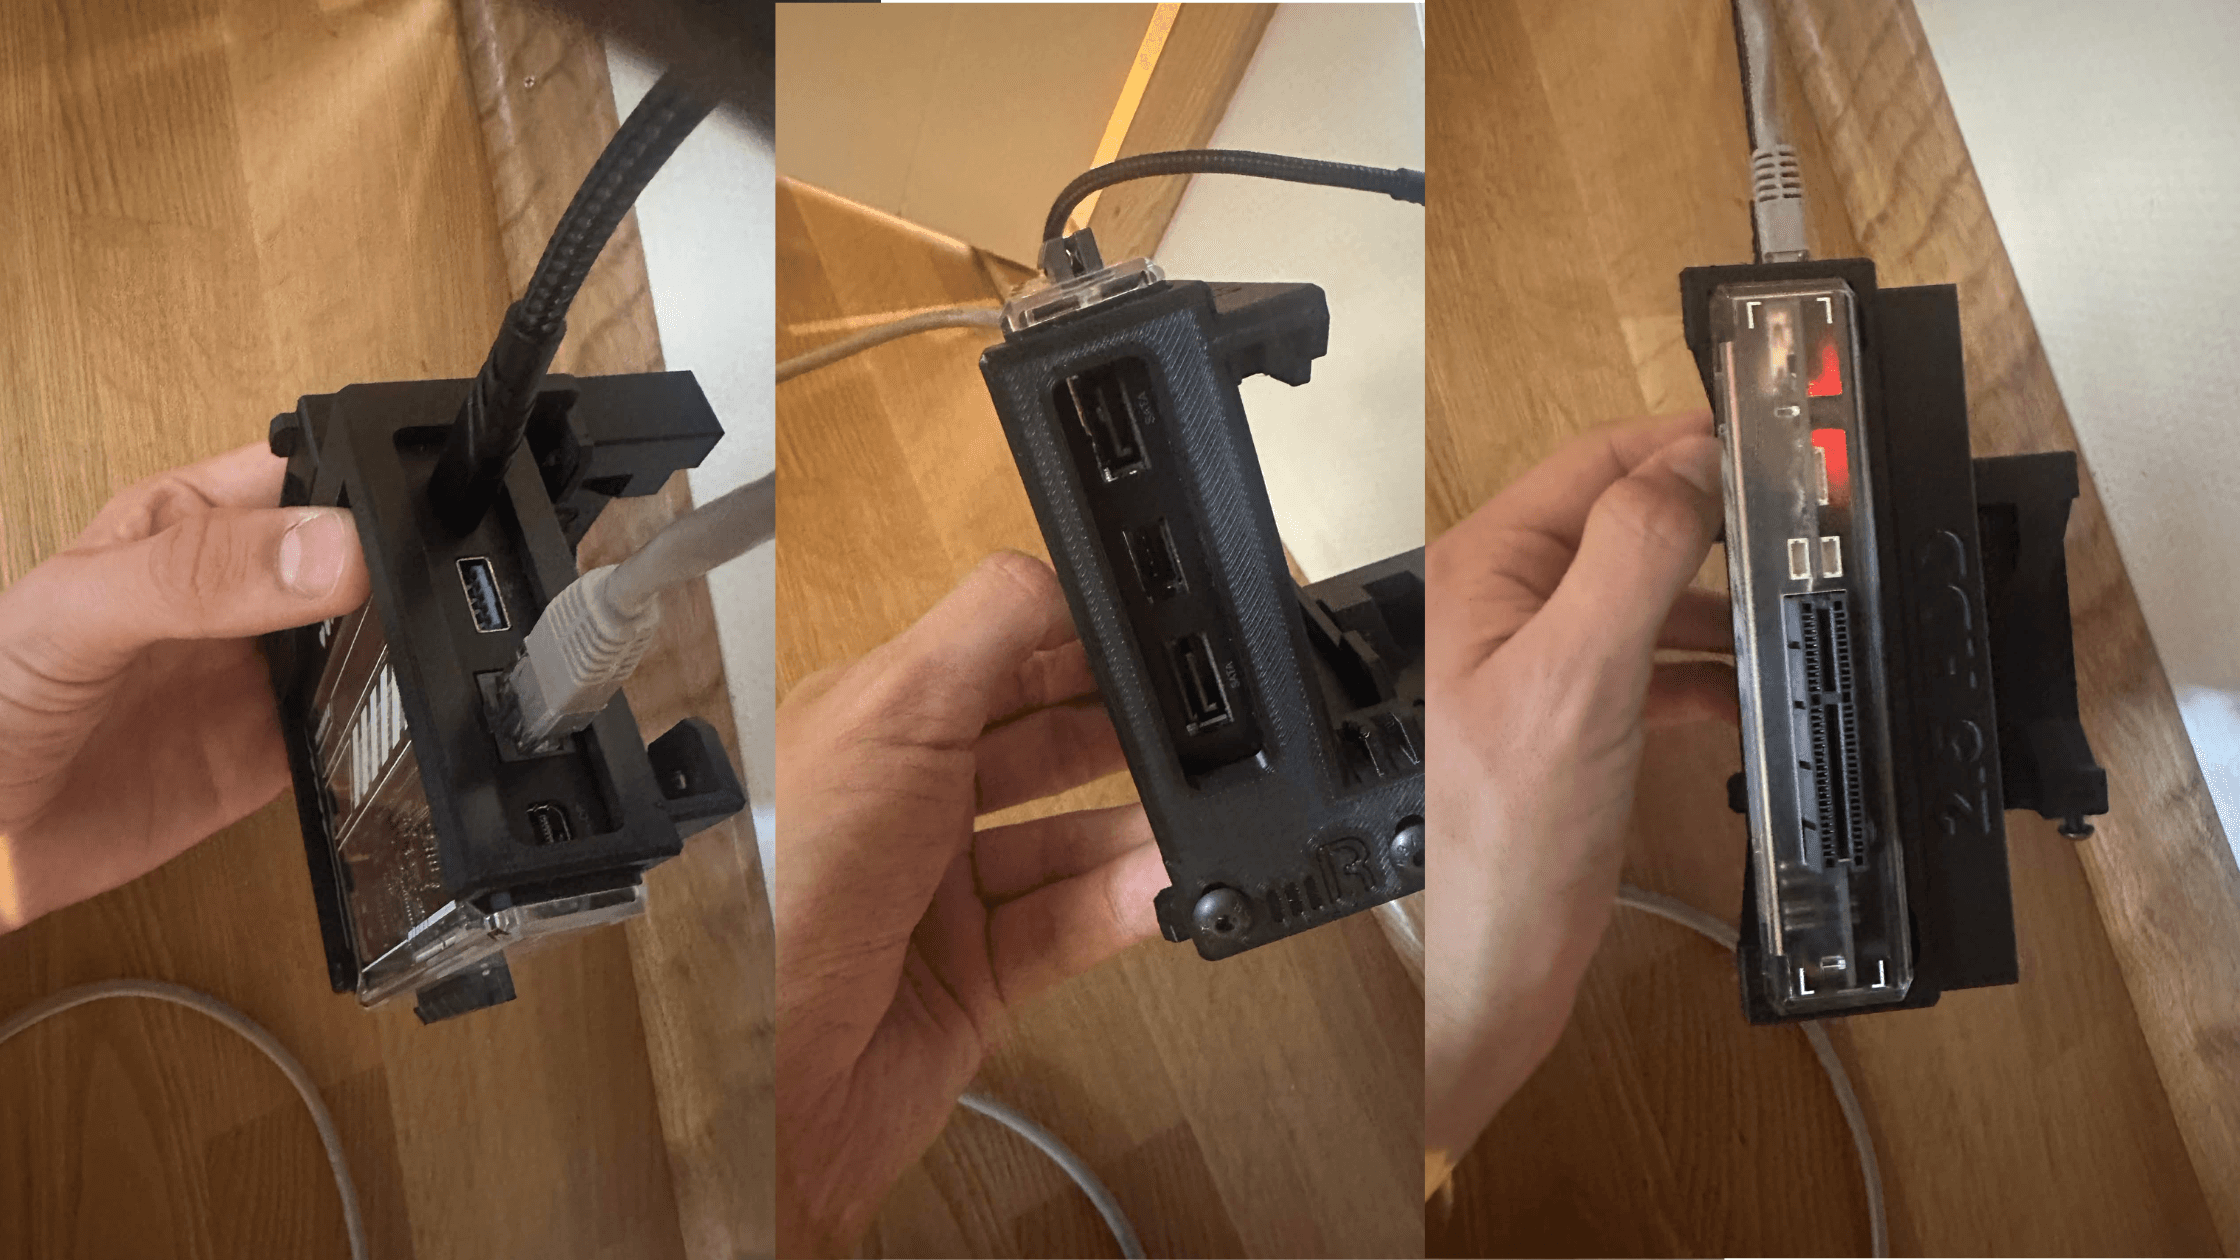
The 3D-Printed microRACK Makes It Feel Like a Real Server
I wanted the ZimaBlade to remain protected and organized beside my PC, while leaving space for the storage I plan to add. I therefore printed the free microRACK server-rack design together with its matching ZimaBlade rack-mount module. Both models were created by futuristicvlad and are available through Printables.
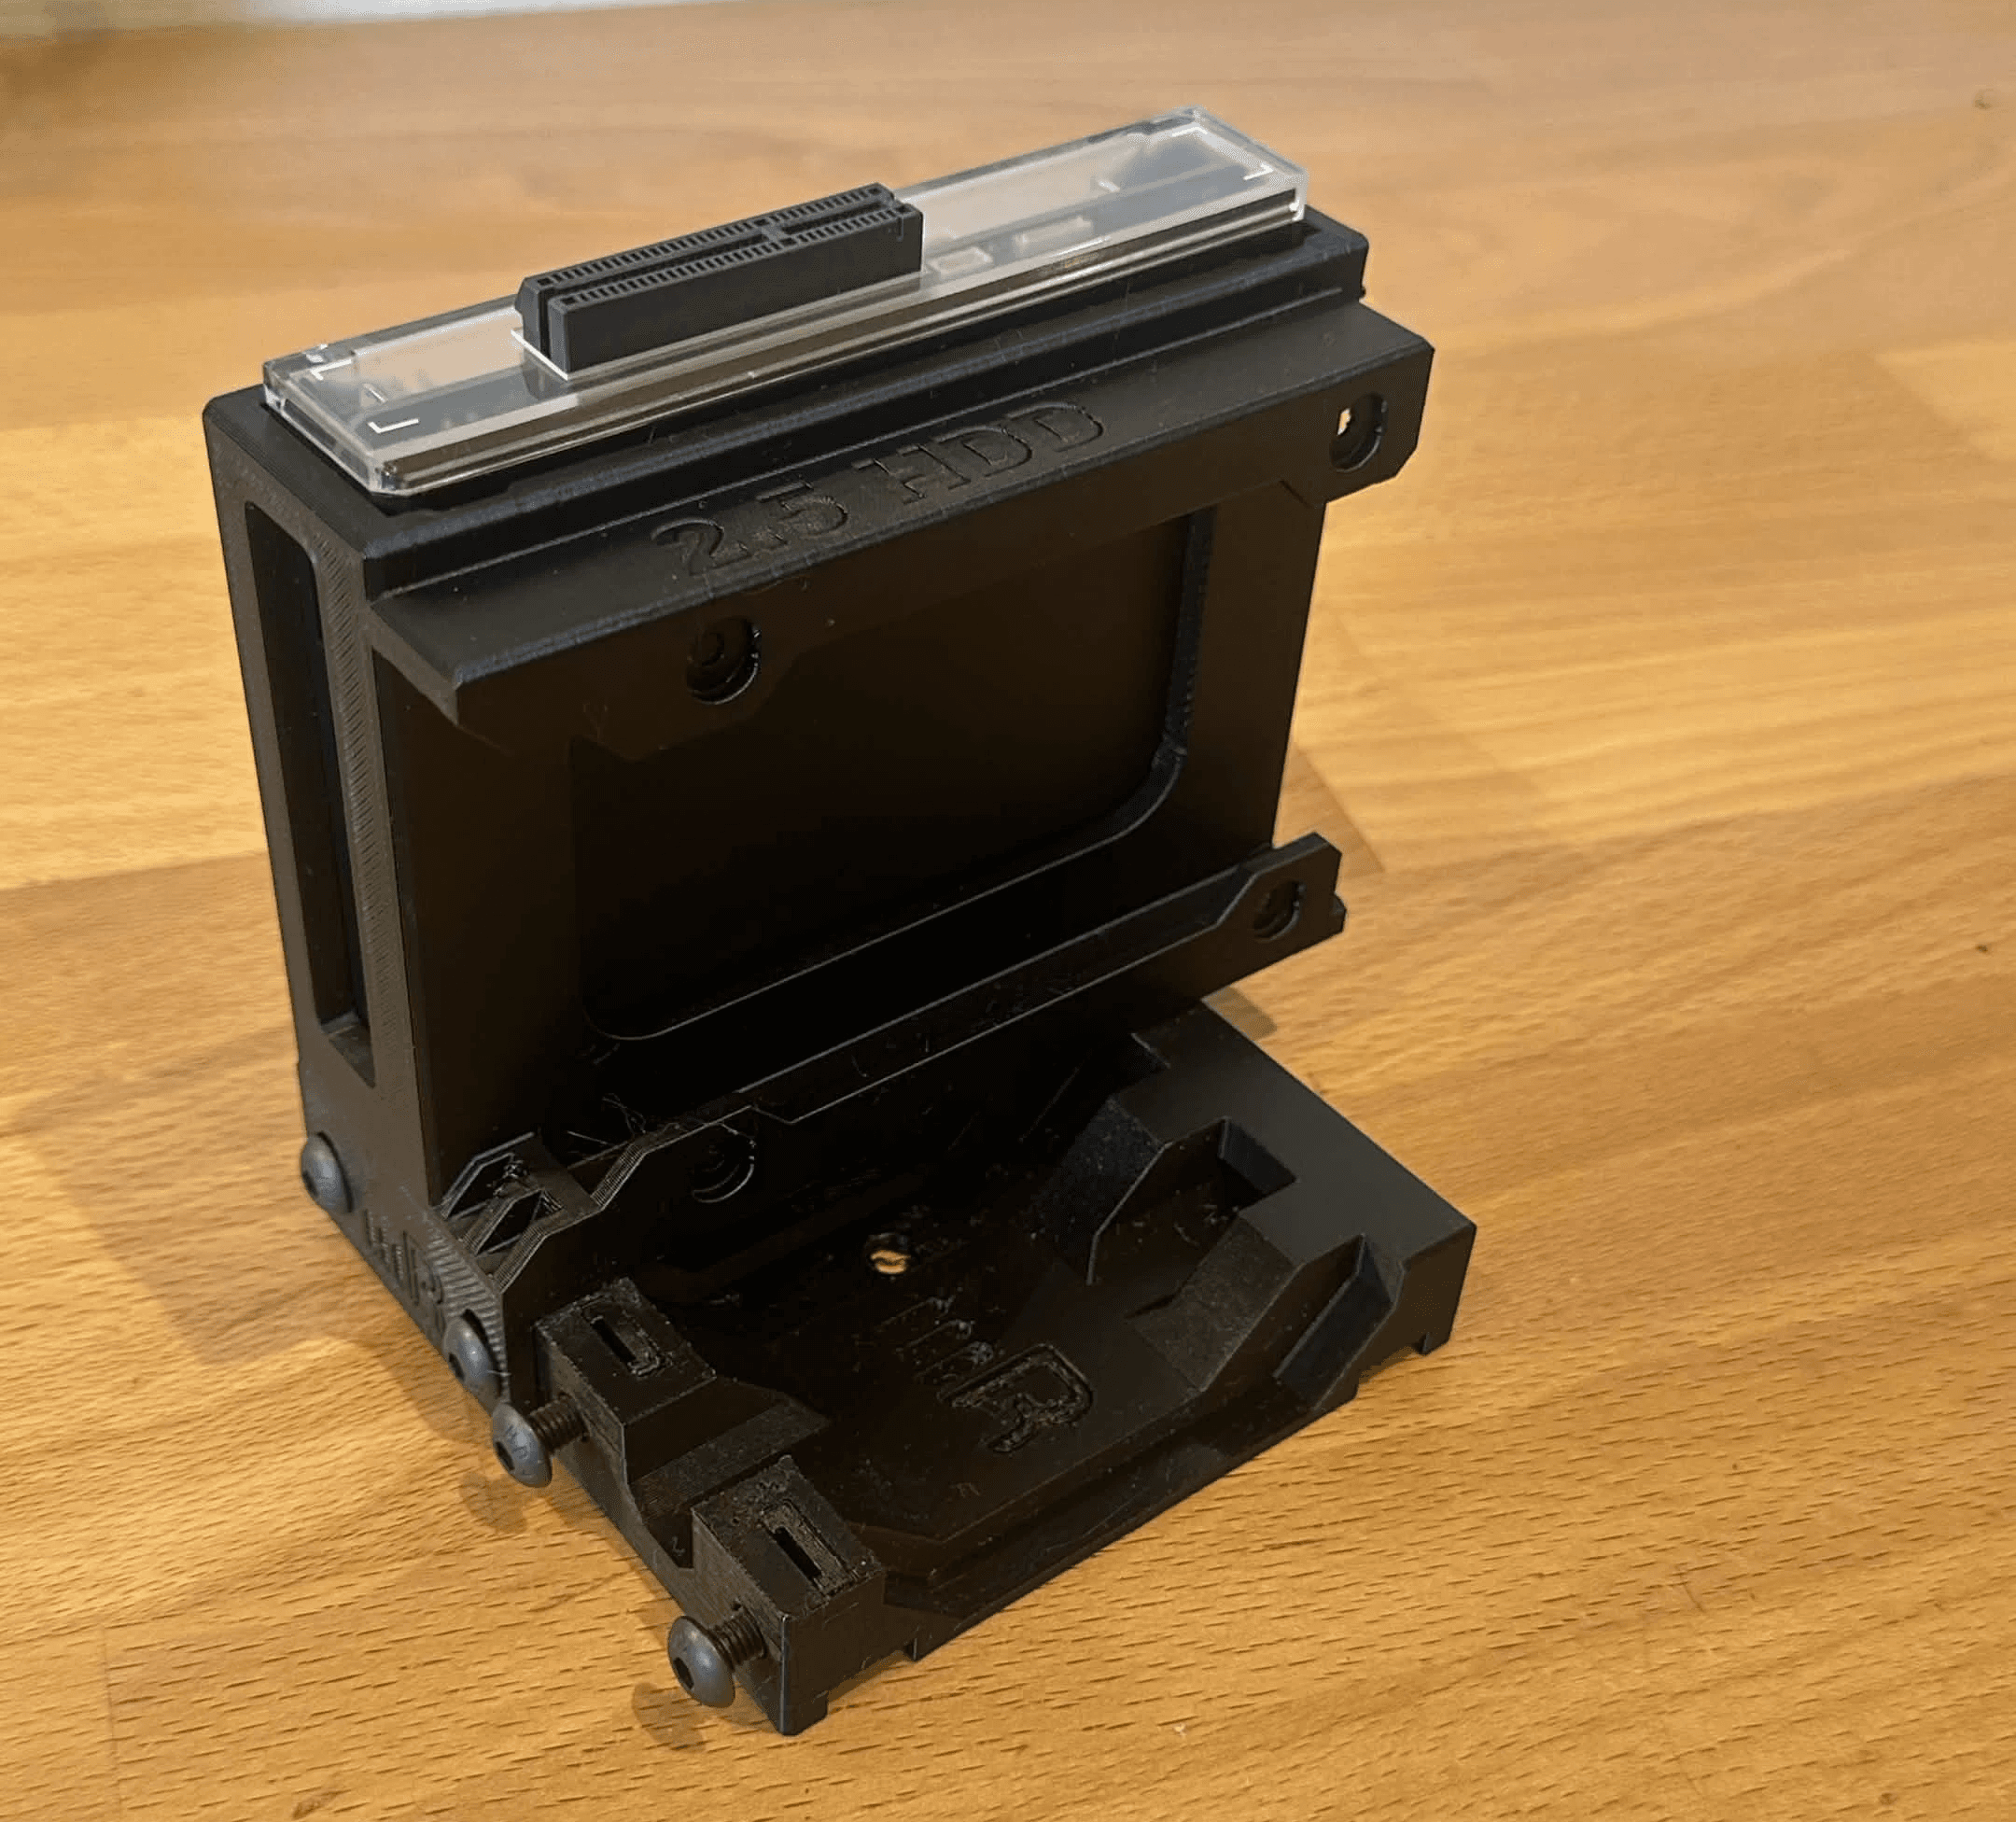
The complete print took around five hours, and the ZimaBlade fitted perfectly without requiring any adjustment to the model. I had to provide the screws myself, but they were easy to find and assembly was straightforward. Once installed, the rack holds the server upright, protects it from being moved around the desk, and gives the project a much cleaner appearance than leaving the board and cables loose.
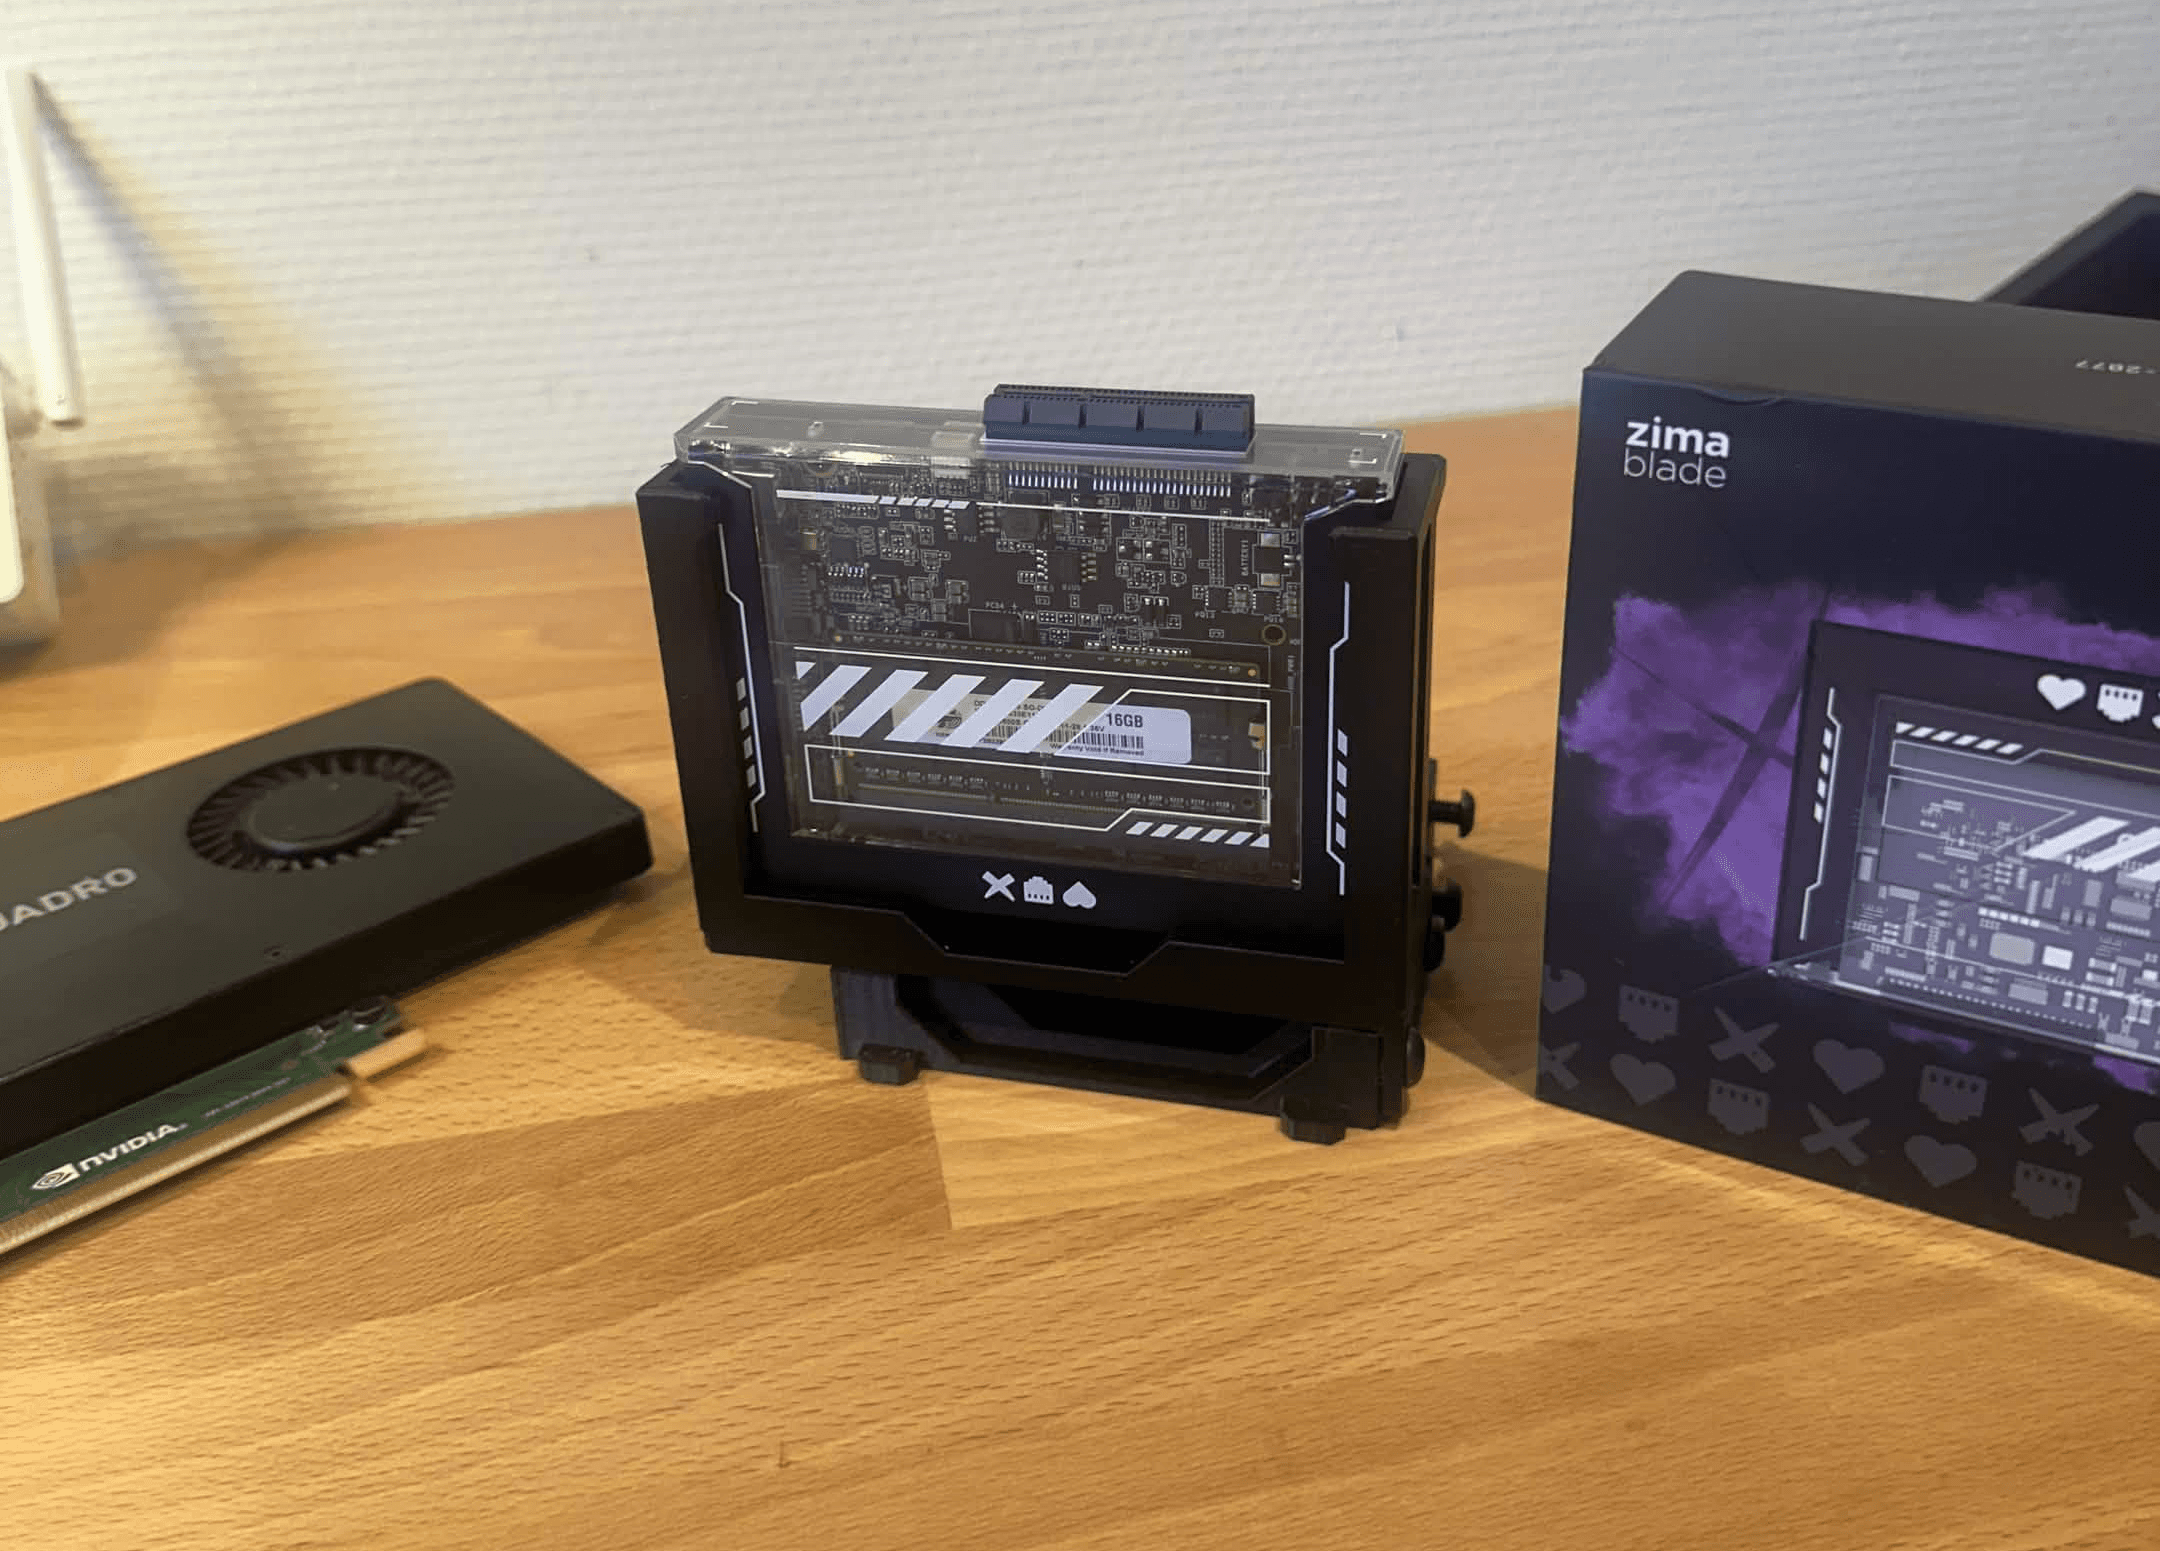
The best detail is the compartment behind the ZimaBlade for a 2.5-inch hard drive or SSD. That makes the print more than a decorative stand it is part of the storage plan. I can mount a drive directly behind the server, connect it through SATA, and keep the main components together in one compact structure. Because the microRACK system is modular, it also leaves room to make the setup larger as I add more drives or other homelab hardware.
Setting Up the ZimaBlade With CasaOS
Strong expansion hardware would mean much less if the software made every project difficult to install. This is where the ZimaBlade became more beginner friendly than I expected. CasaOS was already installed , so the first setup did not begin with creating a boot drive, connecting a permanent display, or spending an evening configuring Linux. After the ZimaBlade was connected to power and the network, I entered "casaos.local" in my browser and reached the dashboard in less than a minute.
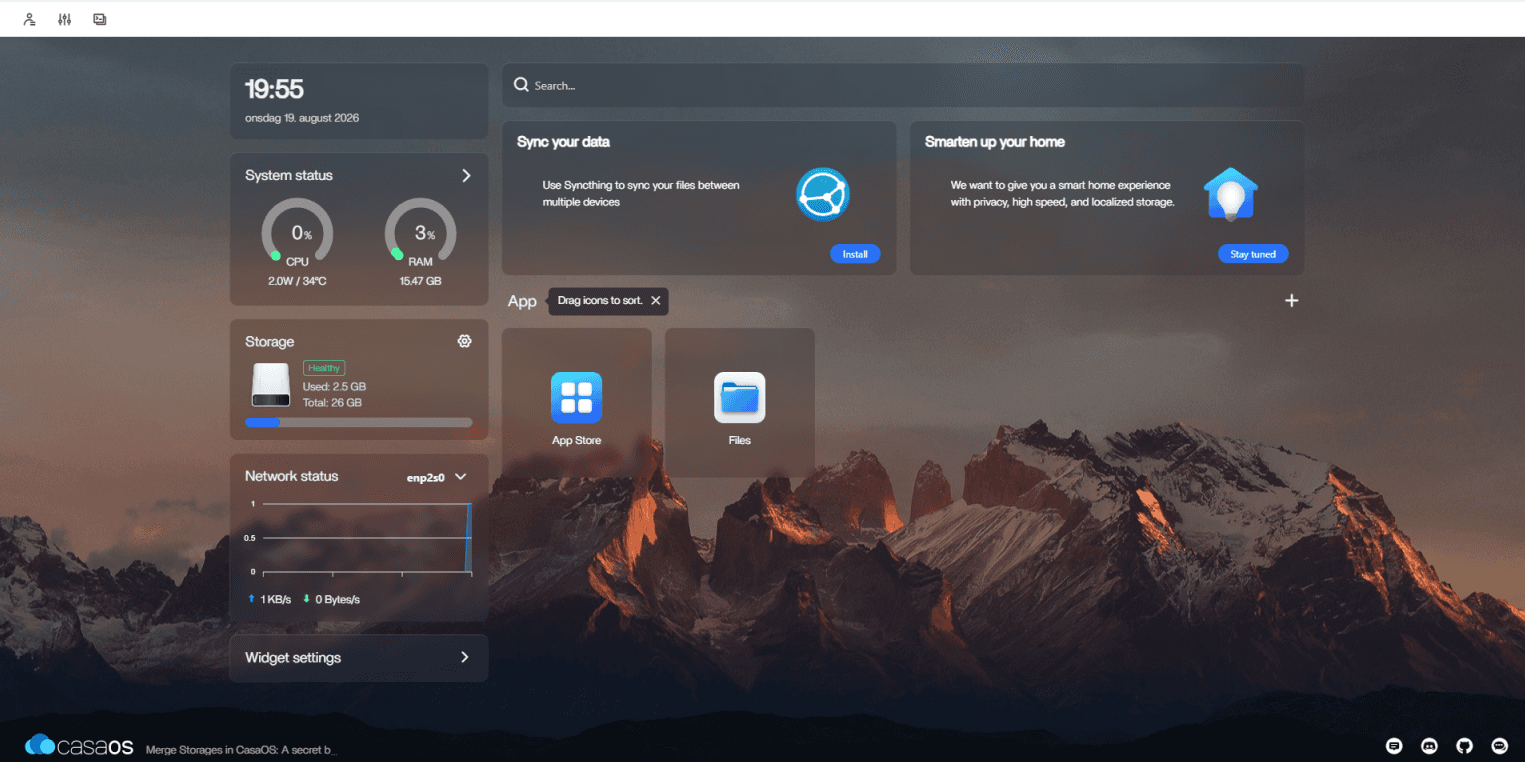
I had not used CasaOS before and had only limited experience with home servers, although having Kali Linux on one of my PCs meant the general idea of working with Linux was not completely unfamiliar. Even so, I did not need that experience to understand the main interface. CasaOS presents the ZimaBlade more like a personal cloud appliance than a traditional Linux server, with clear widgets for processor and memory use, temperature, storage, network activity, files, and installed applications.
The dashboard was also the first time the 16GB configuration felt slightly excessive in a good way. With no demanding applications running, memory use was only around three percent, while the processor was almost completely idle. That leaves plenty of space for the collection of smaller services I want to add. It does not prove that the ZimaBlade can run every workload at once, but it shows why choosing the 7700 with 16GB gives the system room to grow beyond a single app.
What CasaOS Adds to the ZimaBlade
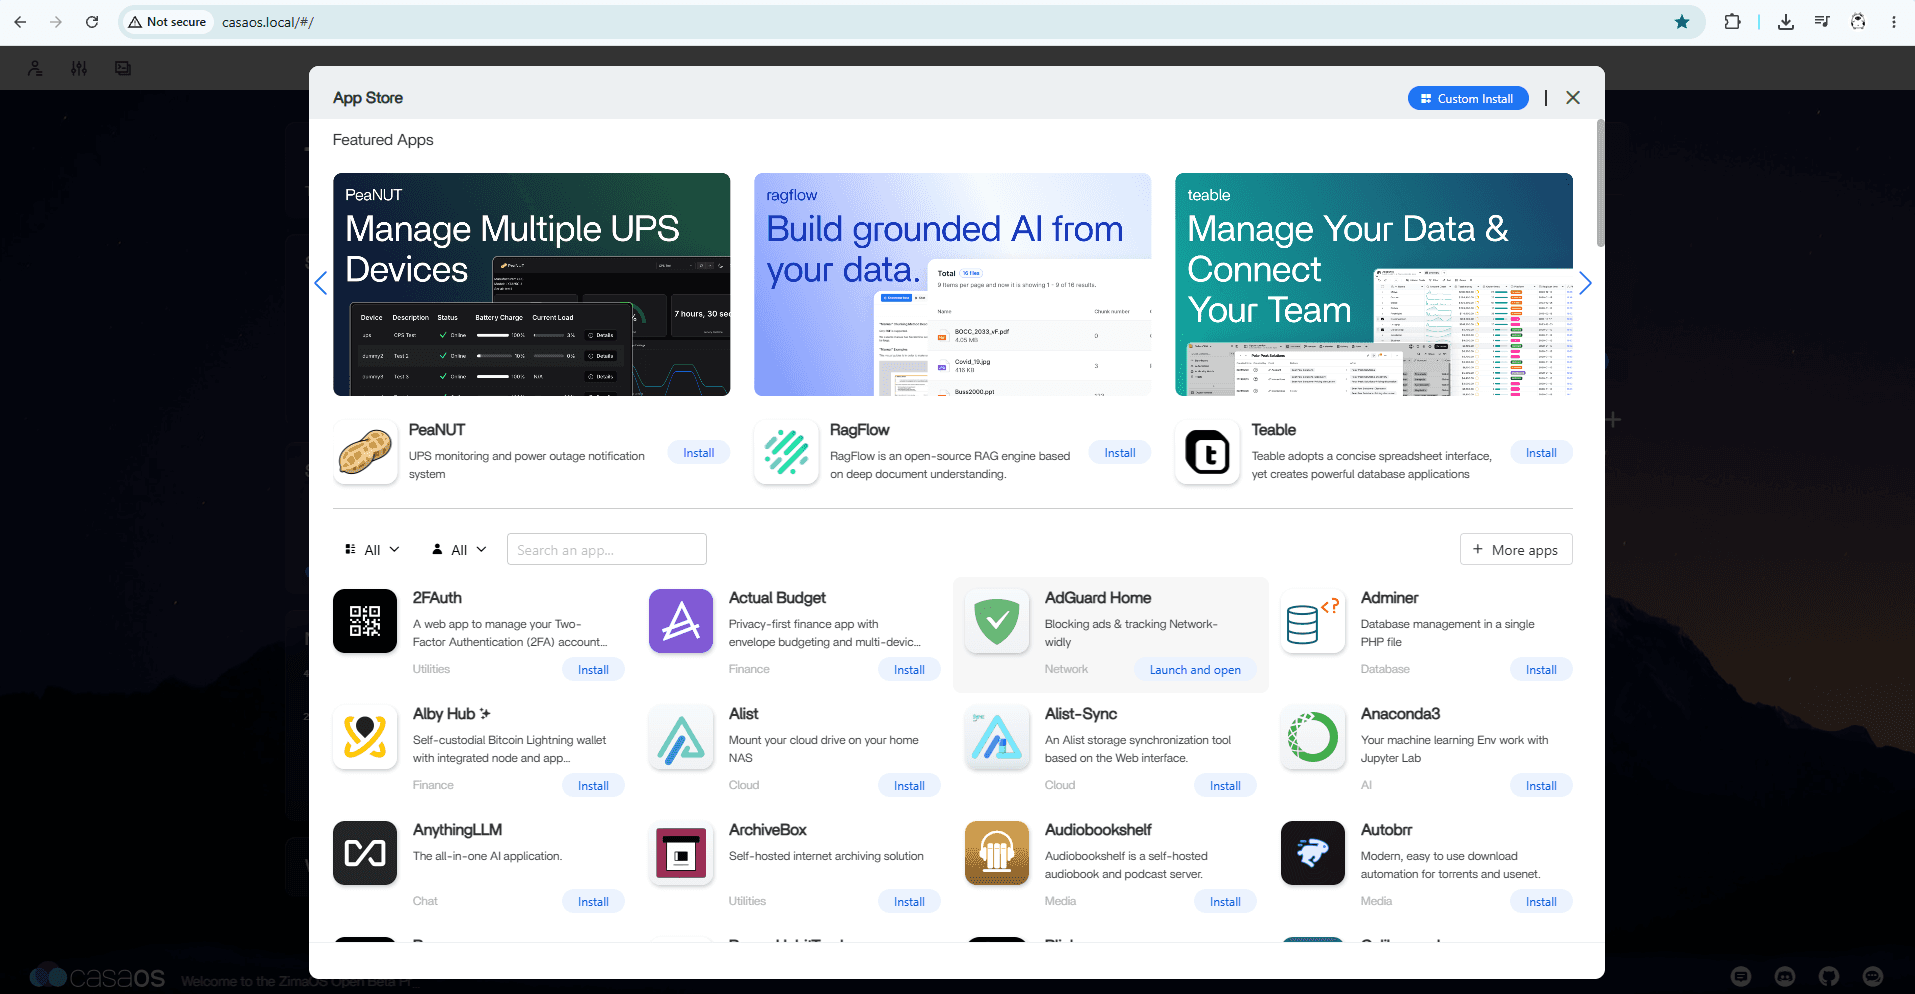
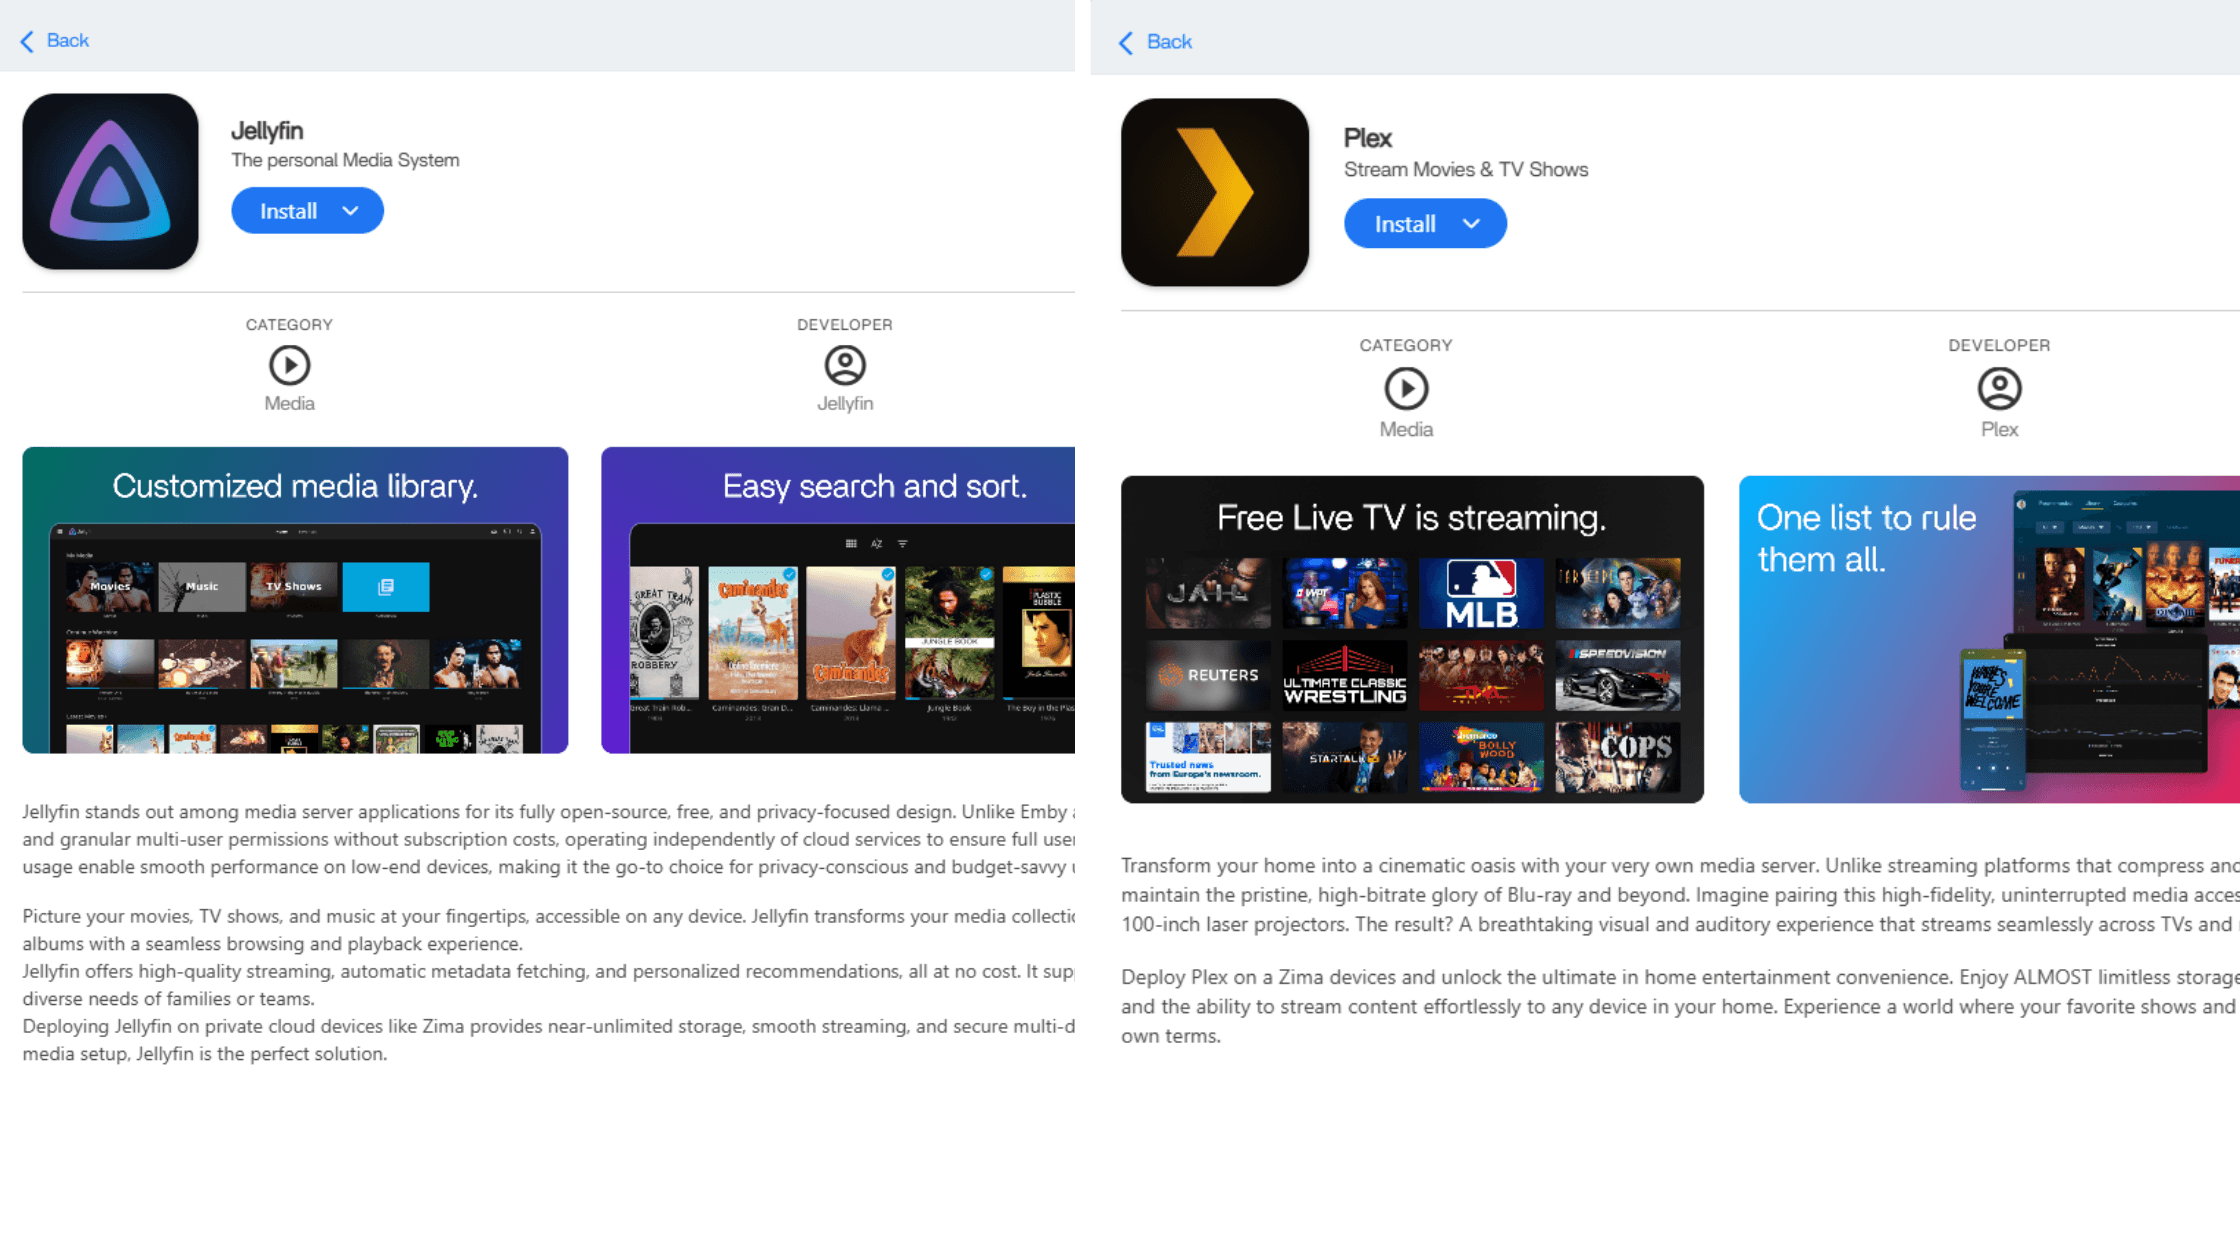
CasaOS is an open source personal cloud interface designed to simplify storage and self-hosted applications. Underneath the clean home screen, many applications still run as Docker containers, but CasaOS removes the need to begin every project by writing commands or building a Docker Compose file manually. One of my favorite parts of CasaOS is the built-in App Store. It makes the ZimaBlade feel much more accessible because you can browse useful applications such as Jellyfin, Plex, AdGuard Home, Nextcloud, Syncthing, and Home Assistant without searching for installation commands or manually configuring everything from scratch. The entire interface is clean, well organized, and surprisingly similar to using an ordinary app store. Most applications can be installed with only a few clicks, while more experienced users can still adjust ports, storage locations, and other settings when needed. It is a genuinely nice experience, especially for someone building a home server for the first time, and it makes experimenting with new projects feel far less intimidating.
That software layer is important to the ZimaBlade’s value. The hardware remains open enough for experienced users to replace CasaOS or work directly with Linux, while beginners can install their first useful service through a visual interface. It prevents the system from feeling limited to one purpose. A device that starts as an ad blocker can later become a file server, media library, VPN, smart-home controller without replacing the hardware.
CasaOS has so far been one of the strongest parts of my experience. The interface is clean, the available applications make the ZimaBlade feel useful immediately, and I have not encountered instability during my initial setup. This is not yet a claim about months of reliability, and users who prefer a more advanced NAS platform may eventually want something such as TrueNAS or another Linux-based setup. For a first home server, however, CasaOS makes the learning curve far less intimidating without removing the option to go deeper later. Zima also has the zimaOS operating system, and im thinking about getting other products later on, and getting deep into zimaOS.
The 32GB eMMC also makes more sense when viewed as a system drive rather than the main storage for the server. CasaOS and a few lightweight applications can live there, while movies, backups, and larger libraries belong on SATA-connected drives. That separation fits the ZimaBlade’s design. The onboard storage gets the system running quickly, and the user decides how much dedicated storage to add afterward.
Installing AdGuard Home as My First Project
The first application I installed was AdGuard Home. I chose it because it is one of the quickest ways to turn the ZimaBlade from interesting hardware into something useful. AdGuard Home acts as a local DNS server, blocking requests to known advertising and tracking domains before a configured device connects to them. It can also provide query statistics, custom filtering rules, parental controls, and protection against selected malicious domains.
The installation through CasaOS took approximately one minute. I opened the App Store, found AdGuard Home, selected the installation option, and completed the initial configuration through its web interface. I then set my PC to use the ZimaBlade as its DNS server and could see requests appearing in the AdGuard Home dashboard almost immediately.
For anyone trying the same project, the process is straightforward:
Open the CasaOS dashboard and select the App Store.
Search for AdGuard Home and install it.
Open the application and complete its first-time setup.
Use the ZimaBlade’s local address as the DNS server on one test device.
Check the AdGuard Home query log to confirm that requests from the device are reaching the server.
After the test works, configure other devices individually or change the network’s DHCP-provided DNS address if you want wider coverage.
My current setup is running on my PC, where AdGuard Home has blocked advertising and tracking requests across many regular websites. The software can protect an entire home network when all devices are configured to use it, but installing the application alone does not automatically redirect every phone, television, and computer. That distinction is important because it prevents a successful test on one PC from being confused with a complete network-wide setup.
The main limitation I noticed is YouTube. AdGuard Home does not reliably remove YouTube video ads because DNS filtering works at the domain level, and YouTube can deliver advertisements from the same domains used for the actual video content. Blocking those domains would risk blocking the videos too. This is a limitation of DNS-based filtering rather than a problem with the ZimaBlade, and the software still worked well for the website advertising, tracking, and unwanted domains it is designed to handle.
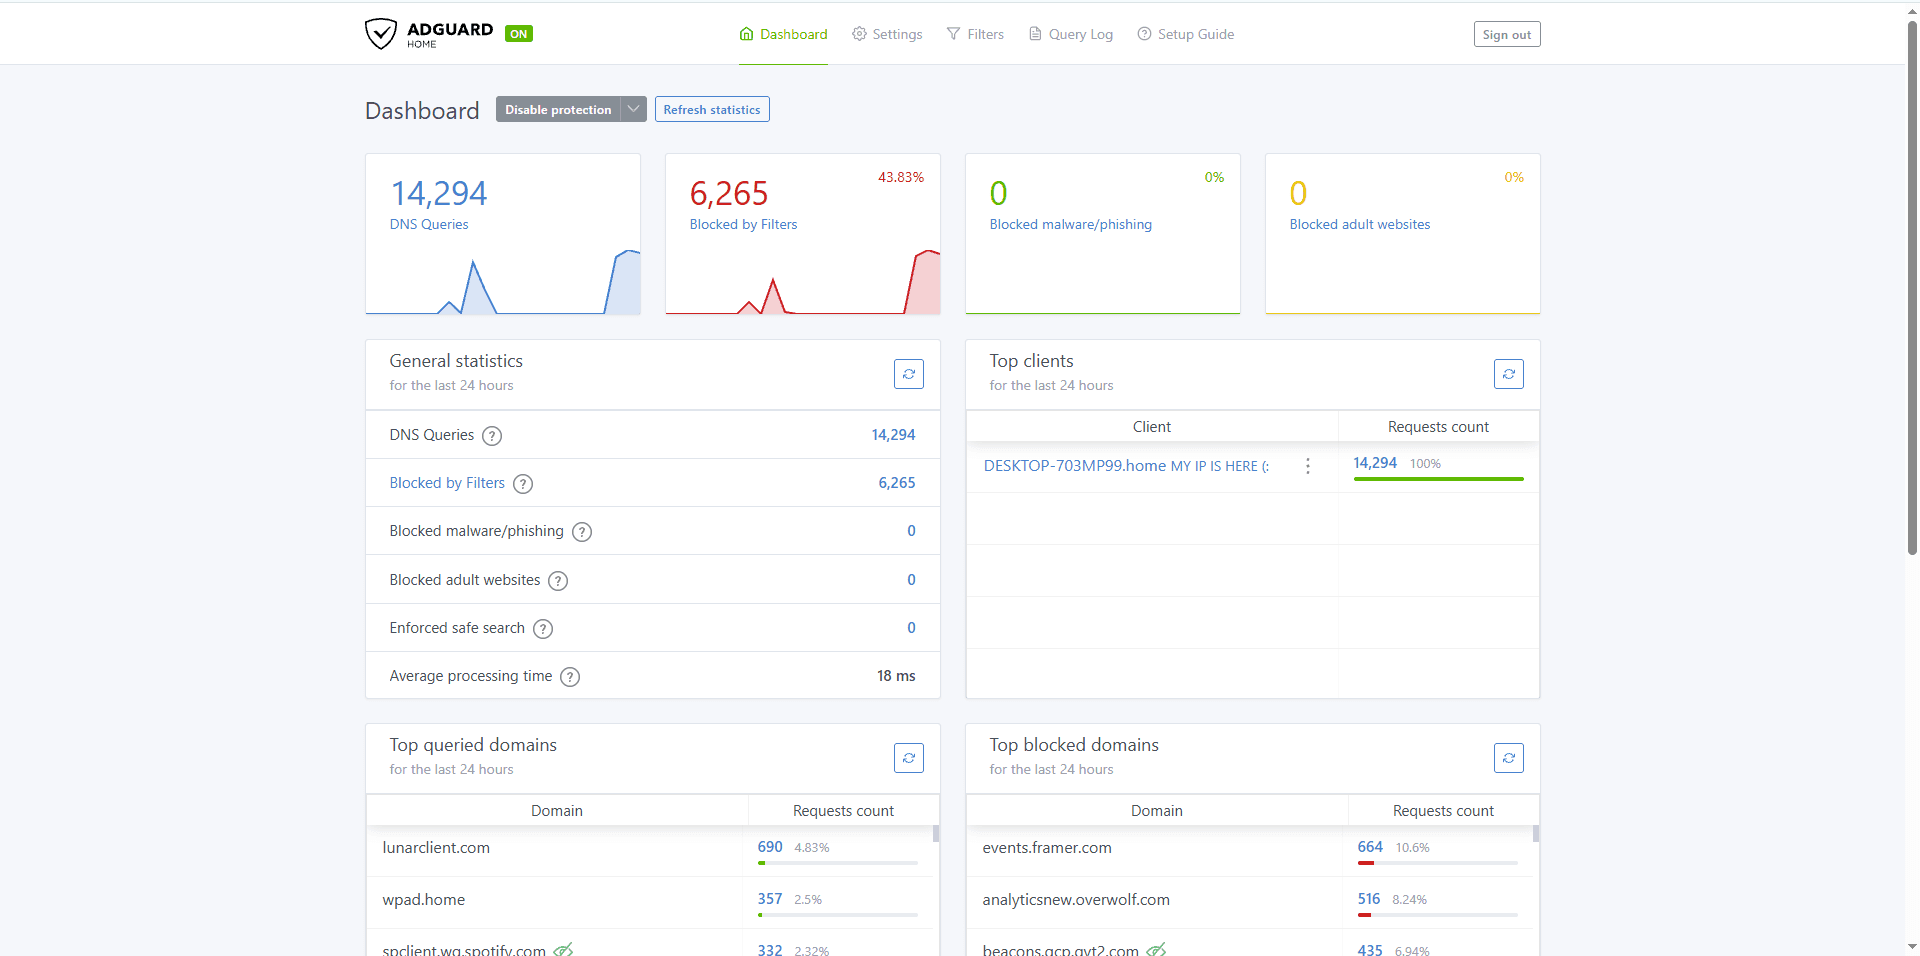
I also made a short video about AdGuard Home, where I explain why it was the first application I installed and why I think it is one of the best projects for anyone starting a home server. If you want to see it in action and learn why I recommend it, you can watch the video on my YouTube channel.
Three of the Best ZimaBlade Projects to Try First
A first home server project should be useful without requiring months of experience or a large collection of additional hardware. The ZimaBlade is particularly good for this because CasaOS makes small services easy to install, while the SATA and PCIe connections leave room for more ambitious builds later. Based on what I have completed and what I am preparing next, these are the three projects I would recommend starting with.
1. AdGuard Home: The Easiest Place to Start
AdGuard Home is the best first project because it is free, quick to install, and does not require a separate storage drive. It demonstrates one of the most important ideas behind a home server: software running on the ZimaBlade can provide a service to another device without being installed directly on that device. The live statistics also make the result easy to see, which is satisfying when you are learning how self-hosting works.
The ZimaBlade 3760 should already have more than enough performance for AdGuard Home, so this project does not require the 7700. On the 7700, it becomes a lightweight background service that can continue running while the server handles other applications. That is the more interesting long-term use: AdGuard Home does not have to be the entire purpose of the ZimaBlade; it can be one useful service among several.
2. Jellyfin or Plex: A Personal Streaming Service
The project I am most excited to build next is a media server. Both Jellyfin and Plex can organize a personal movie or television library and stream it to compatible devices, but Jellyfin is especially appealing because it is free and open source. Combined with SATA storage, the ZimaBlade can hold the media on a dedicated drive while CasaOS and the application remain on the onboard eMMC.
I also have a large collection of DVDs sitting at home that I rarely use anymore, mainly because watching them is less convenient than opening a streaming app. My plan is to digitize the movies I own with MakeMKV and store the resulting files on drives connected to the ZimaBlade. Jellyfin can then organize everything into a clean personal library with posters, descriptions, categories, and watch progress. Instead of leaving the DVDs on a shelf, I will be able to access my collection from compatible devices around the house while keeping the original discs as physical backups.
The ZimaBlade 7700 is best viewed as a lightweight media server rather than a replacement for a powerful modern desktop. Direct play, where a compatible device receives the original video file without conversion, is much easier on the processor. Real-time transcoding is more demanding, which is why I am preparing the Quadro K2200 experiment instead of promising that the integrated hardware will handle every format and resolution. The final result will depend on the source video, playback device, drivers, and whether Jellyfin can use the GPU correctly.
This is also where the 7700 makes more sense than the 3760. Four CPU cores provide more room for Jellyfin and other services to run together, while 16GB of memory prevents the server from becoming constrained as the setup expands. The ZimaBlade’s real strength is that storage and PCIe expansion allow the media build to be customized around the workload.
3. A Private File and Backup Server
A private file server is less visually dramatic than installing a graphics card, but it may become the most useful reason to keep the ZimaBlade running. The two SATA ports allow drives to connect directly, while CasaOS provides file management and access to synchronization applications. My plan is to use multiple hard drives for movies and backups, potentially adding an external drive as the storage requirements grow.
The 2.5 inch compartment in the microrack gives the first drive a clean permanent position directly behind the ZimaBlade. A larger setup can then use additional mounts while keeping the server itself organized beside my PC. Starting without storage also means the cost can be spread over time the ZimaBlade can begin with one useful service and gain capacity as new drives are added.
It is important to separate storage from backup. Saving a file on one hard drive inside a home server creates another location, but it does not protect the file from every failure. Important data should eventually exist in more than one copy, ideally with one copy stored on another device or in another location
For readers who want a finished multi bay NAS rather than a DIY platform, Zima also offers larger systems such as the ZimaCube 2. I covered that approach separately in my ZimaCube 2 review. The ZimaBlade is a very different product it is smaller, far less expensive, and requires more decisions from the user, but that is also what makes it enjoyable as a first homelab project.
What I Want to Run Next
After Jellyfin and dedicated file storage, a personal VPN is next on my list. Running the VPN from home could provide secure remote access to selected services and make the ZimaBlade useful even when I am away from my own network. A small Minecraft server is another possibility, although player count, plugins, world size, and simulation distance would need to remain realistic for an Apollo Lake processor.
Syncthing or Nextcloud could then turn the storage into something closer to a private cloud, automatically moving files between devices instead of requiring every transfer to be started manually. Home Assistant is also available for anyone more interested in smart-home control. The important point is not that every ZimaBlade owner should install all of these applications; it is that the hardware and CasaOS allow the system to change purpose without being replaced.
That flexibility is what has surprised me most. The ZimaBlade initially looked like a small storage-focused computer, but CasaOS makes it feel more like a platform for building a home server one application at a time. The first project took only minutes, while the open SATA and PCIe connections leave enough unanswered possibilities to make the next projects far more ambitious.
The Quadro K2200 Experiment
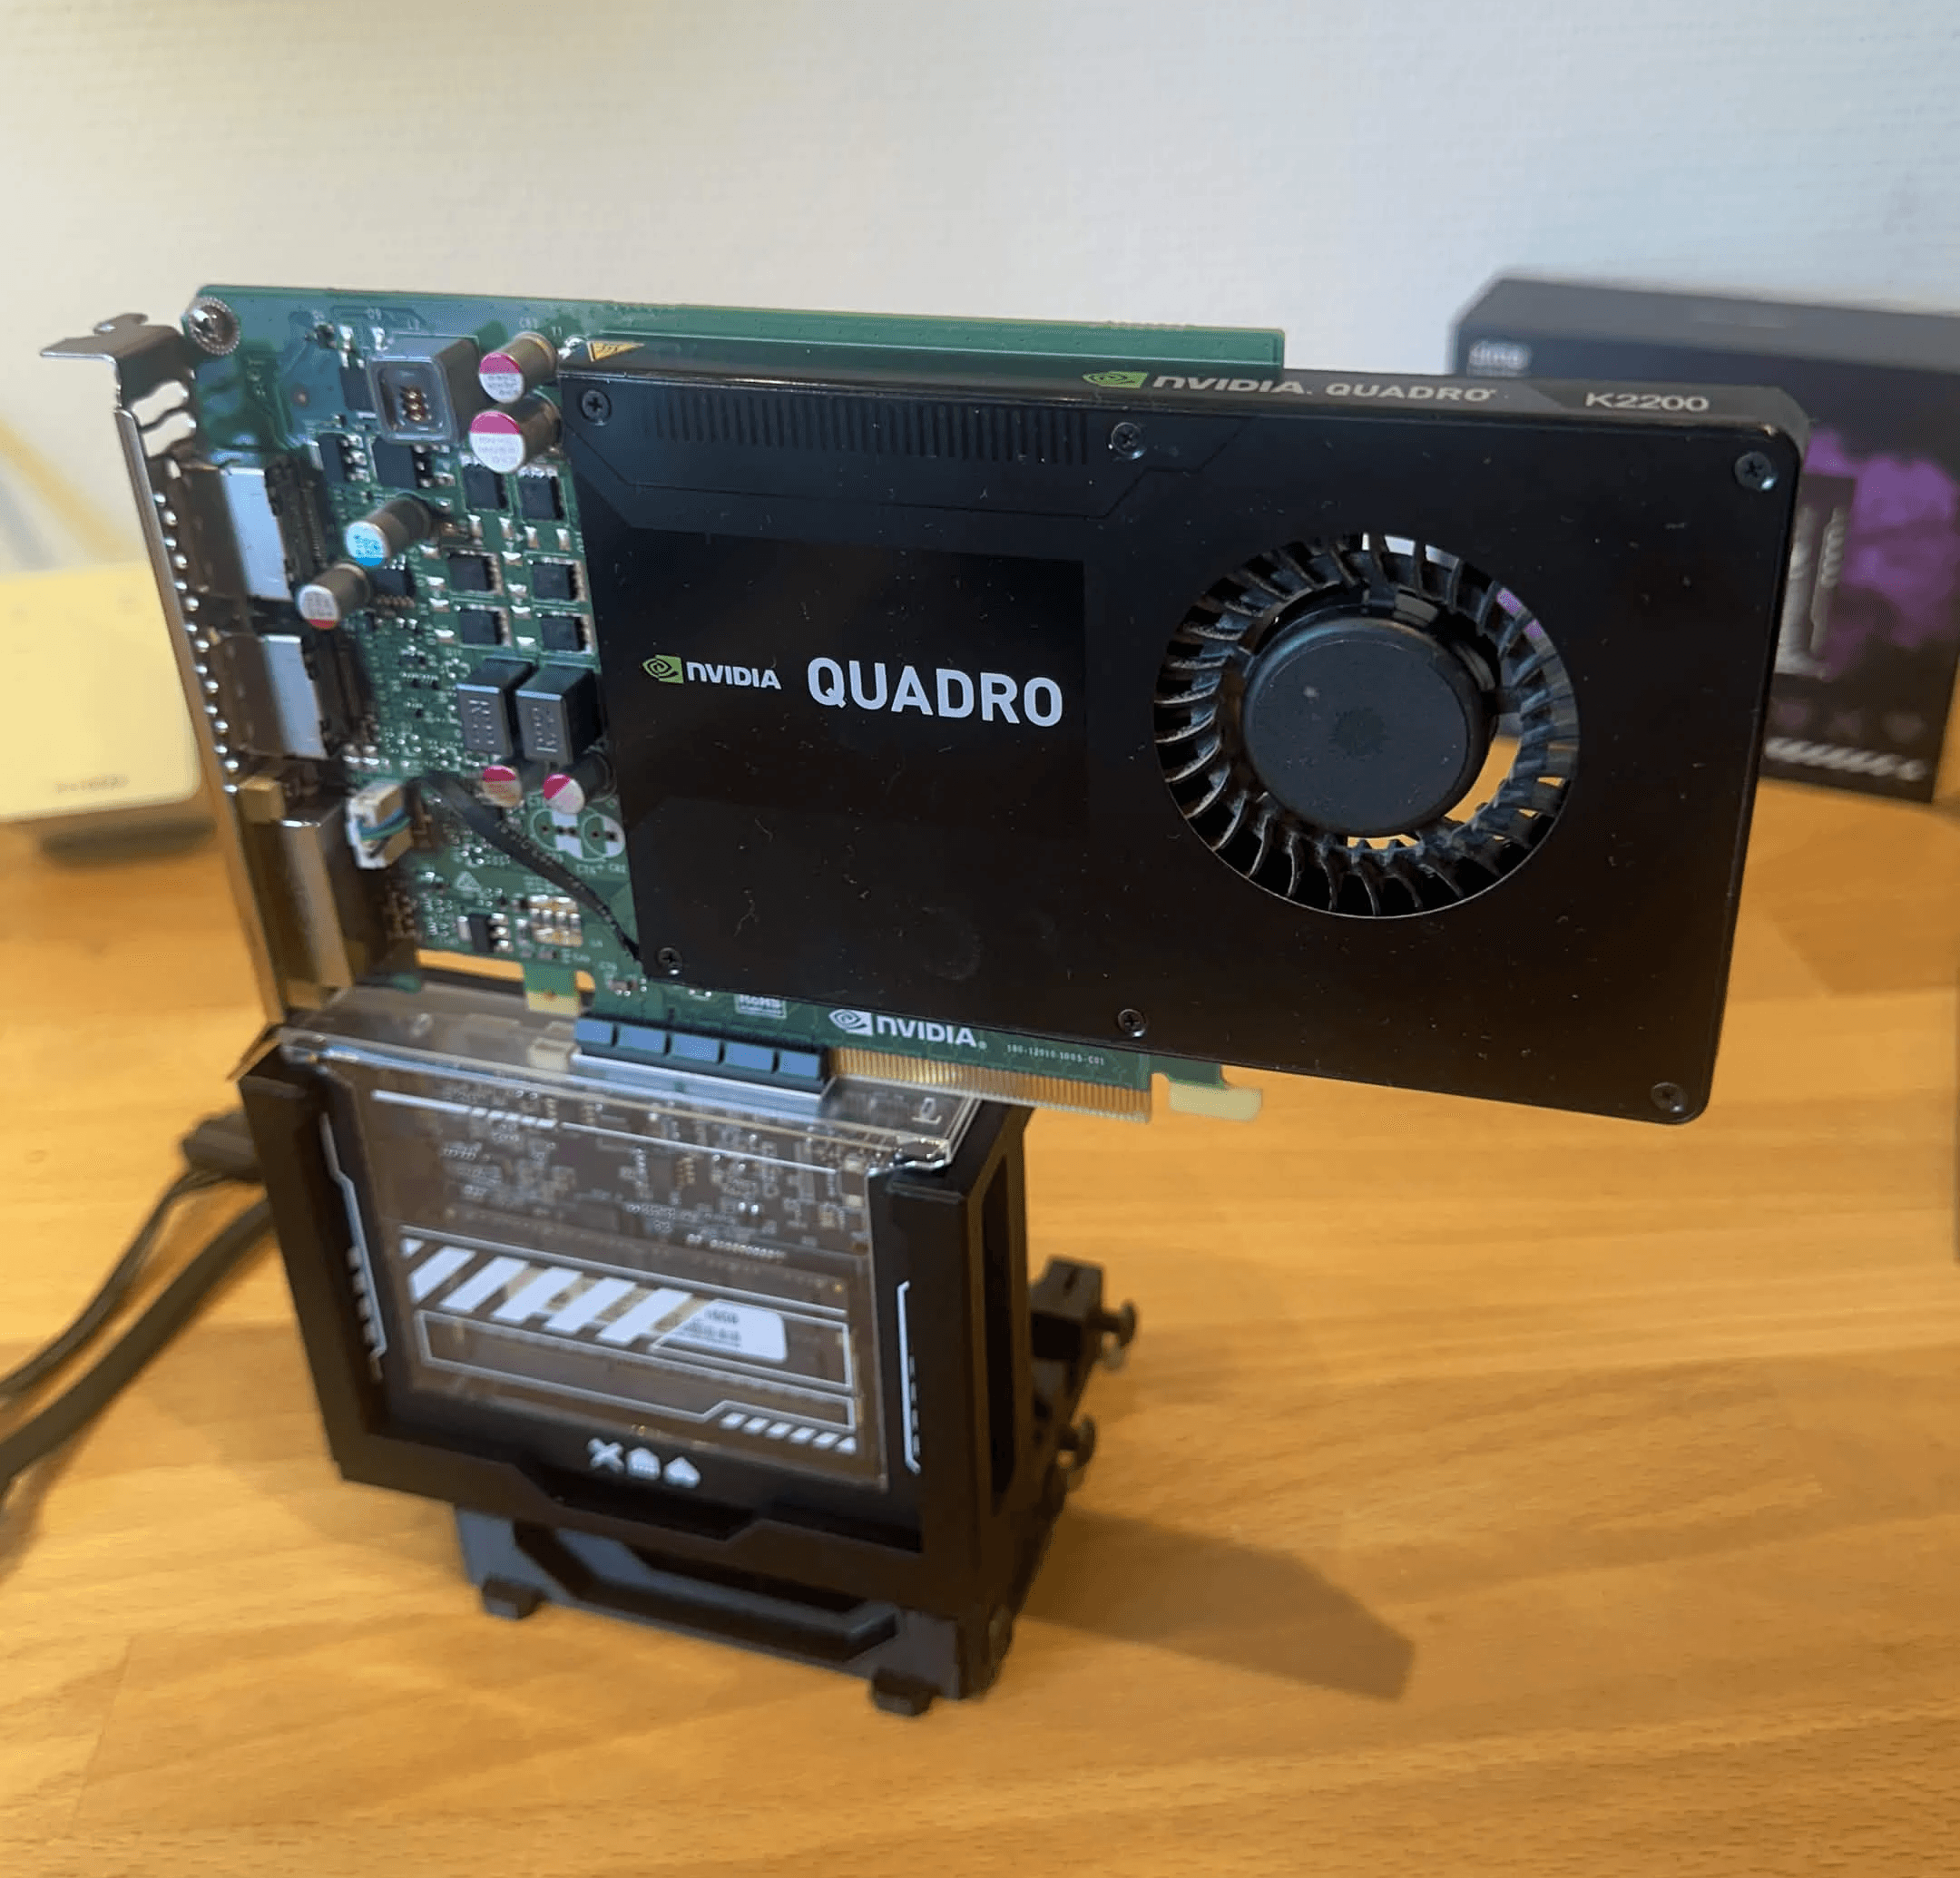
Nothing demonstrates the unusual character of the ZimaBlade better than placing a desktop graphics card beside it. I bought a used NVIDIA Quadro K2200 for $25 because I wanted to explore hardware-assisted transcoding in Jellyfin without spending the kind of money a modern GPU can demand. My first reaction was simply that the combination looked crazy: the graphics card is nearly twice the length of the server and makes the ZimaBlade appear even smaller than it does in my hand.
The K2200 is an older single-slot workstation card rather than a powerful modern gaming GPU. NVIDIA's specifications list 640 CUDA cores, 4GB of GDDR5 memory, a PCIe 2.0 x16 interface, and a maximum power consumption of 60W. Its first-generation Maxwell encoder is mainly interesting to me for H.264 video, so this should be viewed as an inexpensive experiment rather than a future-proof answer for every codec. Newer formats, high-bitrate 4K files, simultaneous users, driver support, and the exact Jellyfin configuration can all change the result.
The physical connection is possible because the ZimaBlade's PCIe x4 slot is open at the end. A full-length x16 card can connect to it and run using the four electrical lanes available from the board. Zima states that the Blade's PCIe 2.0 x4 connection provides about 2GB/s of bandwidth, which is more than enough for many network, storage, and experimental expansion cards. The reduced lane count is not the biggest concern for this particular project; safe and stable power delivery is.
A passive x4-to-x16 adapter does not create additional power. The K2200 has no separate auxiliary power connector, so the required power must reach it through the slot or a properly powered riser. Zima's own PCIe expansion guidance recommends an external 12V ATX power supply for stable operation with external GPUs. I therefore plan to use an appropriate x4-to-x16 riser or adapter, external power where required, and proper physical support before attempting a real transcoding test.
At this point, I have not powered on the ZimaBlade with the K2200 as a working part of the system. I have not installed the NVIDIA driver, confirmed that CasaOS detects the card, or enabled hardware acceleration in Jellyfin. The photo below documents the idea and the physical scale test; it is not evidence that the configuration works. Once the adapter, power arrangement, drivers, thermals, and actual playback tests are complete, the GPU setup deserves its own follow-up article rather than a premature success claim here.
What the ZimaBlade Gets Right and Where It Compromises
The strongest thing about the ZimaBlade is not one benchmark result. It is the number of realistic server projects made possible by a device that can sit in one hand. The base system is silent, CasaOS makes the first hour unusually easy, and the two SATA ports give storage projects a cleaner path than a pile of USB adapters. The open PCIe slot then creates options that are almost never available on a computer this small, whether the eventual upgrade is a network card, an NVMe adapter, more SATA connections, or an experimental GPU.
The enclosure matters as well. Many small boards feel incomplete until the buyer adds a case, while the ZimaBlade already arrives as a protected and visually finished product. The transparent panel keeps the upgradeable hardware visible, and the single SO-DIMM makes the memory easy to install. Combined with x86 compatibility and a 16GB maximum, the 7700 feels closer to a miniature desktop server than a traditional hobby board.
There are compromises, and buyers should understand them before ordering. The Apollo Lake processor is old and should not be mistaken for a modern high-performance CPU. Gigabit Ethernet is useful but no longer exceptional, the single USB 3.0 port may require planning, and Wi-Fi is not built in. The 32GB eMMC works well as a convenient system drive, but anyone building a serious media library, file server, or backup system should budget for separate storage.
The low board only price is therefore the beginning of a build rather than necessarily its final cost. RAM, drives, SATA power, a power supply, mounting hardware, or PCIe accessories may be needed depending on the selected package and project. I see that as part of the ZimaBlade's appeal because I would rather choose the storage and upgrades myself, but someone wanting a complete NAS that works without assembling anything may prefer a more integrated product. Like for example the Zimacube 2.
What I like | What buyers should know |
Two native SATA 6Gbps ports | Storage drives are a separate part of the build |
Open-ended PCIe 2.0 x4 expansion | Large cards may require a riser, external power, and support |
Silent passive cooling | Sustained heavy workloads still need realistic thermal testing |
Up to 16GB of replaceable laptop-style RAM | There is only one memory slot |
Clean, pre-installed CasaOS experience | Advanced users may eventually prefer another operating system, I recommend looking into ZimaOS |
Compact enclosure included | One USB 3.0 port and no built-in Wi-Fi |
Affordable entry price | Apollo Lake performance and Gigabit Ethernet are modest by 2026 standards |
None of those limitations has been frustrating during my first projects. AdGuard Home barely challenges the hardware, the system has remained stable, and CasaOS has given me more applications to explore than I expected. They become important when deciding what not to demand from it. The ZimaBlade is a clever low-cost home-server platform; it is not a replacement for a current workstation, a multi-user enterprise server, or a high-end NAS.
Who Should Buy the ZimaBlade?
The ZimaBlade is easiest to recommend to someone who wants to learn by building something genuinely useful. A beginner can start with CasaOS and AdGuard Home without needing much Linux experience, while a more experienced homelab user can replace the software, add storage and network hardware, or use the PCIe slot for a much more specialized project. That wide range is why the system can appeal to both normal users and technology enthusiasts without treating them as the same audience.
It is especially well suited to a first DIY file server, a small Jellyfin or Plex system built around direct play, a network-wide DNS filter, Home Assistant, a private synchronization service, or a collection of light Docker containers. The 7700 is the better model if several of those jobs may eventually run together. The less expensive 3760 still makes sense when the intended workload is one or two light services and the $69 starting price matters more than extra CPU headroom.
The ZimaBlade is less suitable for someone who wants a completely finished storage appliance with drive bays, redundancy, and guided setup already decided. It is also the wrong tool for heavy software transcoding, demanding virtual machines, large game servers, or workloads that require modern multi-gigabit networking without an expansion card. Those tasks do not make the ZimaBlade bad; they simply sit outside the reason this hardware is interesting.
For my own build, the 7700 is the right balance. It handled the first setup without any difficulty, gives me enough memory to experiment with several services, and still has both storage and PCIe upgrades waiting to be explored. If I started again today, I would not change the overall direction: I would still choose 16GB of RAM, print the microRACK, begin with AdGuard Home, and add the media-server hardware step by step.
ZimaBlade Review Verdict
My experience with the ZimaBlade so far can be summarized in three words: exciting, cool, and educational. The exciting part is how many directions the hardware can take. The cool part is the design—especially the transparent enclosure, visible RAM, and a PCIe slot that looks almost absurd on a computer this small. The educational part is discovering that a home server can be much more than a box for storing files.
The ZimaBlade's biggest success is making that discovery approachable. I went from entering casaos.local to using a real self-hosted service in only a few minutes. CasaOS removes much of the friction from the beginning, but the x86 hardware, SATA ports, and PCIe connection ensure that the server does not have to remain a basic one-app appliance. There is a clear path from the first easy project to something far more personal.
It is important to judge the product for what it actually is. The 7700 uses an older processor, and the board-only price does not include every drive or accessory a complete server may require. Buyers looking for maximum CPU performance, 2.5GbE out of the box, or effortless multi-stream 4K transcoding should look at stronger hardware. Buyers who value compact size, silent operation, direct storage, unusual expansion, and the freedom to build gradually will understand the ZimaBlade immediately.
I am not giving it a numerical score because the most ambitious parts of my setup are still ahead of me. Jellyfin, multiple storage drives, backup automation, and the Quadro transcoding experiment need real long-term testing. What I can say now is that the ZimaBlade 7700 has been stable, simple to start, and much more flexible than I expected. It has already changed my idea of what a first home server can do, which is a strong result before the build is even finished.
For a DIY-minded buyer, the answer to the title is yes: the ZimaBlade 7700 is worth considering, and it is the version I would choose when the server is expected to grow. The $69 ZimaBlade 3760 remains an appealing route into lighter self-hosting, while the 7700's four cores provide the better foundation for a broader homelab. You can compare the available versions and current bundles on the official ZimaBlade product page.
This review is the beginning of the project rather than the end. I plan to return with actual Jellyfin playback and transcoding results, a completed storage configuration, and a clear answer about whether that enormous $25 Quadro can become a useful partner for one of the smallest servers I have used.
ZimaBlade FAQ
Is the ZimaBlade beginner-friendly?
Yes. CasaOS comes pre-installed and provides a browser-based dashboard and App Store, so a beginner can install useful services without starting from a command line. The system still rewards learning because storage, network settings, backups, and advanced applications require more planning as the build grows.
Does the ZimaBlade come with storage and RAM?
The board includes 32GB of eMMC storage for the operating system, but package contents vary. Board-only buyers should check whether their chosen bundle includes memory, a power supply, SATA cables, or drives. The ZimaBlade uses one DDR3L SO-DIMM and supports up to 16GB; large file and media libraries should use separate SATA or external storage.
Can the ZimaBlade run Jellyfin or Plex?
Yes, both can run on the ZimaBlade, and CasaOS makes them easy to install. Direct play is the most realistic workload because real-time conversion depends on the video format, resolution, client device, driver support, and available hardware acceleration. My full Jellyfin and GPU tests are still in progress.
Can a PCIe x16 card work in the ZimaBlade's x4 slot?
The slot is open-ended, so longer x8 and x16 cards can physically connect and operate at the ZimaBlade's PCIe 2.0 x4 electrical speed. Compatibility is not guaranteed merely because a card fits. Power delivery, drivers, cooling, mounting, and bandwidth must all be checked, and an externally powered riser may be necessary for a GPU.
Is the ZimaBlade silent?
The base ZimaBlade uses passive cooling and has been completely silent in my setup. Added hard drives, fans, or PCIe hardware can introduce noise, so the final sound level depends on the complete build.
Should I buy the ZimaBlade 3760 or 7700?
Choose the 3760 for inexpensive, lightweight services such as AdGuard Home, Home Assistant, or basic file sharing. Choose the 7700 if you want four CPU cores, expect to run several applications, or plan to grow the server into a broader storage and media setup.
Popular Posts
tech Reviews
GOverlay Plus 7.8-Inch Review: The Little Screen That Brought My Gaming Setup Together
Tech Reviews
UNIHIKER K10 Review: The $28.90 AI Board That Can Become Almost Anything
Gaming
What We Know About the Guy Behind the GTA 6 Leak: CyberLeek
PC Guides
6 Things You Should Do After Getting a New Gaming PC
Keep reading


