Tech Reviews
UNIHIKER K10 Review: The $28.90 AI Board That Can Become Almost Anything
The UNIHIKER K10 packs a color display, camera, microphone, speaker, sensors and Wi-Fi into a $28.90 AI coding board. After building six projects, including a TikTok follower counter, PC monitor and camera-controlled game, I found one of the most flexible beginner boards available at this price.
By Worth-the-cart.com
•
•
7 min read


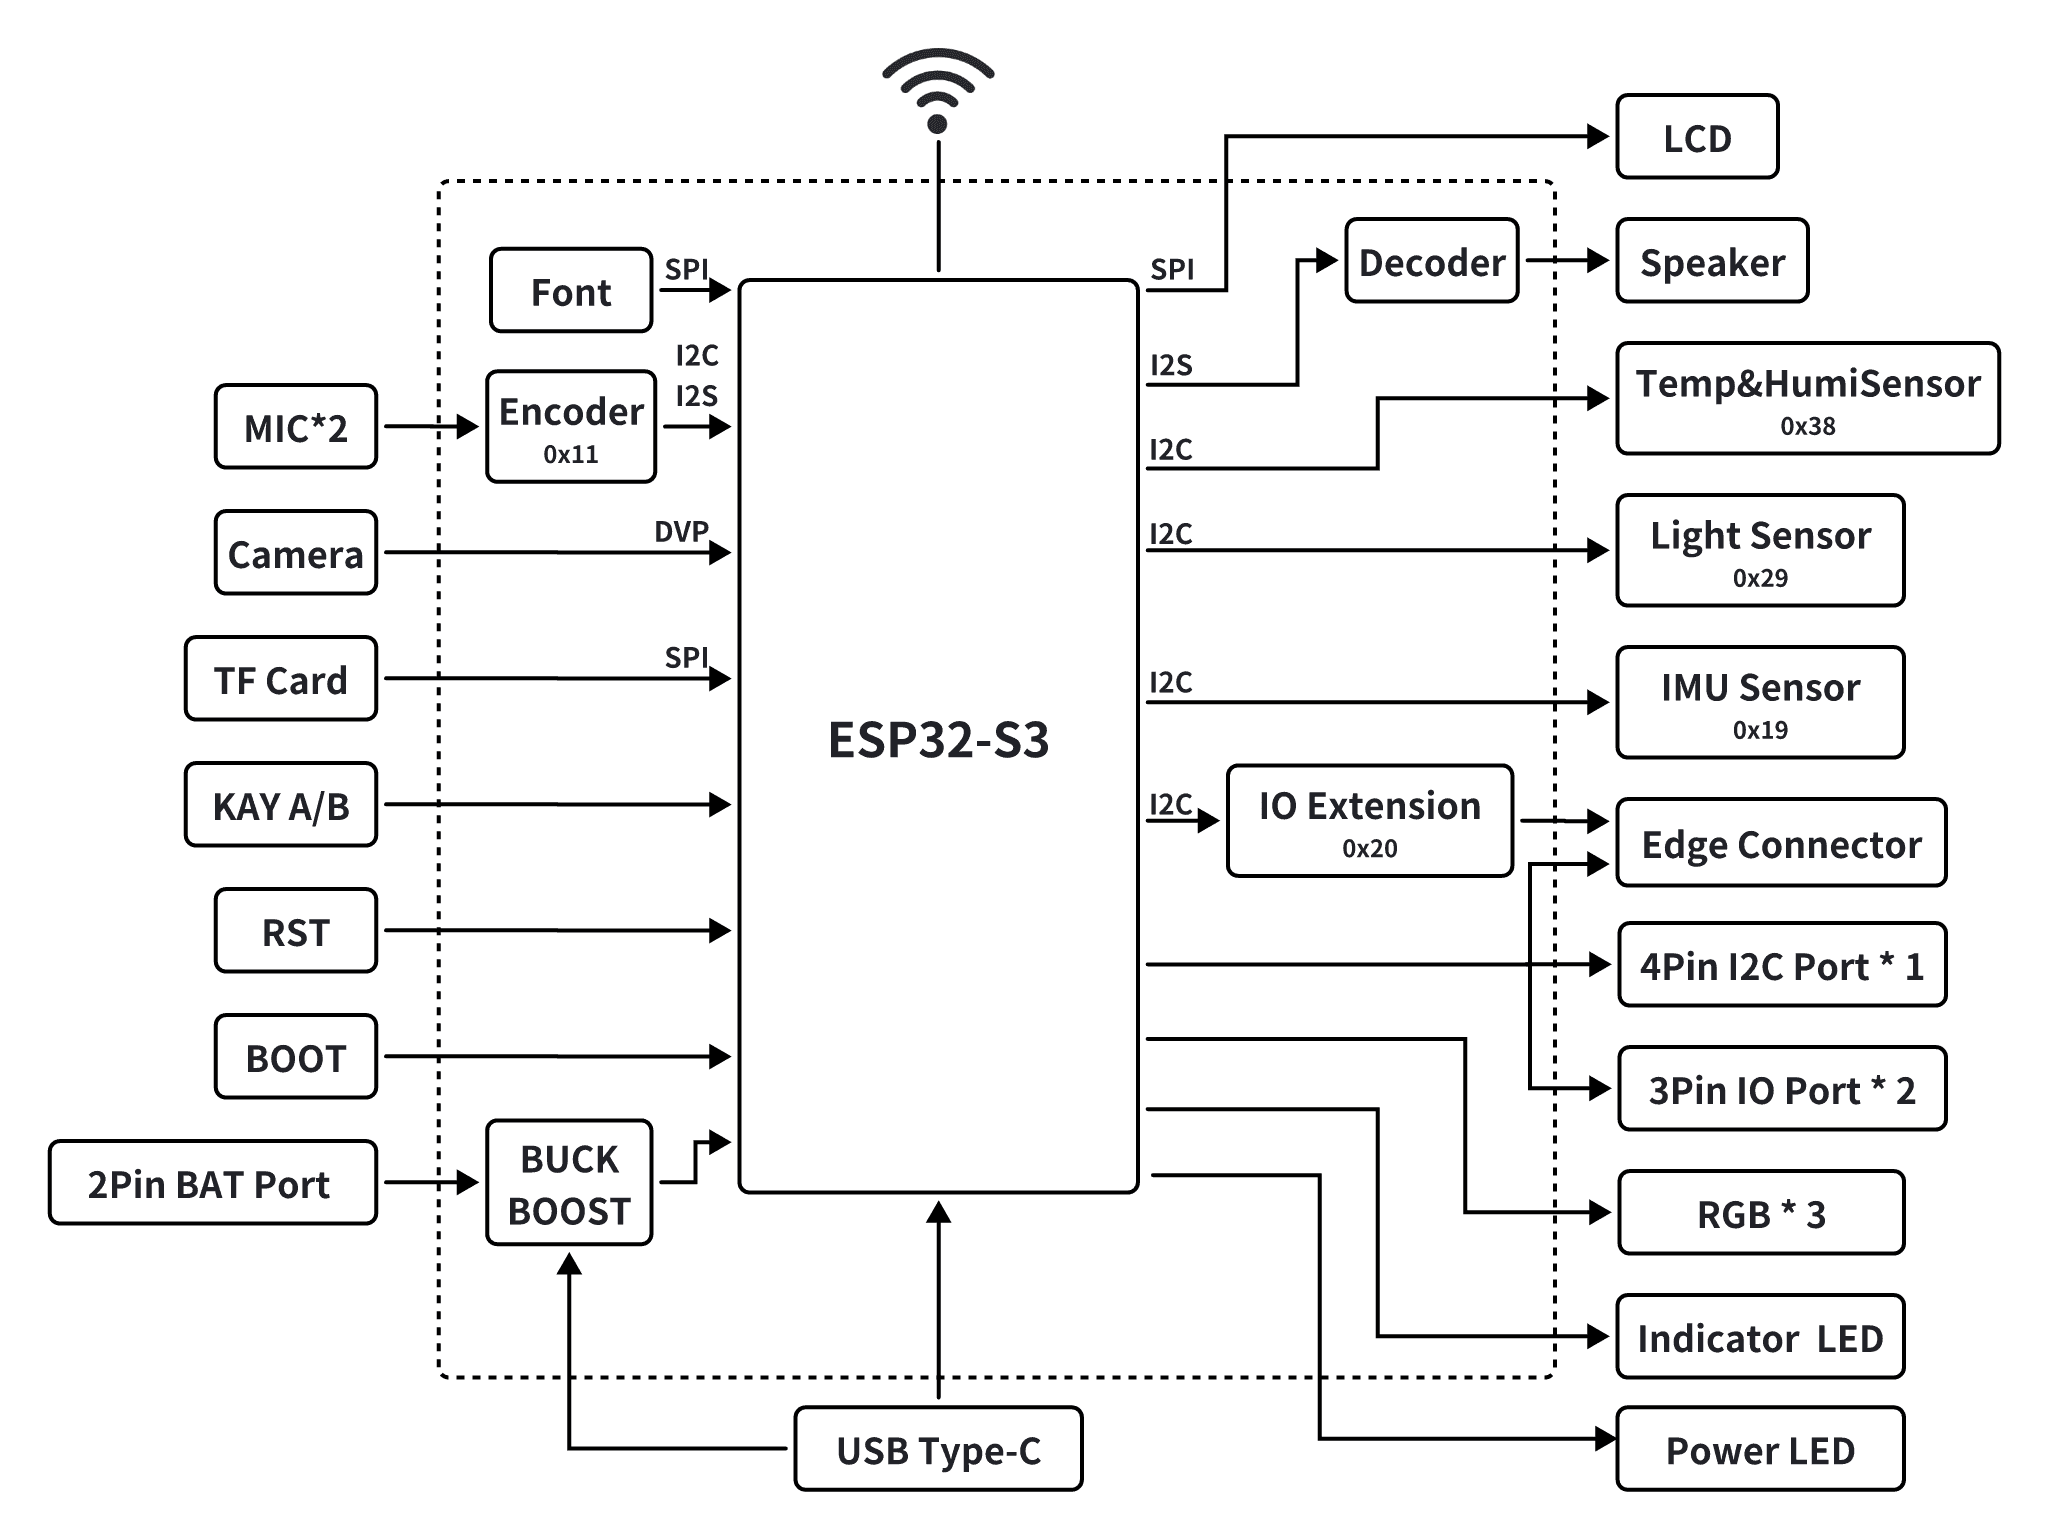
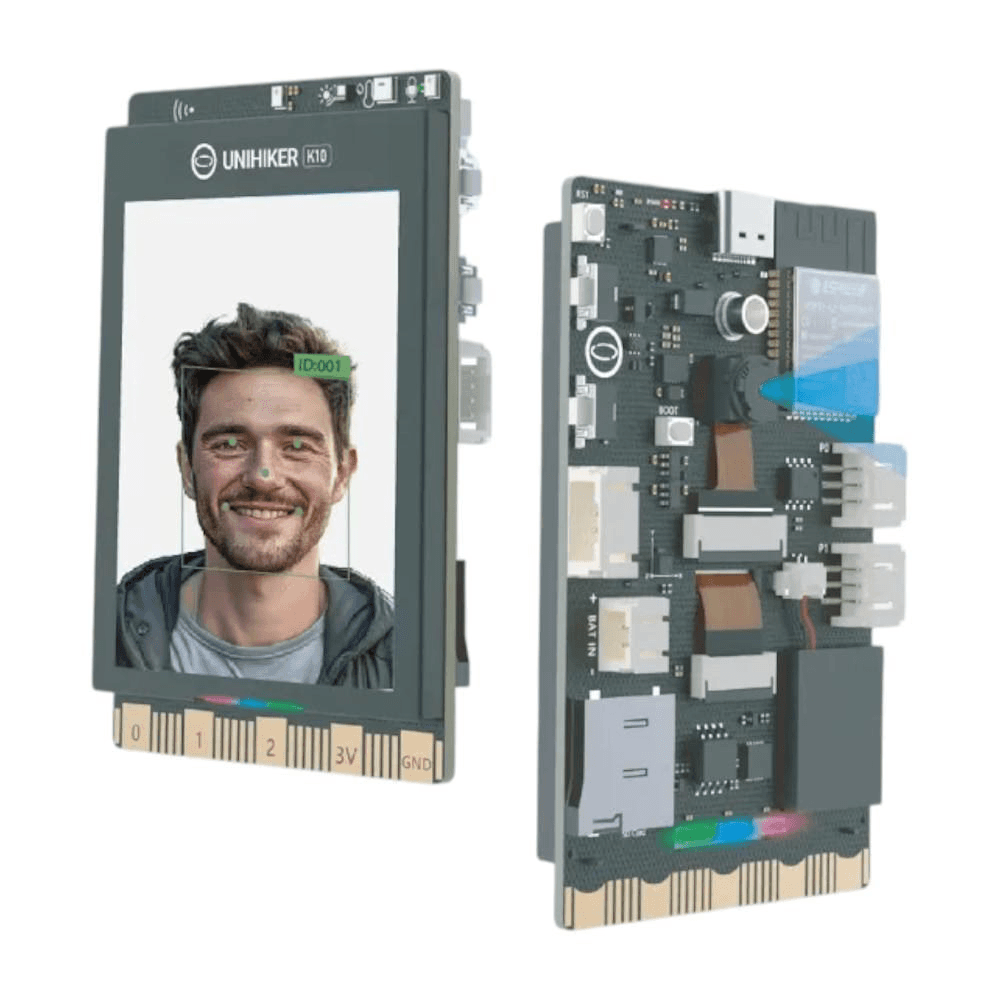
When I first unboxed the UNIHIKER K10, I thought the built-in screen would be the main reason to buy it. After actually building with it, the screen was only part of the story. This tiny $28.90 board also includes an ESP32-S3 processor, a 2MP camera, microphone, speaker, Wi-Fi, Bluetooth, RGB lights, environmental sensors, buttons, microSD storage and several expansion ports.
I have tested small computers and development boards before, and most of them need extra hardware before they become visually interesting. You might get a powerful board, but then you still need to choose a display, find compatible sensors and work out how everything should be powered and mounted. The K10 is different because most of that work has already been done. It arrives looking much closer to the center of a finished project than the beginning of one.
That meant I could skip the usual first step of ordering and wiring extra parts. I started with a follower counter, but one idea quickly became six: a camera-powered rock paper scissors game, smart alarm clock, PC hardware monitor, wireless stream deck and a filming assistant for my TikTok videos. They all used the same board, just with different code.
Some of those projects were based on examples, while others came from things I genuinely wanted on my desk. The PC monitor had to communicate with my Windows computer. The follower counter needed live information from the internet. The filming assistant was designed around the exact sequence I use when recording videos for WorthTheCart. Trying ideas that were this different gave me a much better impression of the K10 than simply following one beginner tutorial and calling it a review.
The K10 is not a Raspberry Pi replacement, and it is definitely not a tiny desktop PC. It is a microcontroller board that makes small ideas feel like real gadgets surprisingly quickly. You upload a program over USB-C and immediately see it working on the screen, reacting to the buttons, camera or sensors. That instant feedback is what made me want to keep trying new projects with it.
Disclosure: DFRobot provided the UNIHIKER K10 used for this review. The company did not control the testing or the conclusions in this article.
Quick Verdict
For $28.90, the UNIHIKER K10 gives you a ridiculous amount to experiment with. The camera, microphone, screen, buttons, speaker, RGB lights and sensors are already connected, so you spend more time building the idea and less time checking wires.
The built-in screen is still my favorite part, but it works because the rest of the board gives it something useful to display. It can show what the camera recognizes, turn sensor readings into a dashboard or provide feedback when a command has been sent to a PC. The K10 feels less like a screen attached to an ESP32 and more like a small platform where all the parts were chosen to work together.
I would recommend it to beginners, students and makers who want projects they can actually see and interact with. It is especially fun for content creation because the finished result looks like a real little device on camera, not just code running in a terminal. You will still hit limits with large AI models, full webpages and more demanding software, but I never expected a board this cheap to replace a Raspberry Pi. I expected it to be fun to build with, and it absolutely was.
My main complaint is that the board feels unfinished without a case or stand. The exposed components are normal for this category, but several of the best K10 projects are meant to stay on a desk and be handled regularly. I solved that with a 3D-printed case, and it improved the experience enough that I think DFRobot should consider selling an official one.
You can view the current price and full product information on the official DFRobot UNIHIKER K10 product page.
What Is the UNIHIKER K10?
The UNIHIKER K10 is an ESP32-S3 development board built for AI, sensor and interactive coding projects. Unlike a basic microcontroller, it already has most of the hardware needed to create something useful. You are not staring at an empty board and wondering which screen, buttons or sensors to buy first.
DFRobot describes it as an AI coding board for STEM education and makers. That is accurate, but it can also make the product sound more classroom-focused than it really is. Yes, it is easy enough for a beginner to use with block programming, but I also found it capable of running custom desk tools that did not feel like school exercises.
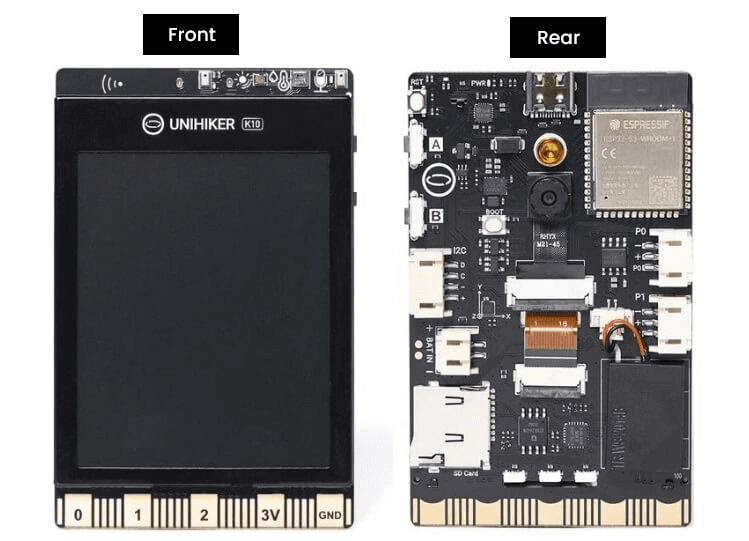
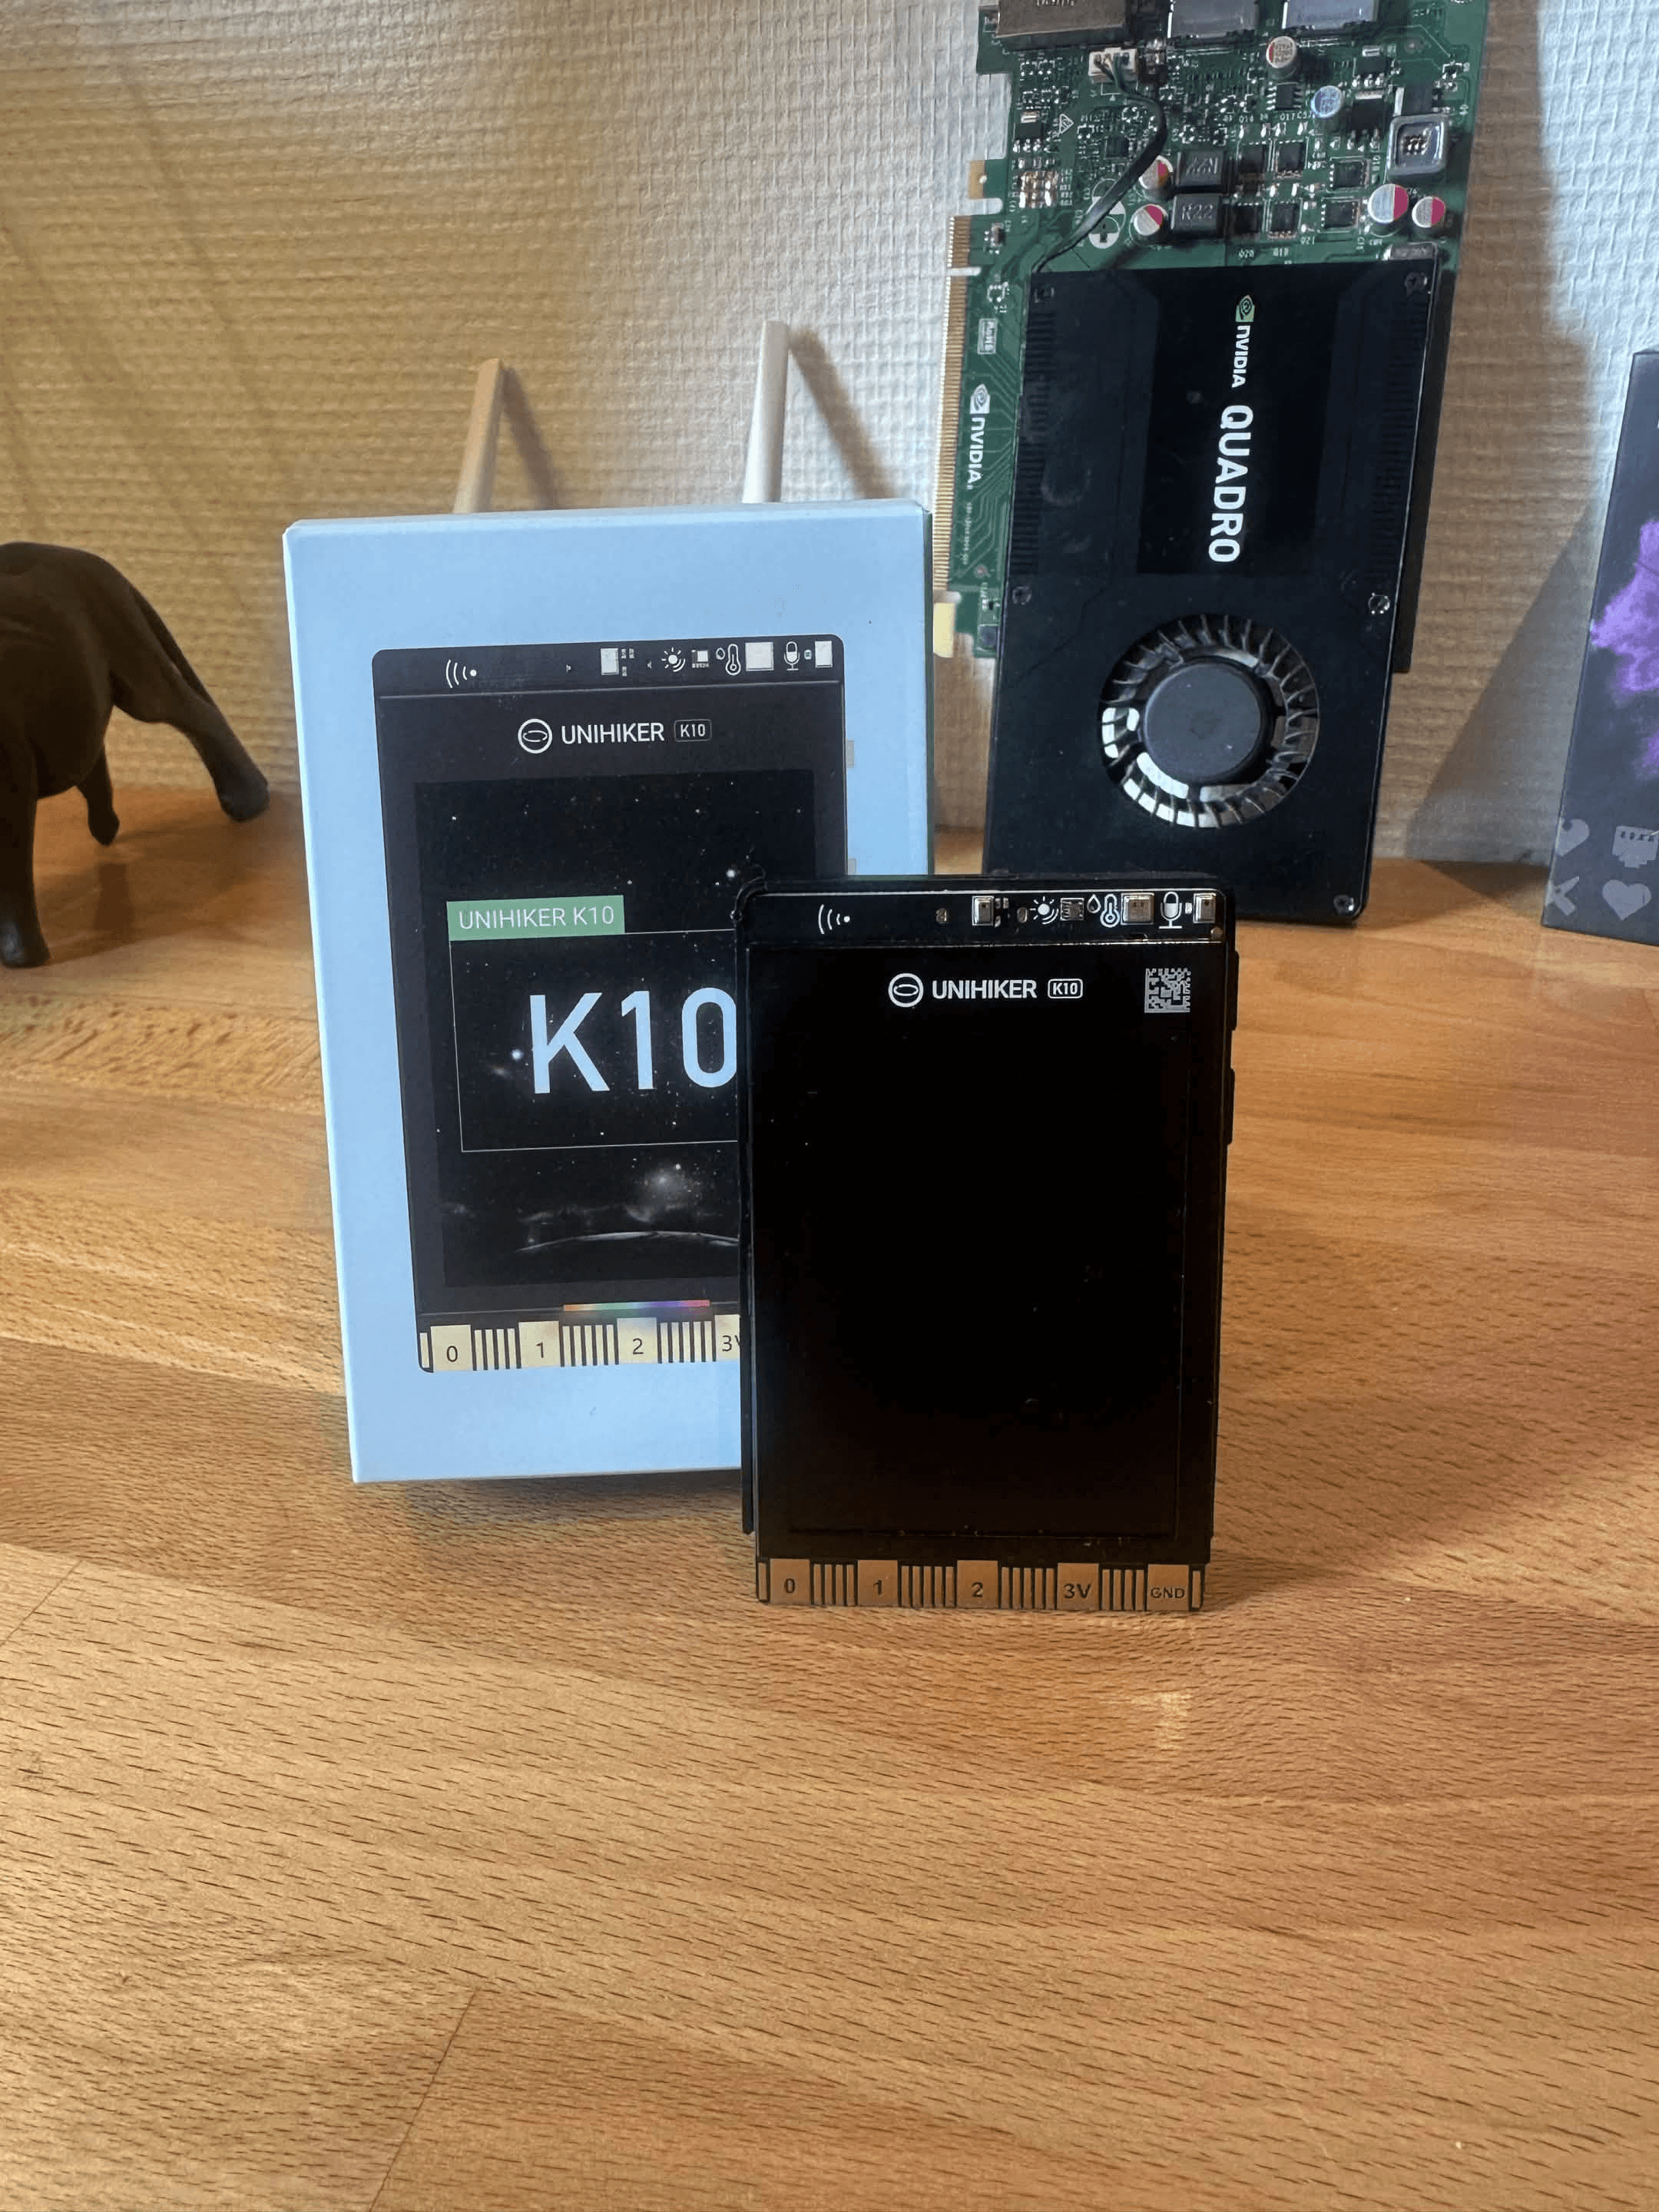
On the front is a 2.8-inch, 240 × 320 color display, two buttons, a 2MP camera, a microphone, temperature and humidity sensing, and an ambient light sensor. The back has a speaker and RGB lights. You also get a three-axis accelerometer, a microSD slot and connections for adding more hardware later.
Having those components in one place changes how quickly you can move between ideas. The buttons used to set my alarm were reused to navigate the stream deck. The microphone that supports voice commands became an audio meter for filming. Even the RGB lights had different jobs depending on the project, from making an alarm more noticeable to showing when a countdown had started.
The 2.4GHz Wi-Fi ended up being more important than I expected. It let the K10 pull follower data from the internet, read CPU and GPU information from my PC and send commands back to the computer. Without Wi-Fi, several of my favorite projects would have stayed as simple offline demos.
UNIHIKER K10 Specifications
Component | Specification |
|---|---|
Processor | ESP32-S3 Xtensa LX7, dual-core, up to 240MHz |
Memory | 512KB SRAM, 16MB flash and 8MB PSRAM |
Display | 2.8-inch color LCD, 240 × 320 resolution |
Camera | 2MP onboard camera |
Wireless | 2.4GHz Wi-Fi and Bluetooth 5.0 |
Built-in inputs | Two buttons, microphone, temperature and humidity sensor, ambient light sensor and accelerometer |
Built-in outputs | Color display, speaker and RGB lights |
Storage | 16MB onboard flash and microSD expansion |
Expansion | USB-C, Gravity three-pin and four-pin ports, battery connector and edge connector |
Programming | Mind+ graphical programming, generated code and MicroPython support |
Size | 51.6 × 83 × 11mm |
Current price | $28.90 |
The ESP32-S3 itself is not unusual. What makes the specification list interesting is everything DFRobot built around it for less than $30. The 16MB of flash and 8MB of PSRAM also give interfaces, images and small AI models more breathing room than they would have on a basic microcontroller. It is still far less powerful than a Linux computer, but the hardware feels well matched to the kind of focused projects the K10 is made for.
That distinction matters before buying one. A Raspberry Pi can run a full operating system, install desktop software and act like a very small conventional computer. The K10 does not work that way. You normally create one focused program and upload it to the board. In return, it starts quickly, uses little power and connects directly to its screen, camera and sensors without needing a full operating system in the middle.
Why the Built-In Screen Matters
The screen is what gives the K10 most of its personality. On many microcontrollers, your first result is text inside a serial monitor. That is useful, but it never feels like a finished gadget. On the K10, my follower count, alarm clock, stream deck menus and filming prompts appeared directly on the board. Even a simple project immediately looked more complete.
The 240 × 320 resolution sounds small, but it is enough for large numbers, icons, progress bars and a few lines of readable text. It also helped while debugging. When the K10 could not connect to a service on my PC, I could show the connection status and error directly on its screen instead of guessing what had gone wrong.
I also enjoyed designing the interfaces more than I expected. You can draw colors, cards, bars and simple graphics in code or load images from a microSD card. It is not a touchscreen, so the two buttons force you to keep the menus simple. For these small projects, that limitation often helped me make cleaner layouts instead of trying to squeeze too much onto the display.
The small size still requires planning. Text that looks fine while the board is in your hand may be difficult to read once it is beside a monitor. For the follower counter and PC dashboard, I made the most important numbers much larger than everything else. Secondary information was placed in smaller cards, and color was used to show status rather than decorate every empty area. I had to think more like I was designing a watch face than a phone app.
I also learned not to redraw the full display unless it was necessary. My first alarm-clock interface constantly cleared and rebuilt the screen, which caused obvious flickering. Updating only the numbers or areas that had changed produced a much smoother result. That kind of detail will not appear on the specification sheet, but it makes a major difference when the K10 is used as a permanent display.
What Comes in the Box?
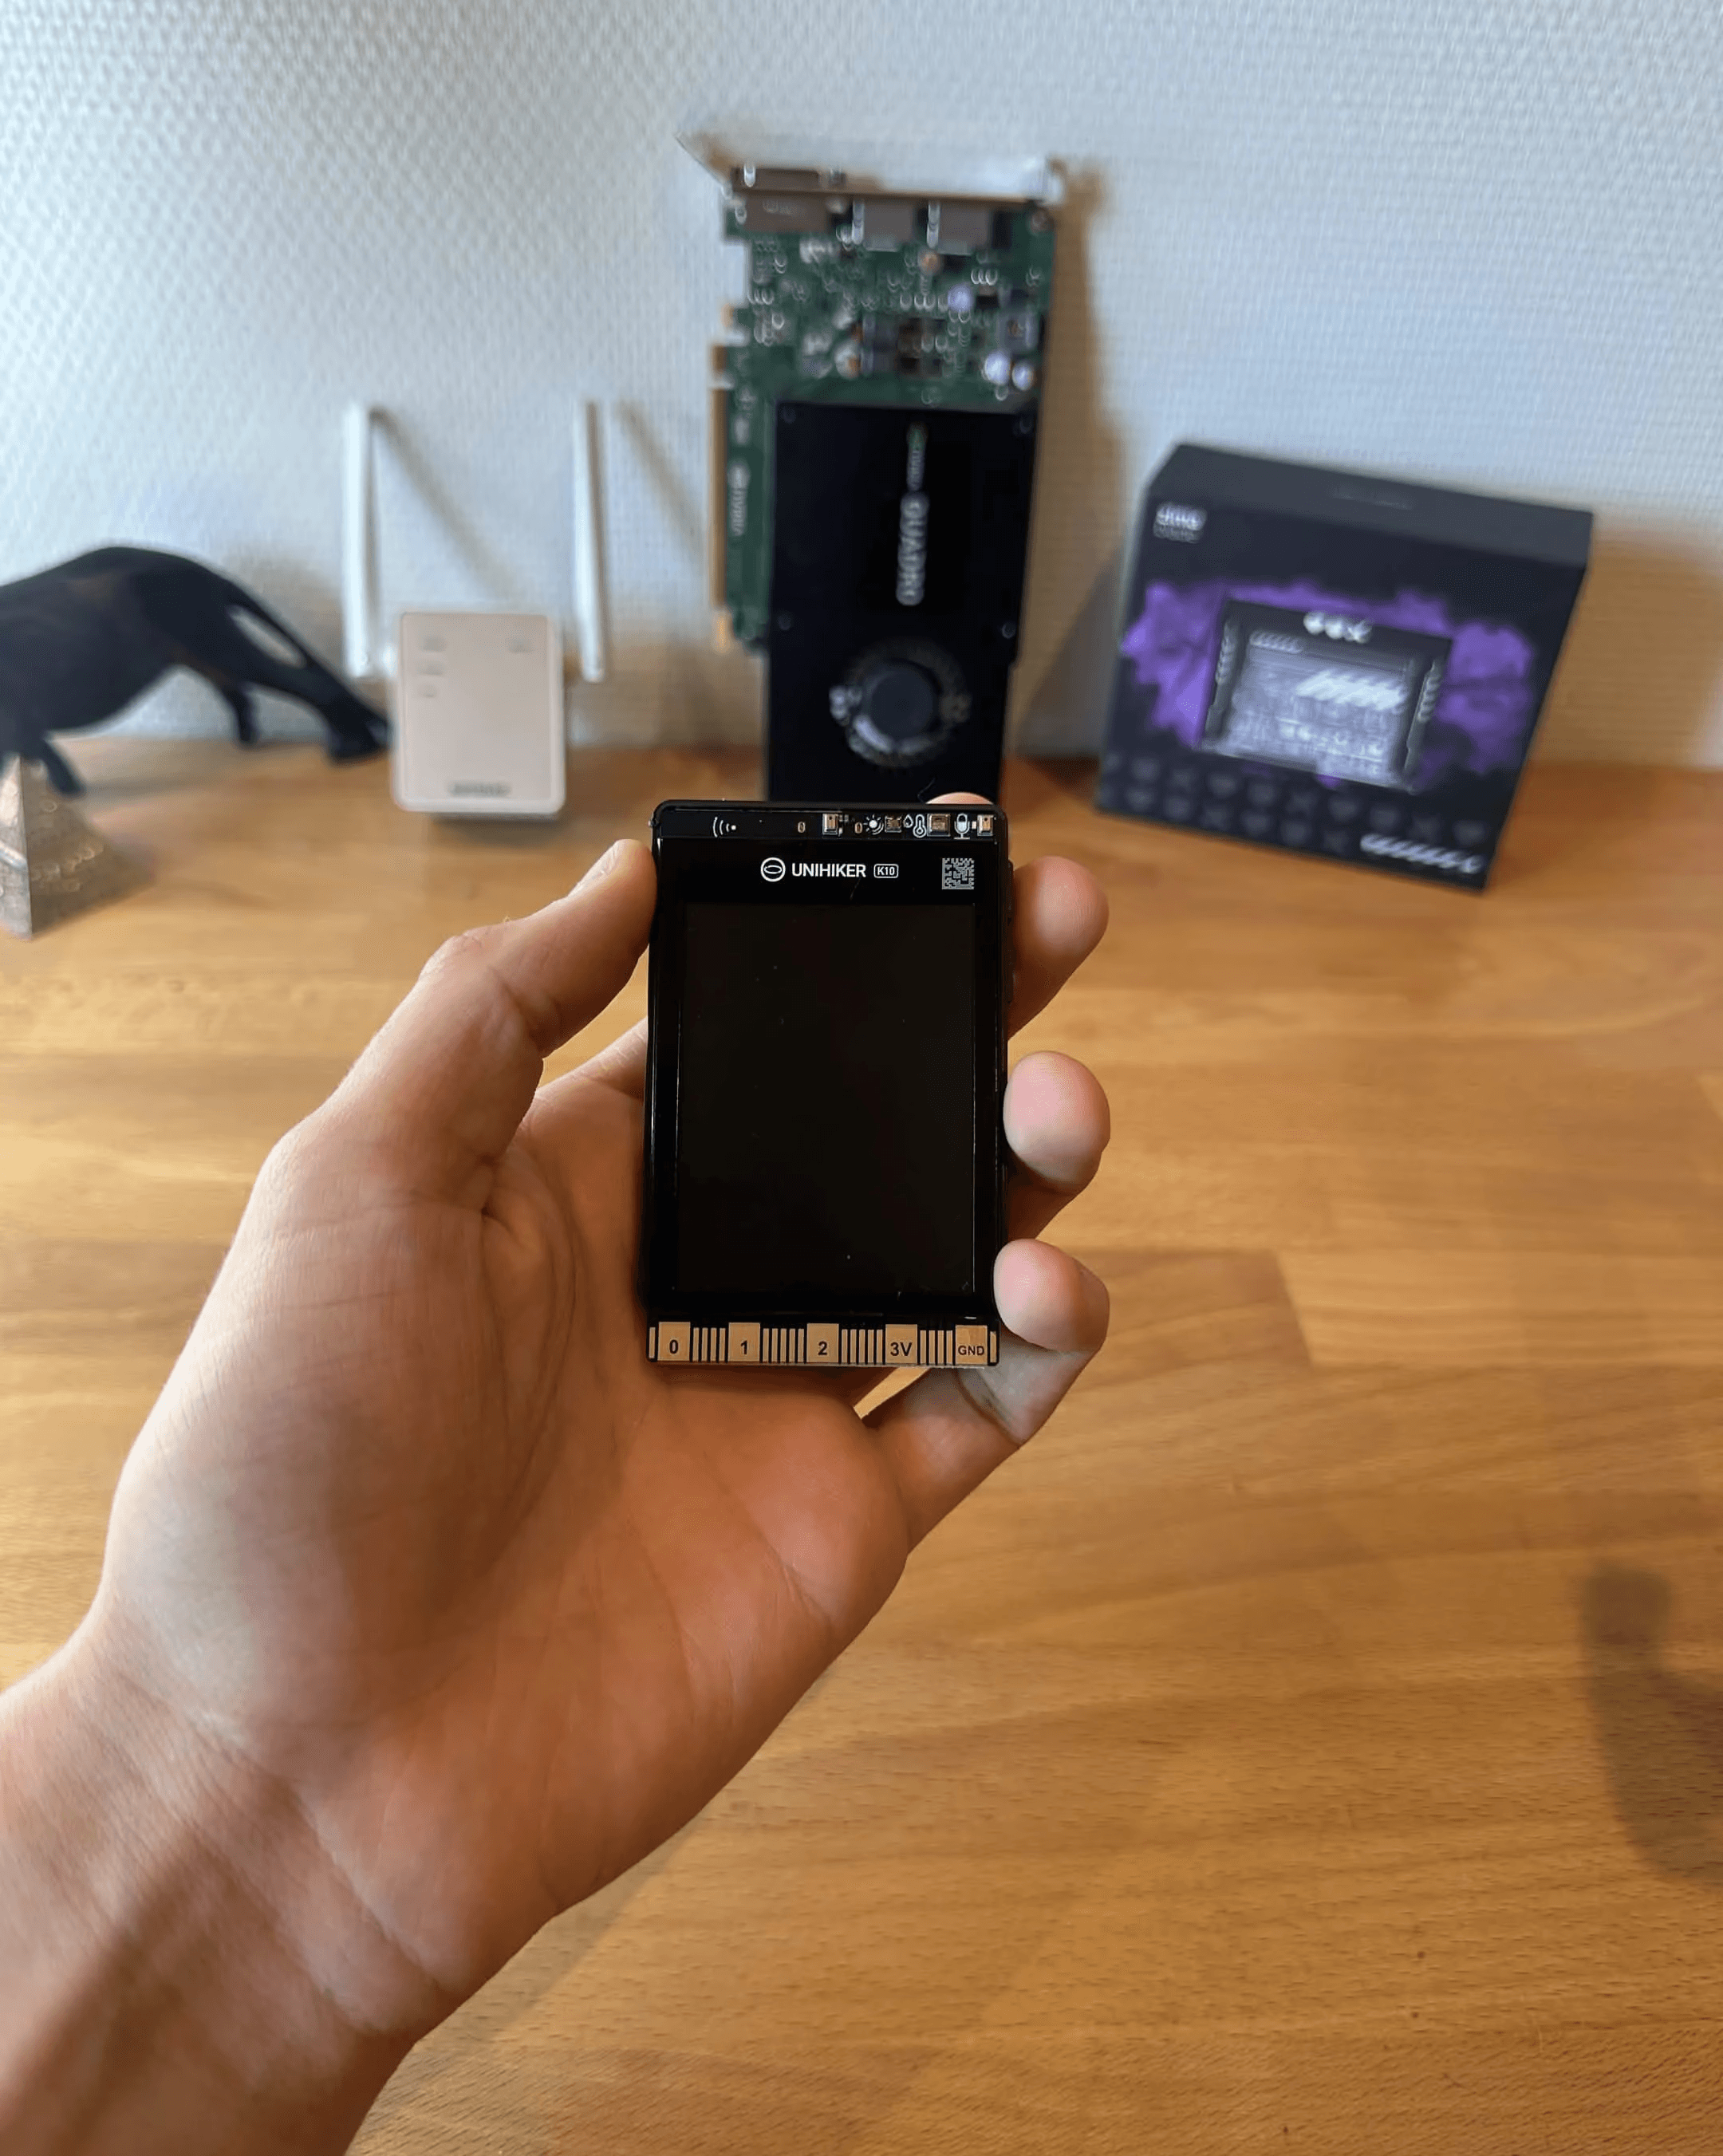
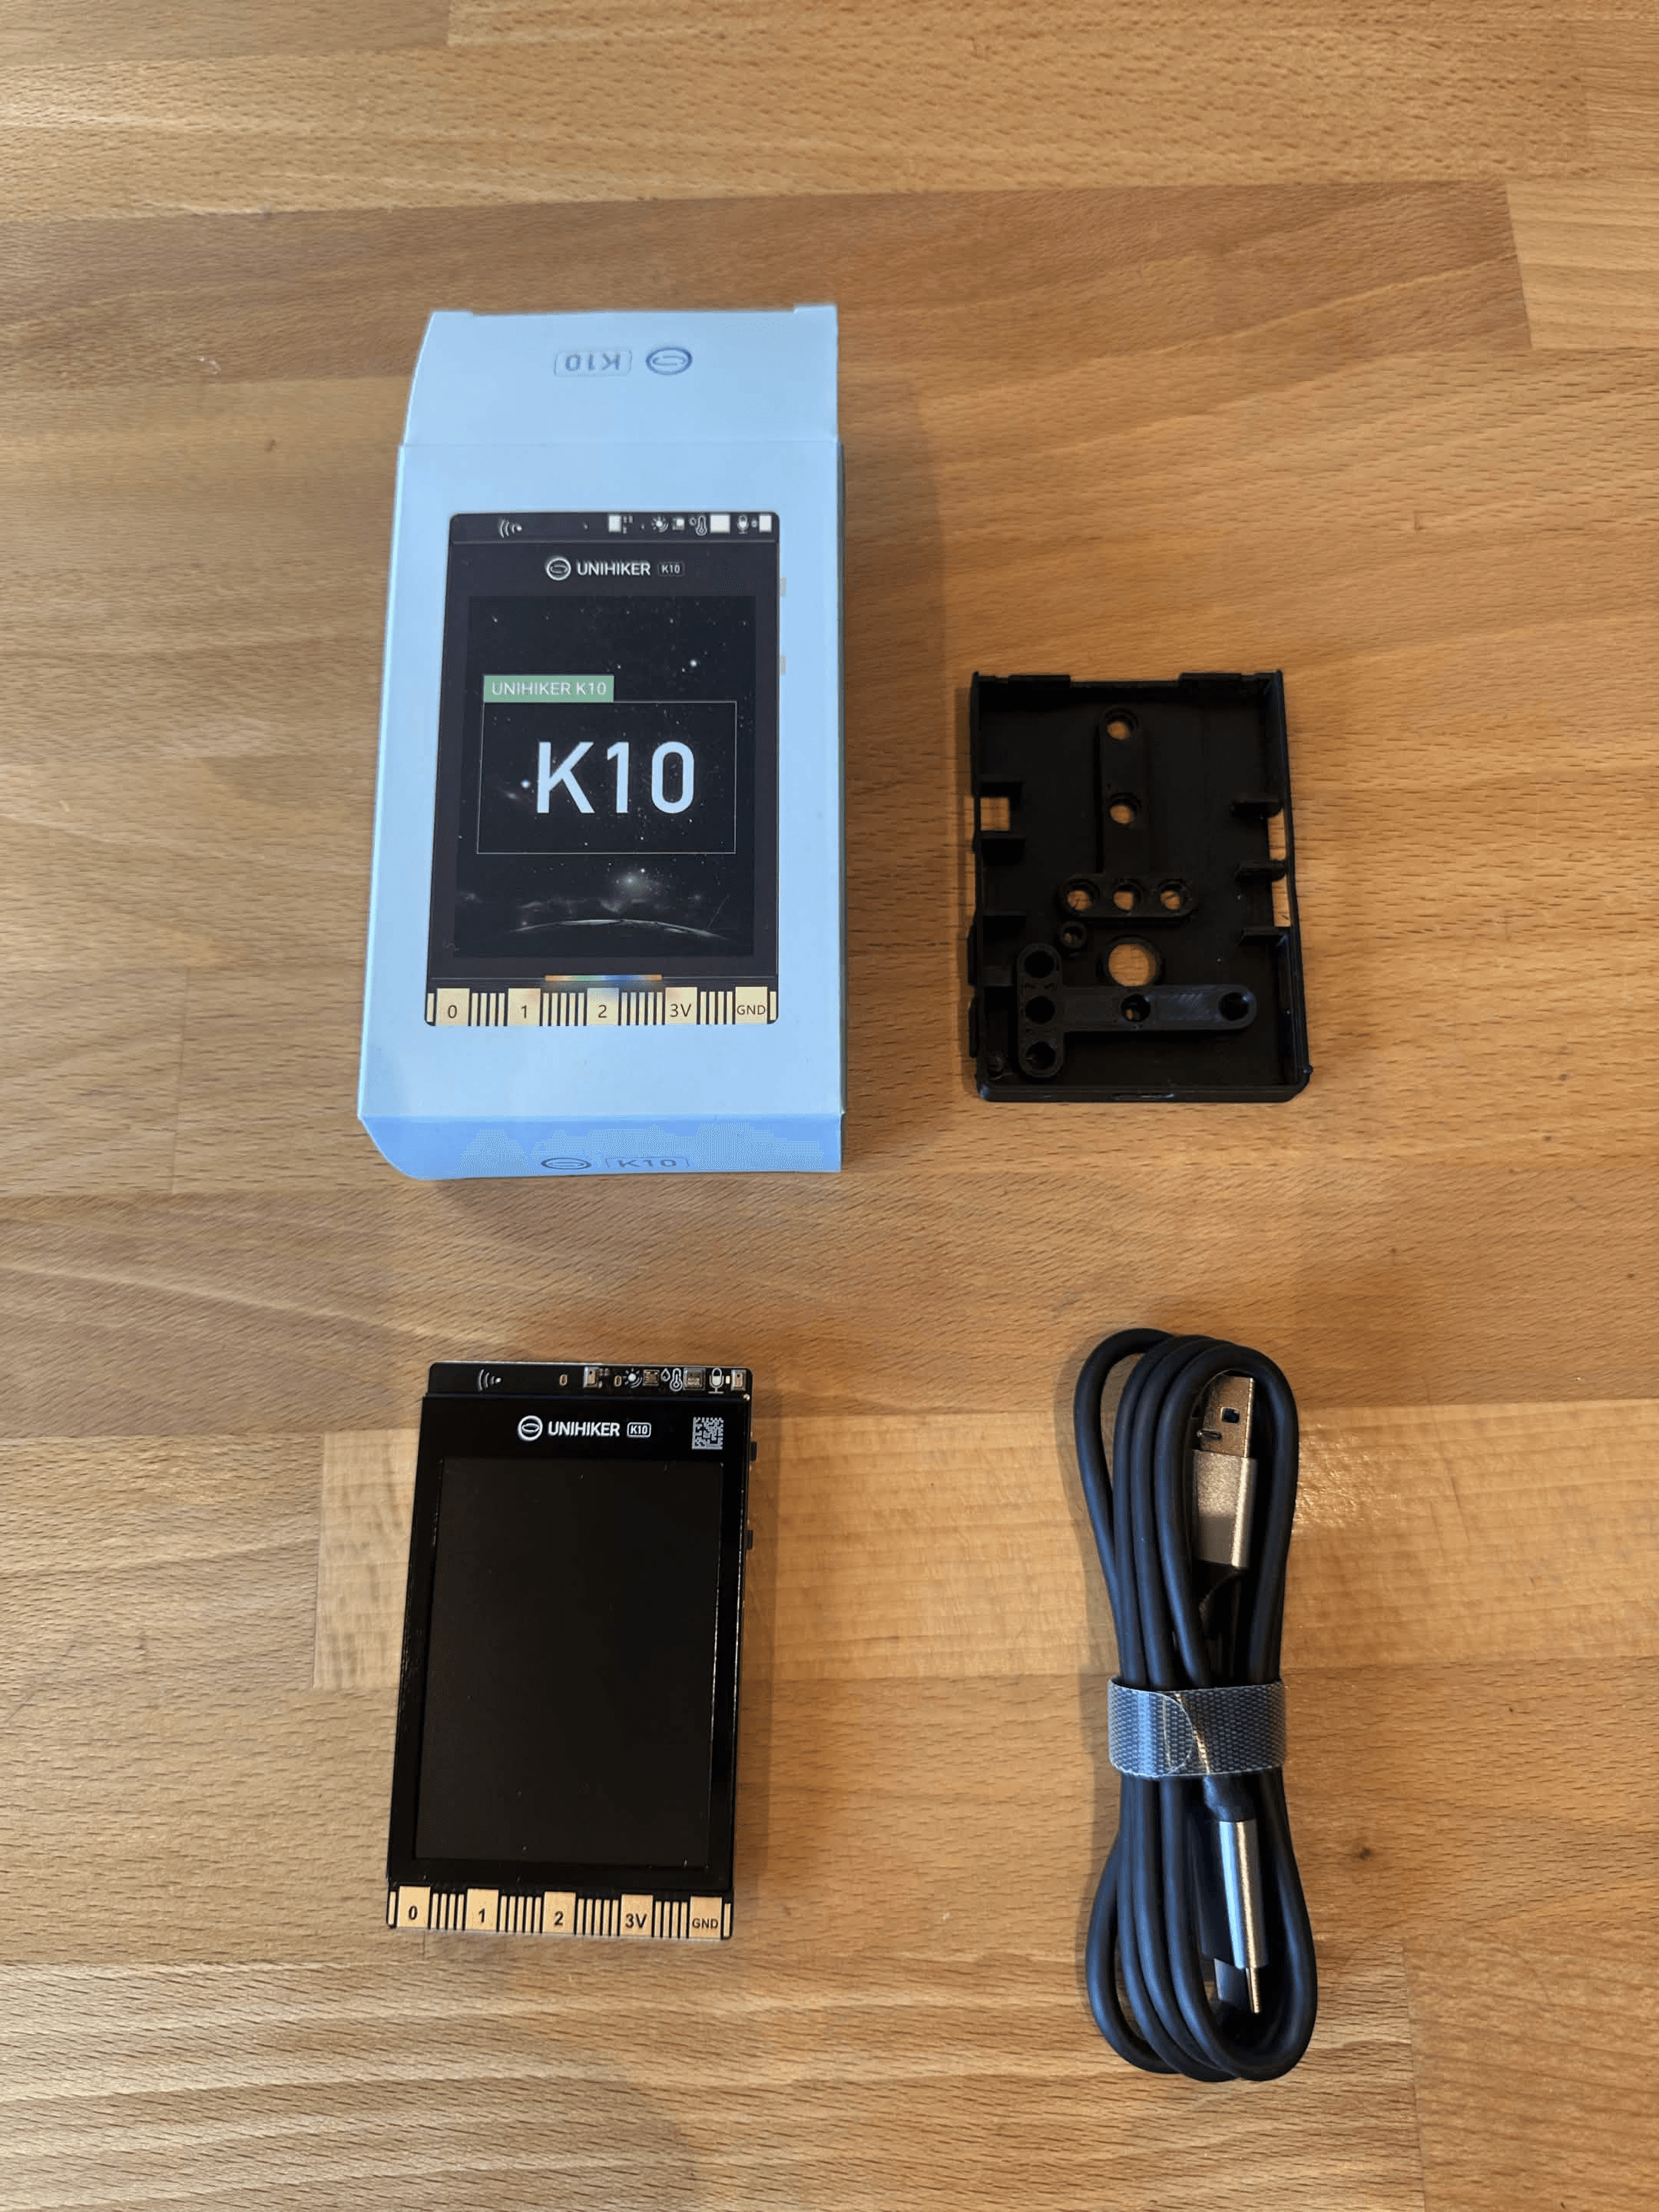
Inside the box you get the K10 and a USB-C cable. That is basically it, but you can still start immediately because the display, camera, microphone, speaker and sensors are already on the board. Plug it into a computer, install Mind+ and you are ready to upload your first project.
The packaging is simple and does not try to make the K10 feel like a premium consumer device. There is no power adapter, storage card or collection of loose accessories. In this case, I did not mind the short list because the product itself already contains the parts that would normally fill the box. The included cable handles both power and programming, so there was nothing essential missing from my first setup.
A microSD card is useful if you want to save photos, audio or larger images, and a compatible battery can make the board portable. You can also connect external sensors through the Gravity ports or edge connector. I did not need any of that for the six projects in this review.
That gives beginners a sensible upgrade path. You can learn the board as it arrives and only buy extra hardware when a particular idea requires it. There is no reason to order a large sensor kit before you know whether you will actually use it.
I only wish DFRobot had included a simple protective case. The exposed board is normal for development hardware, but I wanted to keep mine beside my monitor as a permanent gadget. Luckily, I found a 3D-printable case that fit it extremely well.
You can find the case I printed here: UNIHIKER K10 case on Printables.
The 3D-Printed Case Changed the Experience
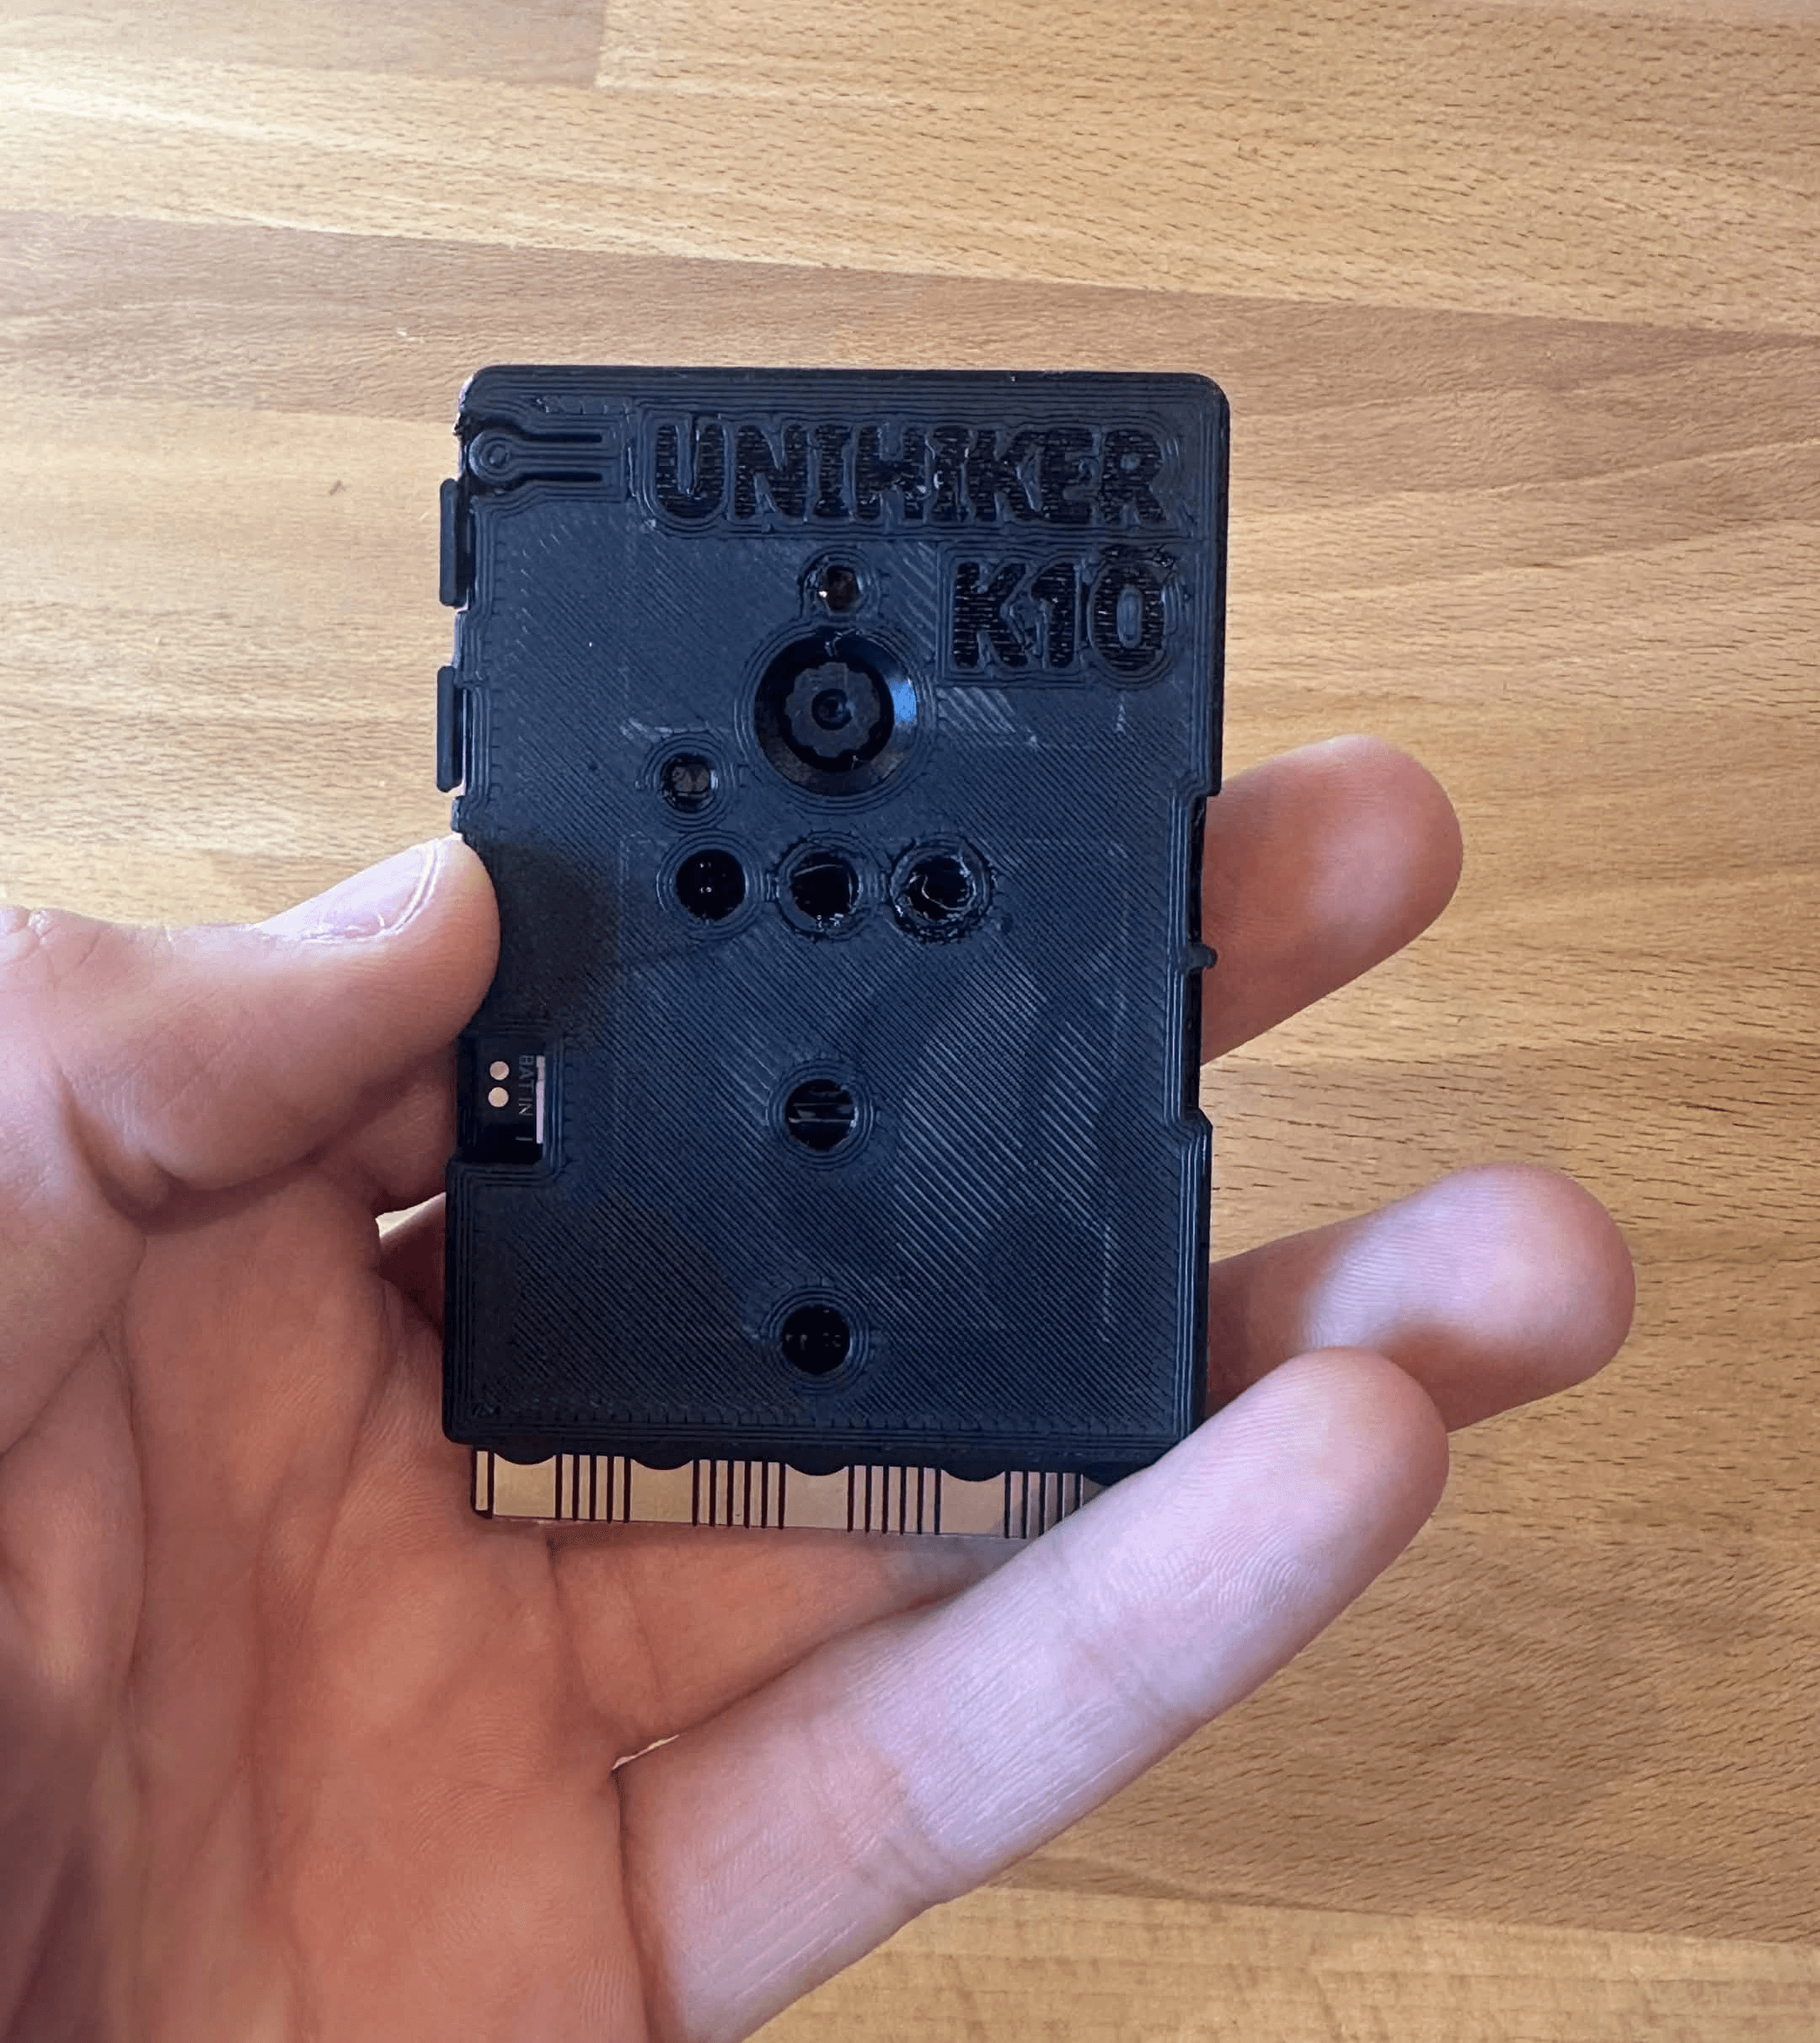
The 3D-printed case made a bigger difference than I expected. Before adding it, the K10 still looked like a bare development board. Afterward, it felt much closer to a tiny finished product that actually belonged on my desk.
The model I printed was a genuinely good fit. The screen, buttons, camera and important ports remained accessible, and the enclosure did not make the board feel bulky. I did not have to modify the file or force the K10 into place. Once everything was assembled, I was much more comfortable moving it around and using it during filming.
It also gave the board more protection and made it easier to position beside my monitor. Because the K10 is so small, the case did not use much filament or take an unreasonable amount of time to print. Mine fit perfectly, and it made every project look better in photos and videos.
This was especially noticeable with the alarm clock, follower counter and PC monitor. Those are not projects I want to dismantle after a five-minute test. They are meant to sit in the same place and run for longer periods. The case made that use feel intentional instead of leaving an exposed circuit board balanced against something on my desk.
An official case would still be a great optional accessory for people without a 3D printer. If you do have one, however, making your own enclosure is part of the fun. You could add a stand, change the camera angle, leave room for a battery or print it in a color that matches your setup.
Getting Started With Mind+
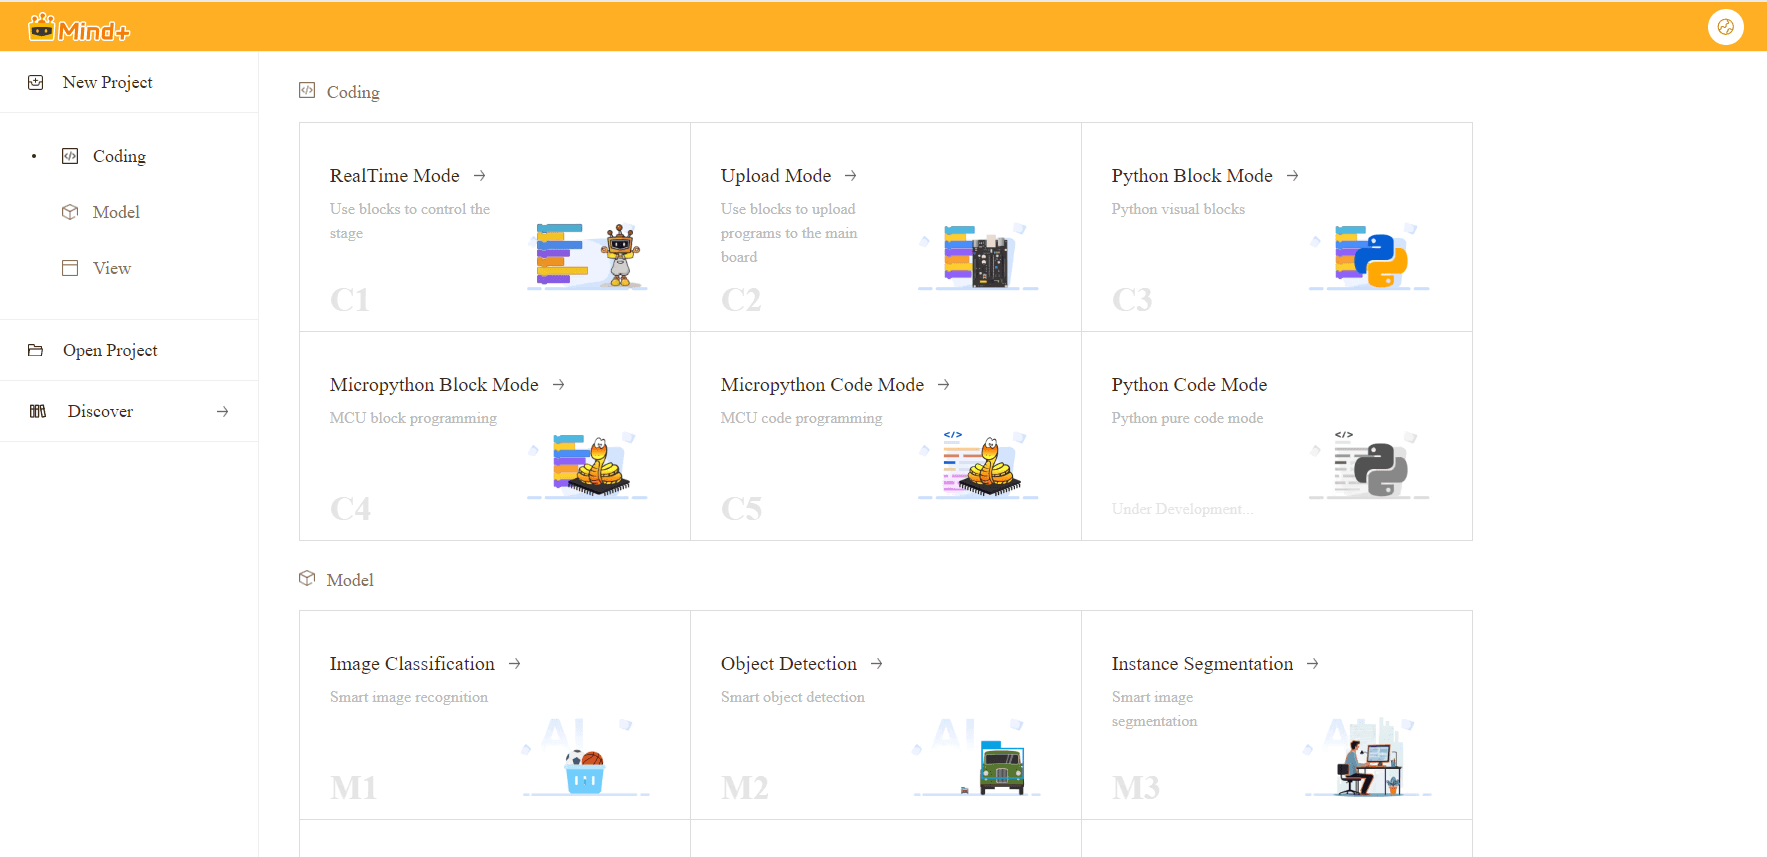
DFRobot recommends Mind+ for getting started. It combines block programming, written code, AI model training and interface tools in one free app. After connecting the K10 over USB-C, you add its extension, select the board and upload your project. The program then keeps running even after you disconnect it from the computer.
The first setup was straightforward. Once the correct K10 extension was installed and the board was selected, I could upload a project without building a separate toolchain or searching for several libraries. That matters for a product aimed partly at beginners because a complicated installation can kill the excitement before anything appears on the screen.
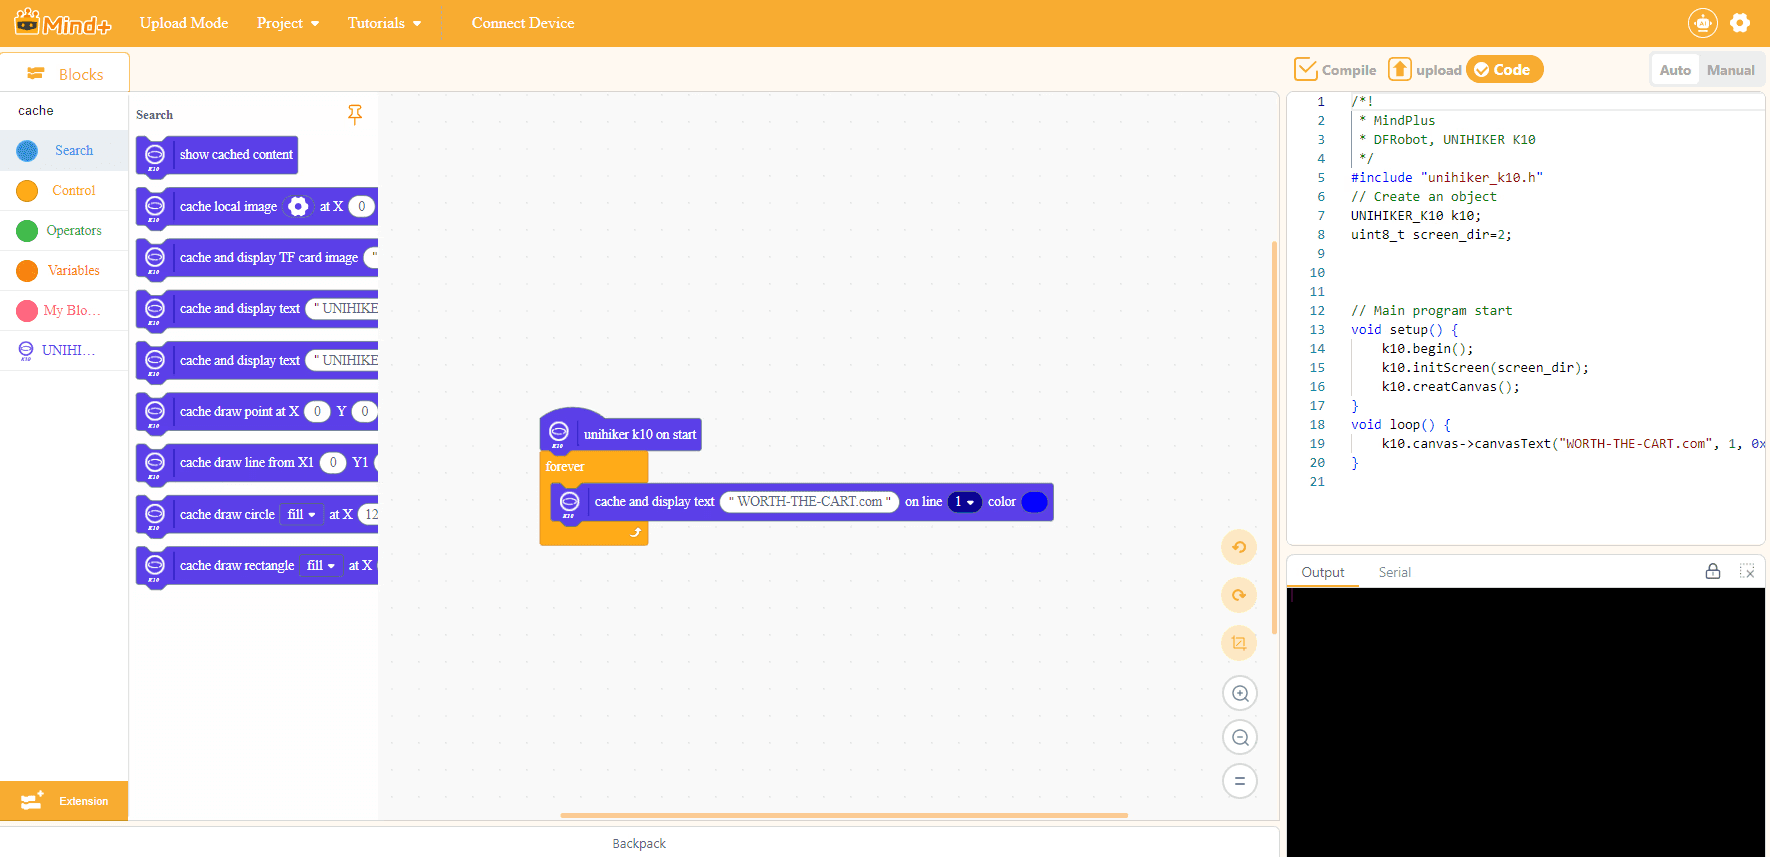
The block interface makes the first project much less intimidating. Instead of memorizing commands for the display, camera or sensors, you drag in clearly labelled blocks. You can start with something as basic as showing text when button A is pressed, then add conditions, sensor readings and graphics when you feel ready.
You are not stuck with blocks forever. Mind+ can generate code, and its manual editor gives you more control when the blocks are no longer enough. I used written code for projects such as the PC monitor and stream deck. Moving between the two felt like a natural way to learn what the blocks were actually doing.
That transition is one of the better ideas behind Mind+. Block programming is sometimes treated as a dead end for very young beginners, while written code is presented as a completely separate skill. Here, you can build the logic visually, inspect what it produces and gradually take control of more of the program. You still need to learn variables, functions and libraries for advanced work, but the starting point feels much less abrupt.
Uploading was usually easy, but the more complicated projects still took patience. Large images can turn into huge arrays of numbers, and errors in manually edited code are harder to spot than a block in the wrong place. I also would not choose the Mind+ editor over a professional coding environment for a large project. For experimenting with the K10, though, having everything in one place was convenient.
I ran into the most friction when my ideas moved beyond the prepared blocks. The editor works, but navigation and error handling are not as comfortable as the tools experienced programmers are used to. This did not stop any of my projects, although it made me appreciate why DFRobot also supports other workflows for users who want to take the board further.
More Than Beginner Programming Software
Mind+ looks a little like Scratch, but it is capable of much more than basic classroom exercises. You can collect and label training data, train supported models and move them onto compatible hardware without building the complete machine-learning workflow yourself.
That does not remove the work of collecting useful examples. A custom model is still only as good as the images or sounds used to train it. What Mind+ removes is much of the setup around that process. A student can spend more time seeing how different examples change the result and less time installing software they do not yet understand.
That works especially well with the K10. A camera result can change what appears on the screen, a voice command can trigger the RGB lights, and tilting the accelerometer can control a game. Seeing those actions connected as blocks makes the logic easy to follow, even when several parts of the board are working together.
DFRobot also documents MicroPython, Arduino and TensorFlow Lite Micro workflows for users who want more control. I would still begin with Mind+ because it is the quickest way to get something working. The other options become useful when your idea needs a library or function that Mind+ does not already provide.
The AI Features Are More Than Marketing
AI is the main theme of the K10, and it is not just a word printed on the box. The 2MP camera supports projects involving face detection, image recognition, cat and dog detection, QR codes and motion detection. The microphone can also be used for local speech recognition and custom commands. Because some of these tasks run on the board, the K10 can respond without sending every image or command to an online service.
This is the right scale of AI for the hardware. The K10 is not trying to generate long answers or understand an entire room. It is much better at answering a focused question: Is there a face in front of the camera? Does this image look like one of the categories in the model? Was a known voice command spoken? Those results can then control the display, sound, lights or another connected device.
I tried several of the ready-made camera features, and seeing the result appear directly on the screen makes them easy to understand. A face detector can draw a box around you, a motion alarm can react when the image changes, and pet detection could trigger a camera or message. DFRobot's examples give you a useful starting point instead of expecting you to build the recognition system from zero.
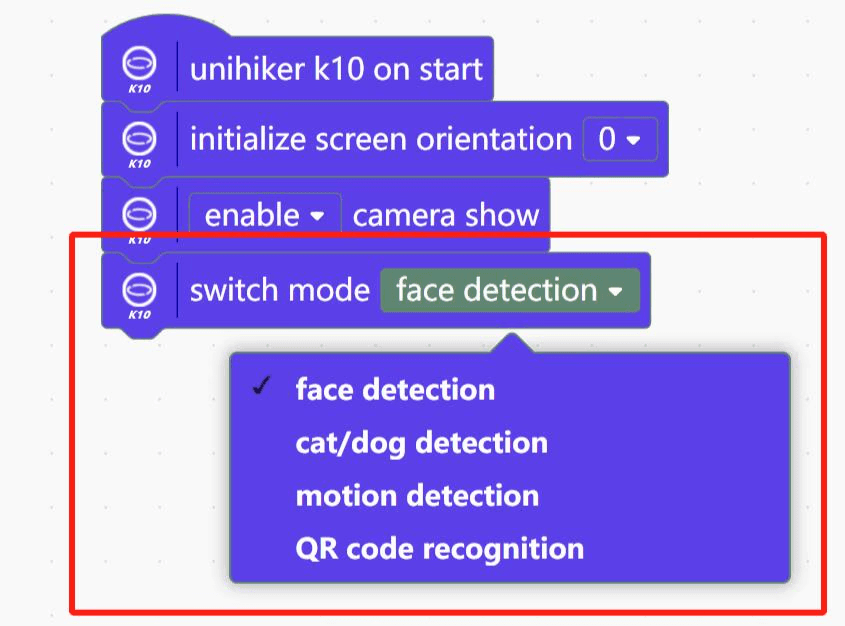
The built-in models have clear limits. Face detection finds a face; it does not automatically know who the person is or understand everything in the scene. Cat and dog detection cannot identify any random object you hold in front of it. Lighting, distance, camera angle and the background all affected my results, which is exactly the kind of real-world lesson a beginner will not get from simply reading about AI.
In practice, those limitations showed up quickly. A hand gesture that worked in front of a plain wall became less reliable when other objects filled the frame. Moving too fast created blur, while poor lighting removed details the model needed. It was not a case of the feature either working perfectly or being useless. Small changes to how I positioned the board and presented the object often made the difference.
For something more specific, the K10 also supports TinyML and custom model workflows. You prepare a small model for a focused task and deploy it to the board. The ESP32-S3 and 8MB of PSRAM are useful here, but you are still working with microcontroller hardware. Train large models somewhere else and use the K10 to run the smaller finished model.
Camera, Voice and Sensors Working Together
The K10 becomes much more interesting when several components work together. The camera can provide the input, the screen can show the result, the speaker can confirm it and the RGB lights can indicate what is happening. Wi-Fi adds live data, while the two buttons are always available when voice or camera controls would be unnecessary.
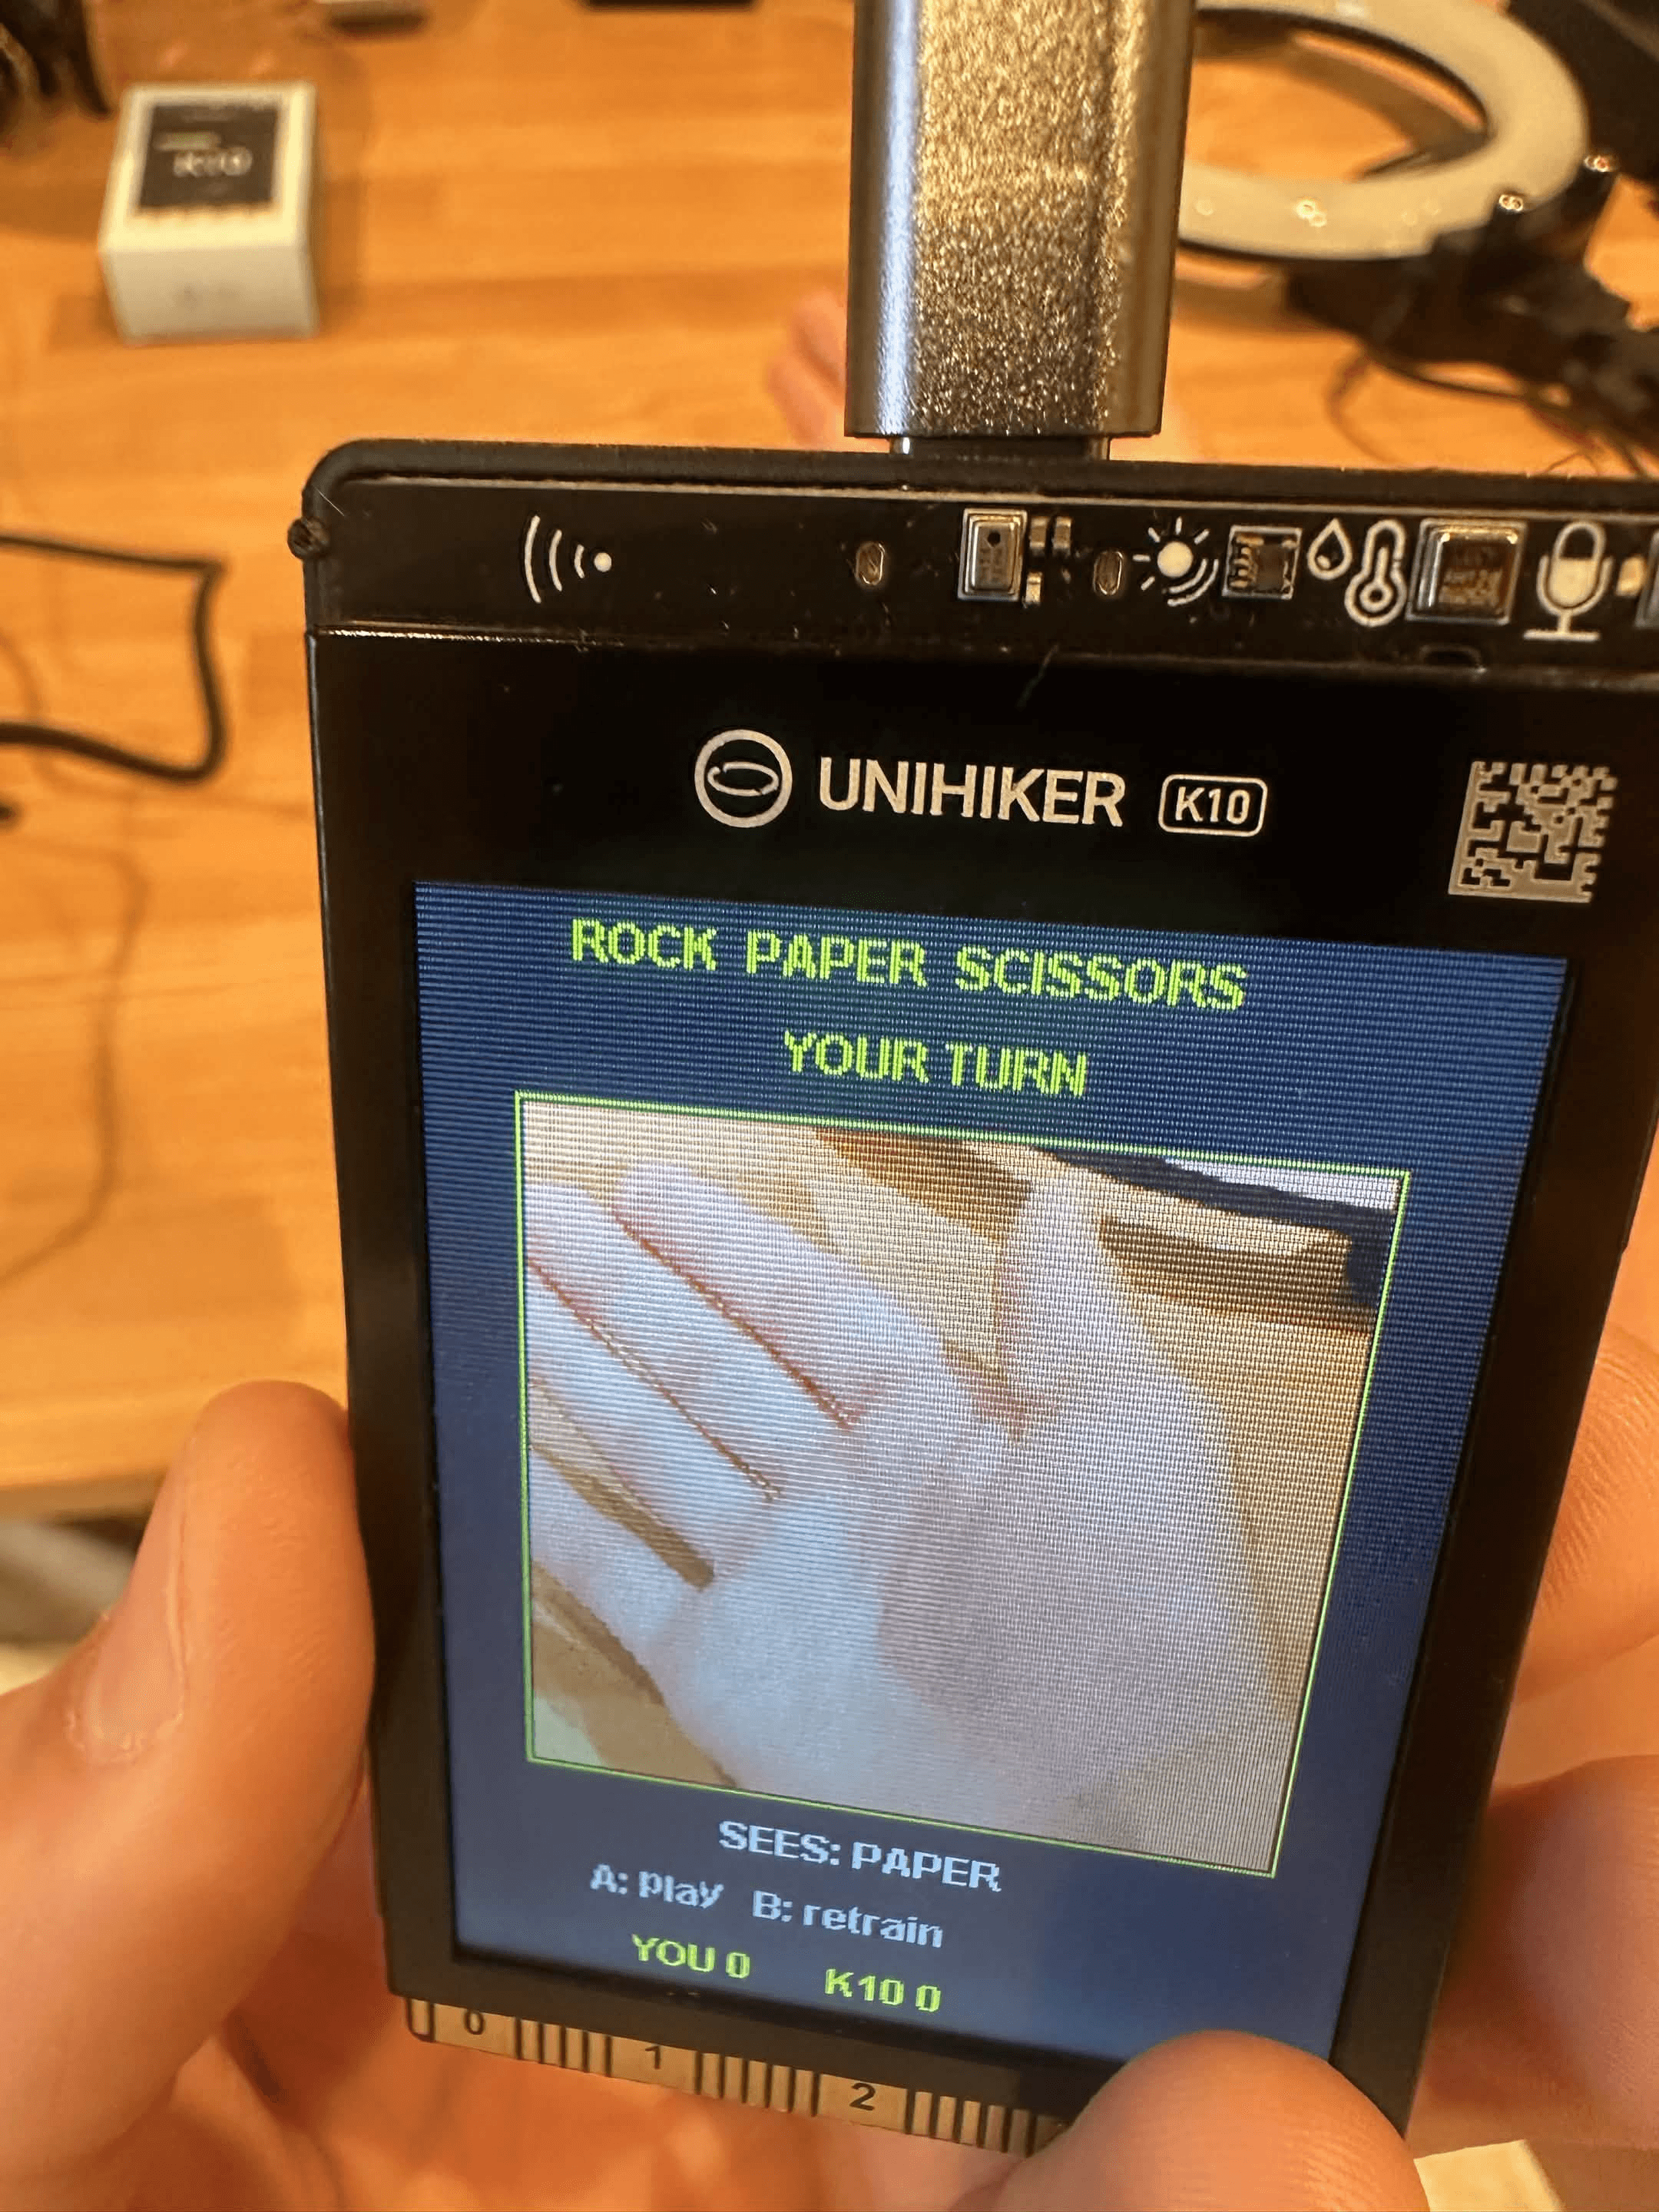
My rock paper scissors game is a good example. The camera tries to recognize the player's hand, the program chooses its own move and the screen announces the winner. You could build the game with a normal ESP32, but you would have to add a camera, screen and controls first. On the K10, everything happens on one small board.
I also tested an assistant that reacted to the wake word “Jarvis.” Recognized commands could change the screen or trigger another function. The synthesized voice is basic compared with a modern cloud assistant, so I preferred using short sounds, recorded audio and visual feedback.
There is an important difference between local recognition and cloud AI. The K10 can handle selected camera and voice tasks by itself, but it is not running a ChatGPT-sized language model on the ESP32-S3. Projects involving DeepSeek or more advanced chatbots use the board as the physical interface while an online service does the heavy processing.
The other sensors give you even more options. Temperature, humidity and light readings can power a simple room monitor, while the accelerometer works for movement, tilt controls and games. I used the microphone as an audio meter in my TikTok filming assistant so I could quickly see whether I was speaking too quietly or the room was getting too loud.
A Platform That Encourages New Ideas
One project kept giving me ideas for the next. Once I had live data on the screen, I wanted the K10 to talk to my PC. After using the camera for a game, a motion alarm suddenly seemed possible. The same two buttons could adjust an alarm, navigate a stream deck or move through filming prompts.
That is what separates the K10 from a cheaper bare board for me. A blinking LED may teach the basics, but it is not especially exciting to show someone. The K10 gives beginners a more rewarding first result while still leaving enough room to build something personal.
Here are the six projects I built:
Live TikTok Follower Counter
Rock Paper Scissors With Camera
Smart Alarm Clock
PC Temperature Monitor
Setup Stream Deck
Smart TikTok Filming Assistant
Six Projects I Built With the UNIHIKER K10
Specifications only tell you what is on the board, so I wanted to see how many genuinely different things I could make with it. The six projects below tested the camera, AI, Wi-Fi, custom interfaces, time synchronization, PC communication, buttons, sound and RGB lights. They also exposed problems I never would have found during a quick unboxing.
1. Live TikTok Follower Counter
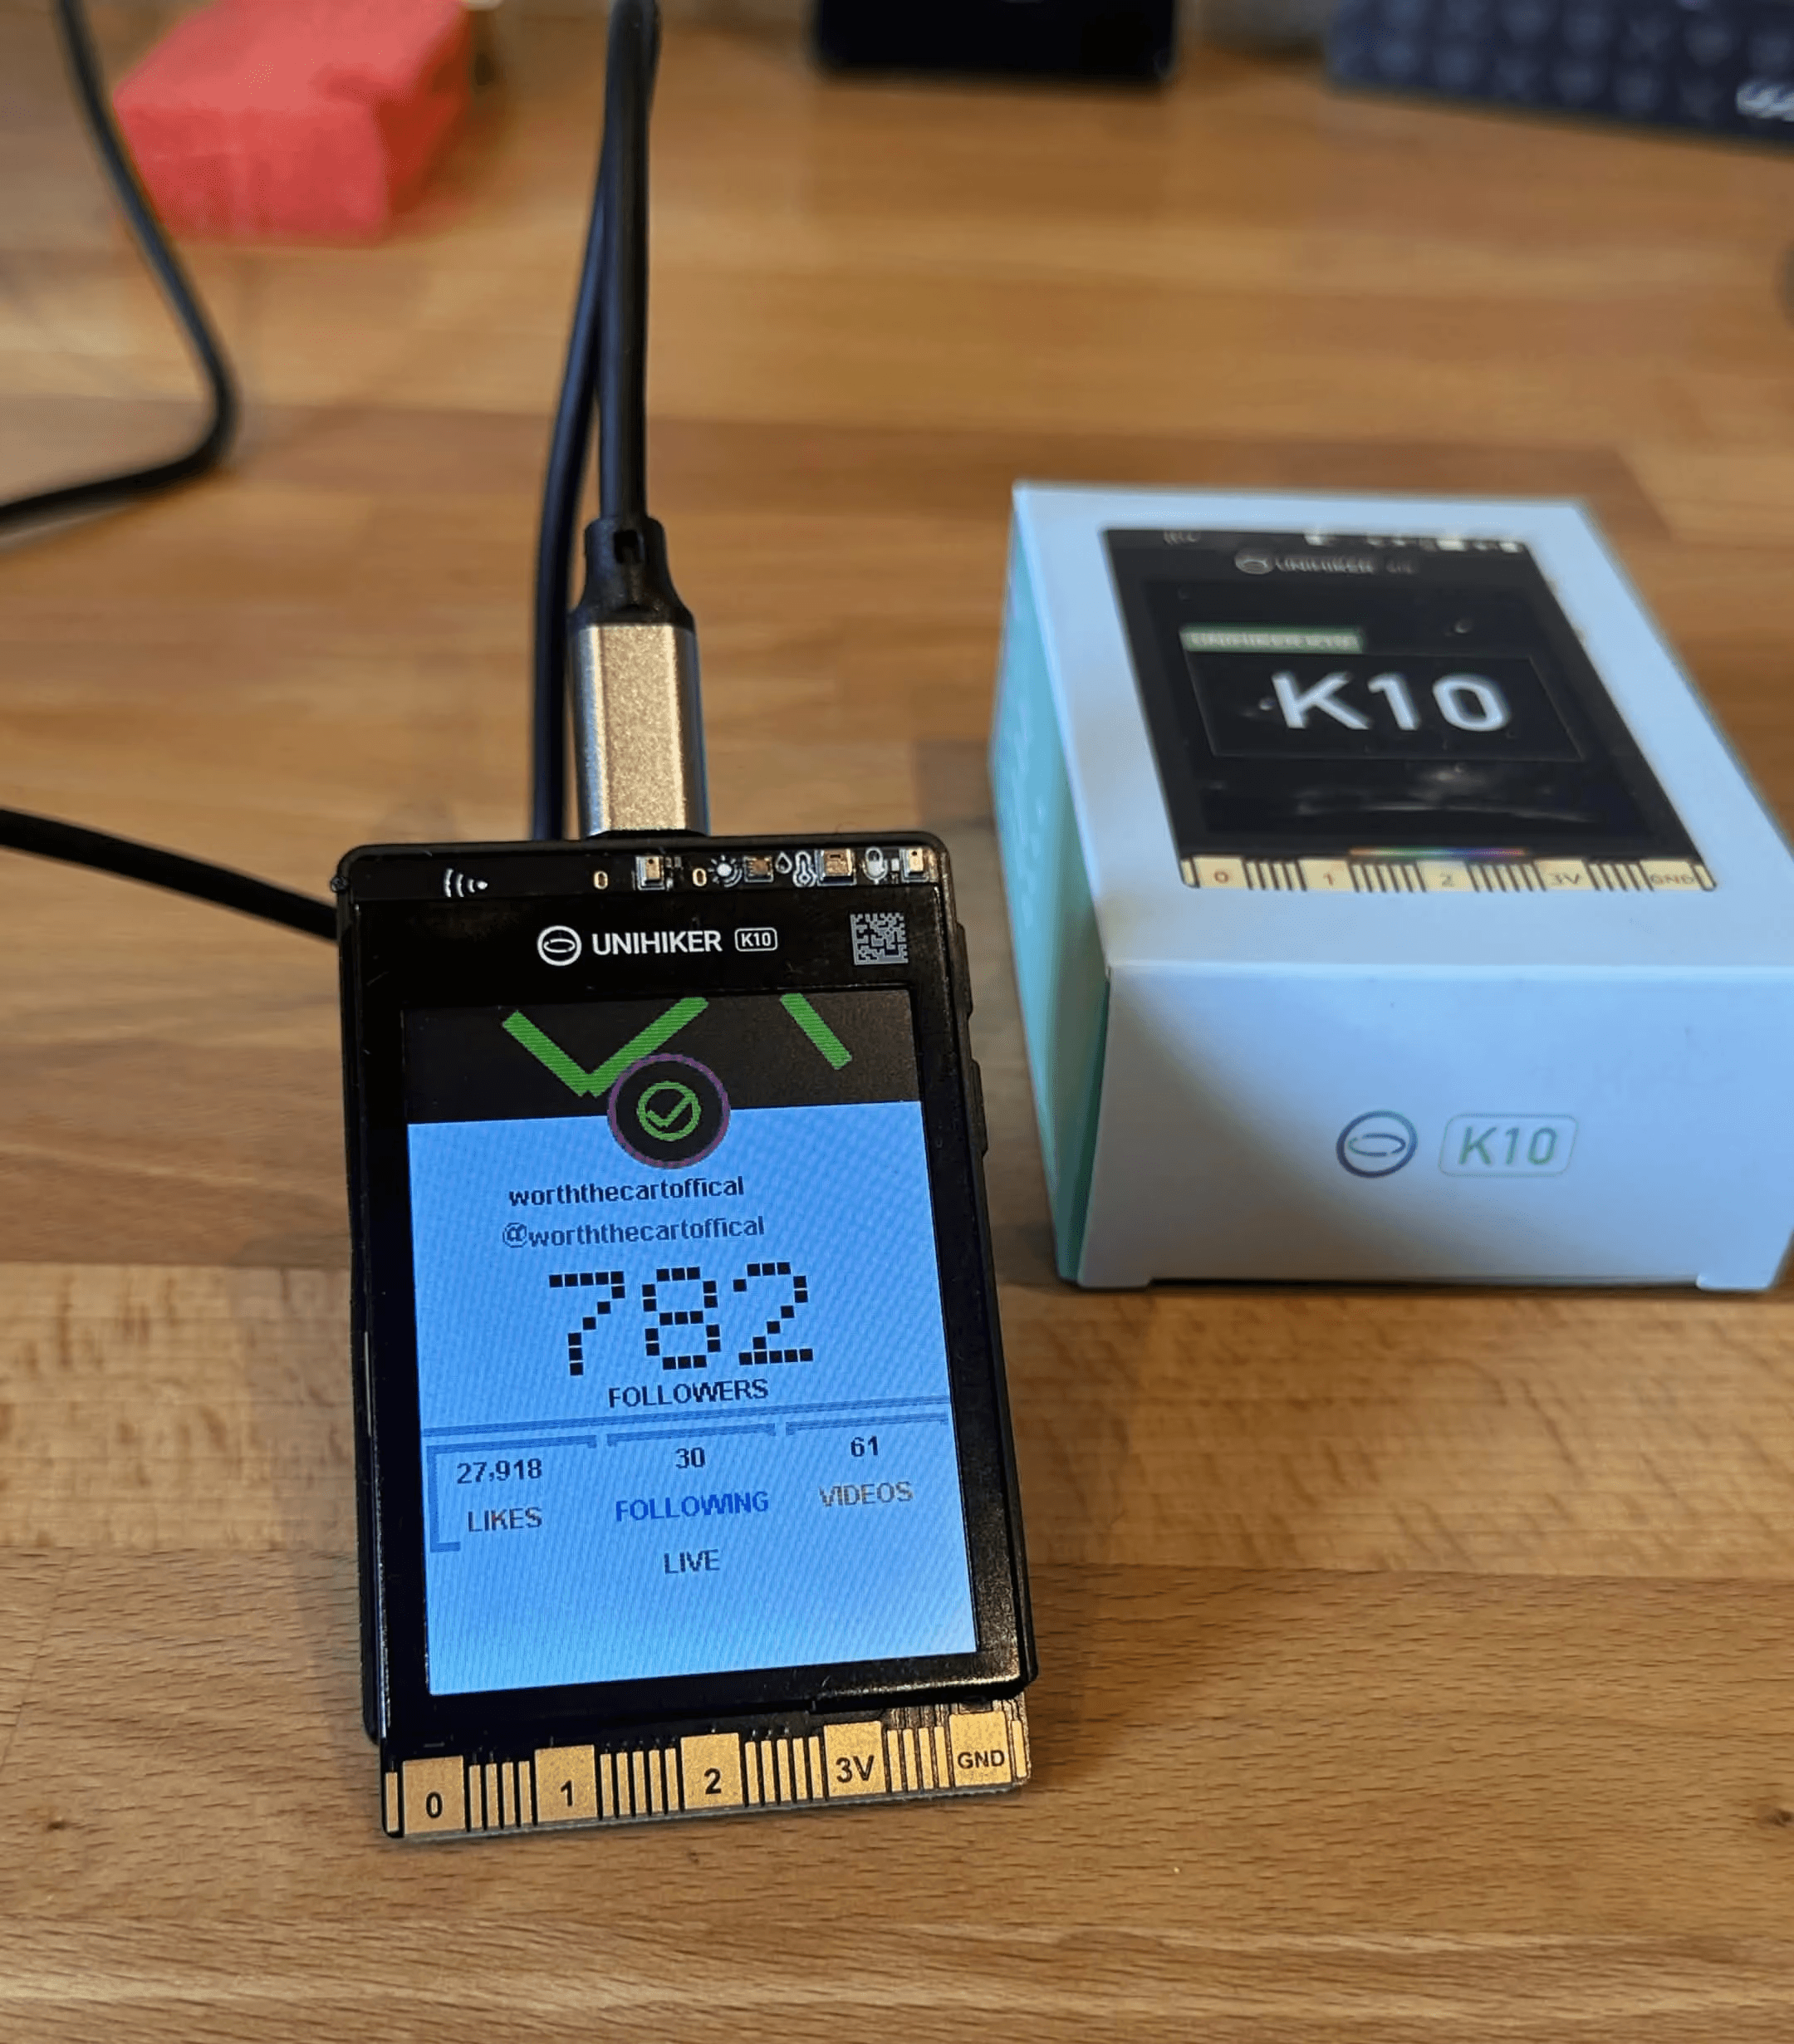
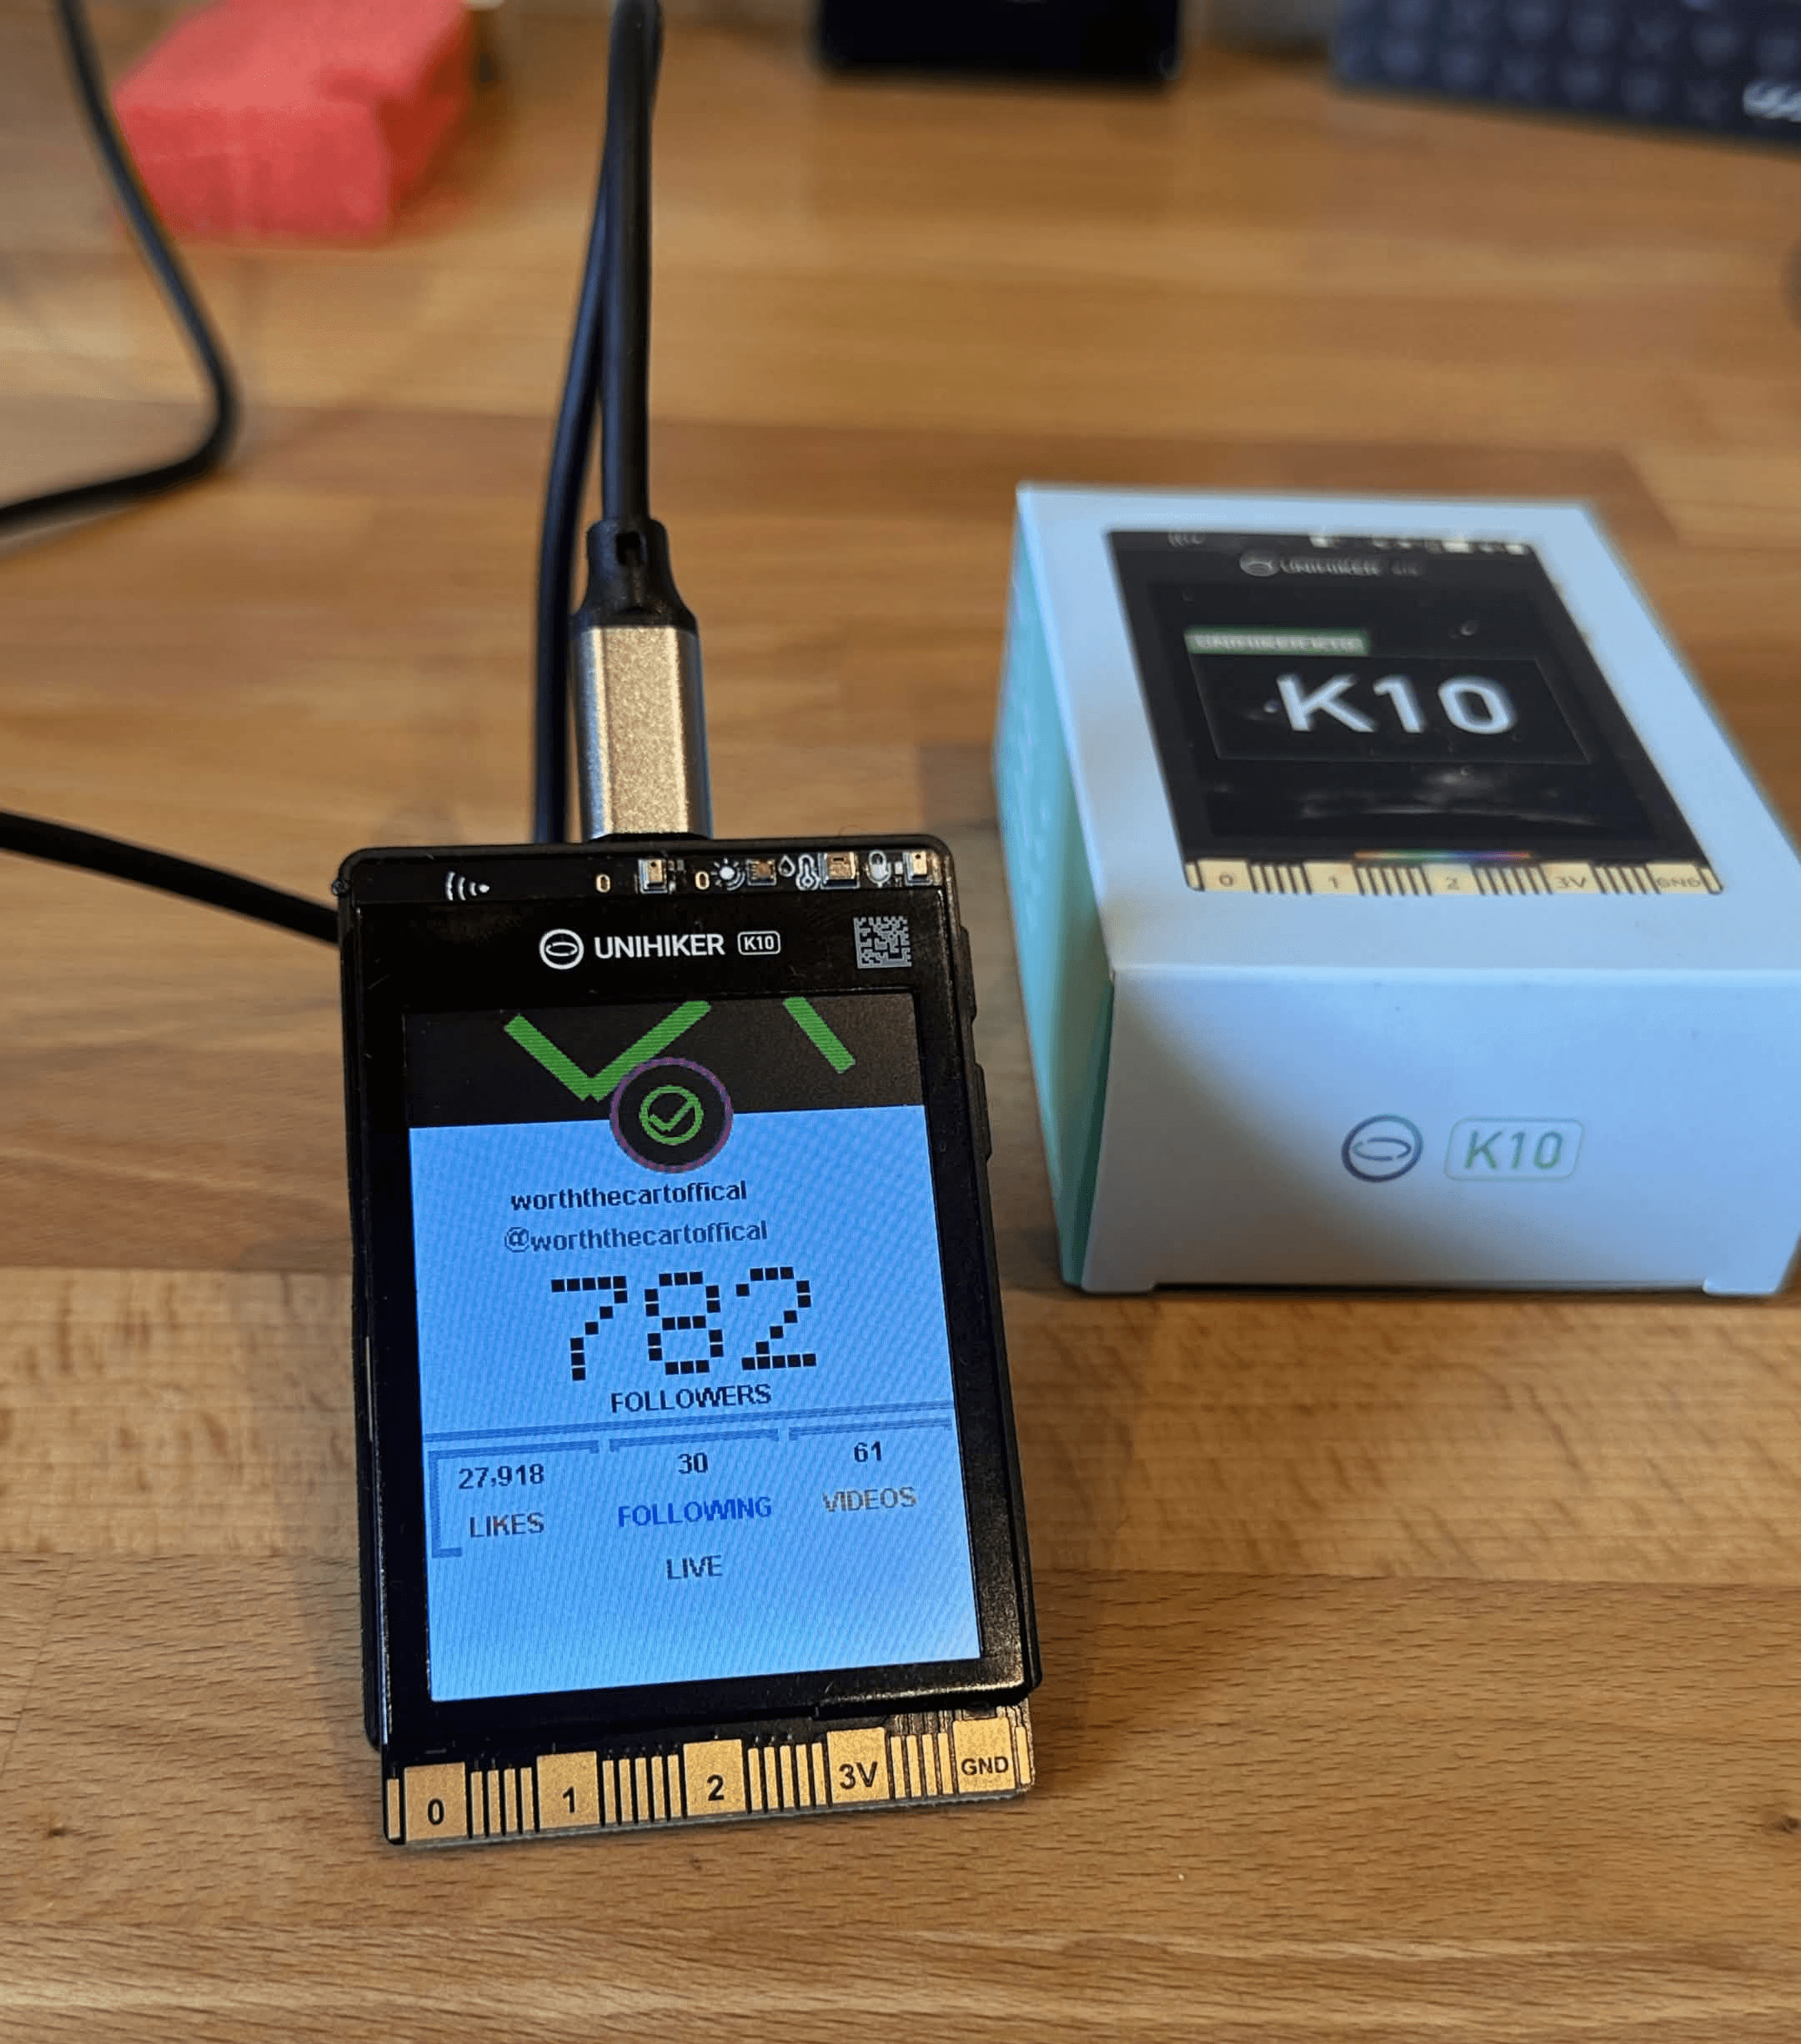
My first project was a live follower counter for @worththecartoffical. The K10 connects to Wi-Fi, retrieves the latest account data and puts the follower count in the middle of the screen. I based the design on Livecounts, using a dark header, lime-green details and smaller cards for likes, following and published videos. It now sits beside my monitor, so I can check the number without opening a browser.
I wanted it to look recognizable rather than like a default programming example. The follower total receives most of the screen, while the smaller statistics are there when I look more closely. The colors also match WorthTheCart better than a plain white interface would. Designing around a specific account made the K10 feel like my device instead of a generic development board.
The difficult part was not displaying a number. The code had to request the data, find the values I wanted and update only the parts of the screen that changed. I also added messages for connecting, updating and errors. Otherwise, a failed request would leave a frozen number on the screen and I would have no idea what happened.
I did not want the entire interface to flash every time the count refreshed, so the static parts of the design remain in place and only the live values are redrawn. The refresh rate also needs some restraint. Requesting the same number continuously would create unnecessary traffic and could make the service more likely to block the project. A follower counter does not need updates every second to be useful on a desk.
There is one downside: the K10 is not a web browser. It cannot simply open the Livecounts page or display an iframe. The program needs data it can read, and a change to the service or its API could break the counter later. Even with that risk, this was one of my favorite builds because it turned the K10 into something I genuinely wanted to leave on my desk.
2. Rock Paper Scissors With the Camera
Rock paper scissors was the best project for showing the K10's AI features. Instead of pressing a button, you hold your hand in front of the camera. The board tries to recognize rock, paper or scissors, chooses its own move and shows the winner on the screen. It is easy to understand even if you know nothing about microcontrollers.
The game starts by telling the player where to place their hand. Once the gesture is detected, the program saves the result, creates an opponent move and compares the two choices using normal game rules. The AI is only responsible for understanding the camera input; everything after that is ordinary programming. I like that separation because it makes the project easier to explain.
Several parts of the K10 work together here. The camera captures the hand, the model classifies it, normal game logic picks the winner and the display gives instructions and shows the result. I could also use sound or the RGB lights for a win or when the gesture needed to be shown again.
The screen is important because recognition needs feedback. If the model is unsure, the player should know whether to move closer, hold still or try again. Without that feedback, a camera project can feel broken even when the model is simply waiting for a clearer image. Adding instructions made the game much easier for another person to use without me explaining every step.
Recognition was not perfect. I got better results with strong lighting, a simple background and my hand at a consistent distance. Hidden fingers and motion blur caused mistakes. That honestly made the project more interesting because it showed how much the environment affects a small vision model. For a video or classroom demonstration, this is probably the clearest way to show that the camera can be a real input device rather than just take photos.
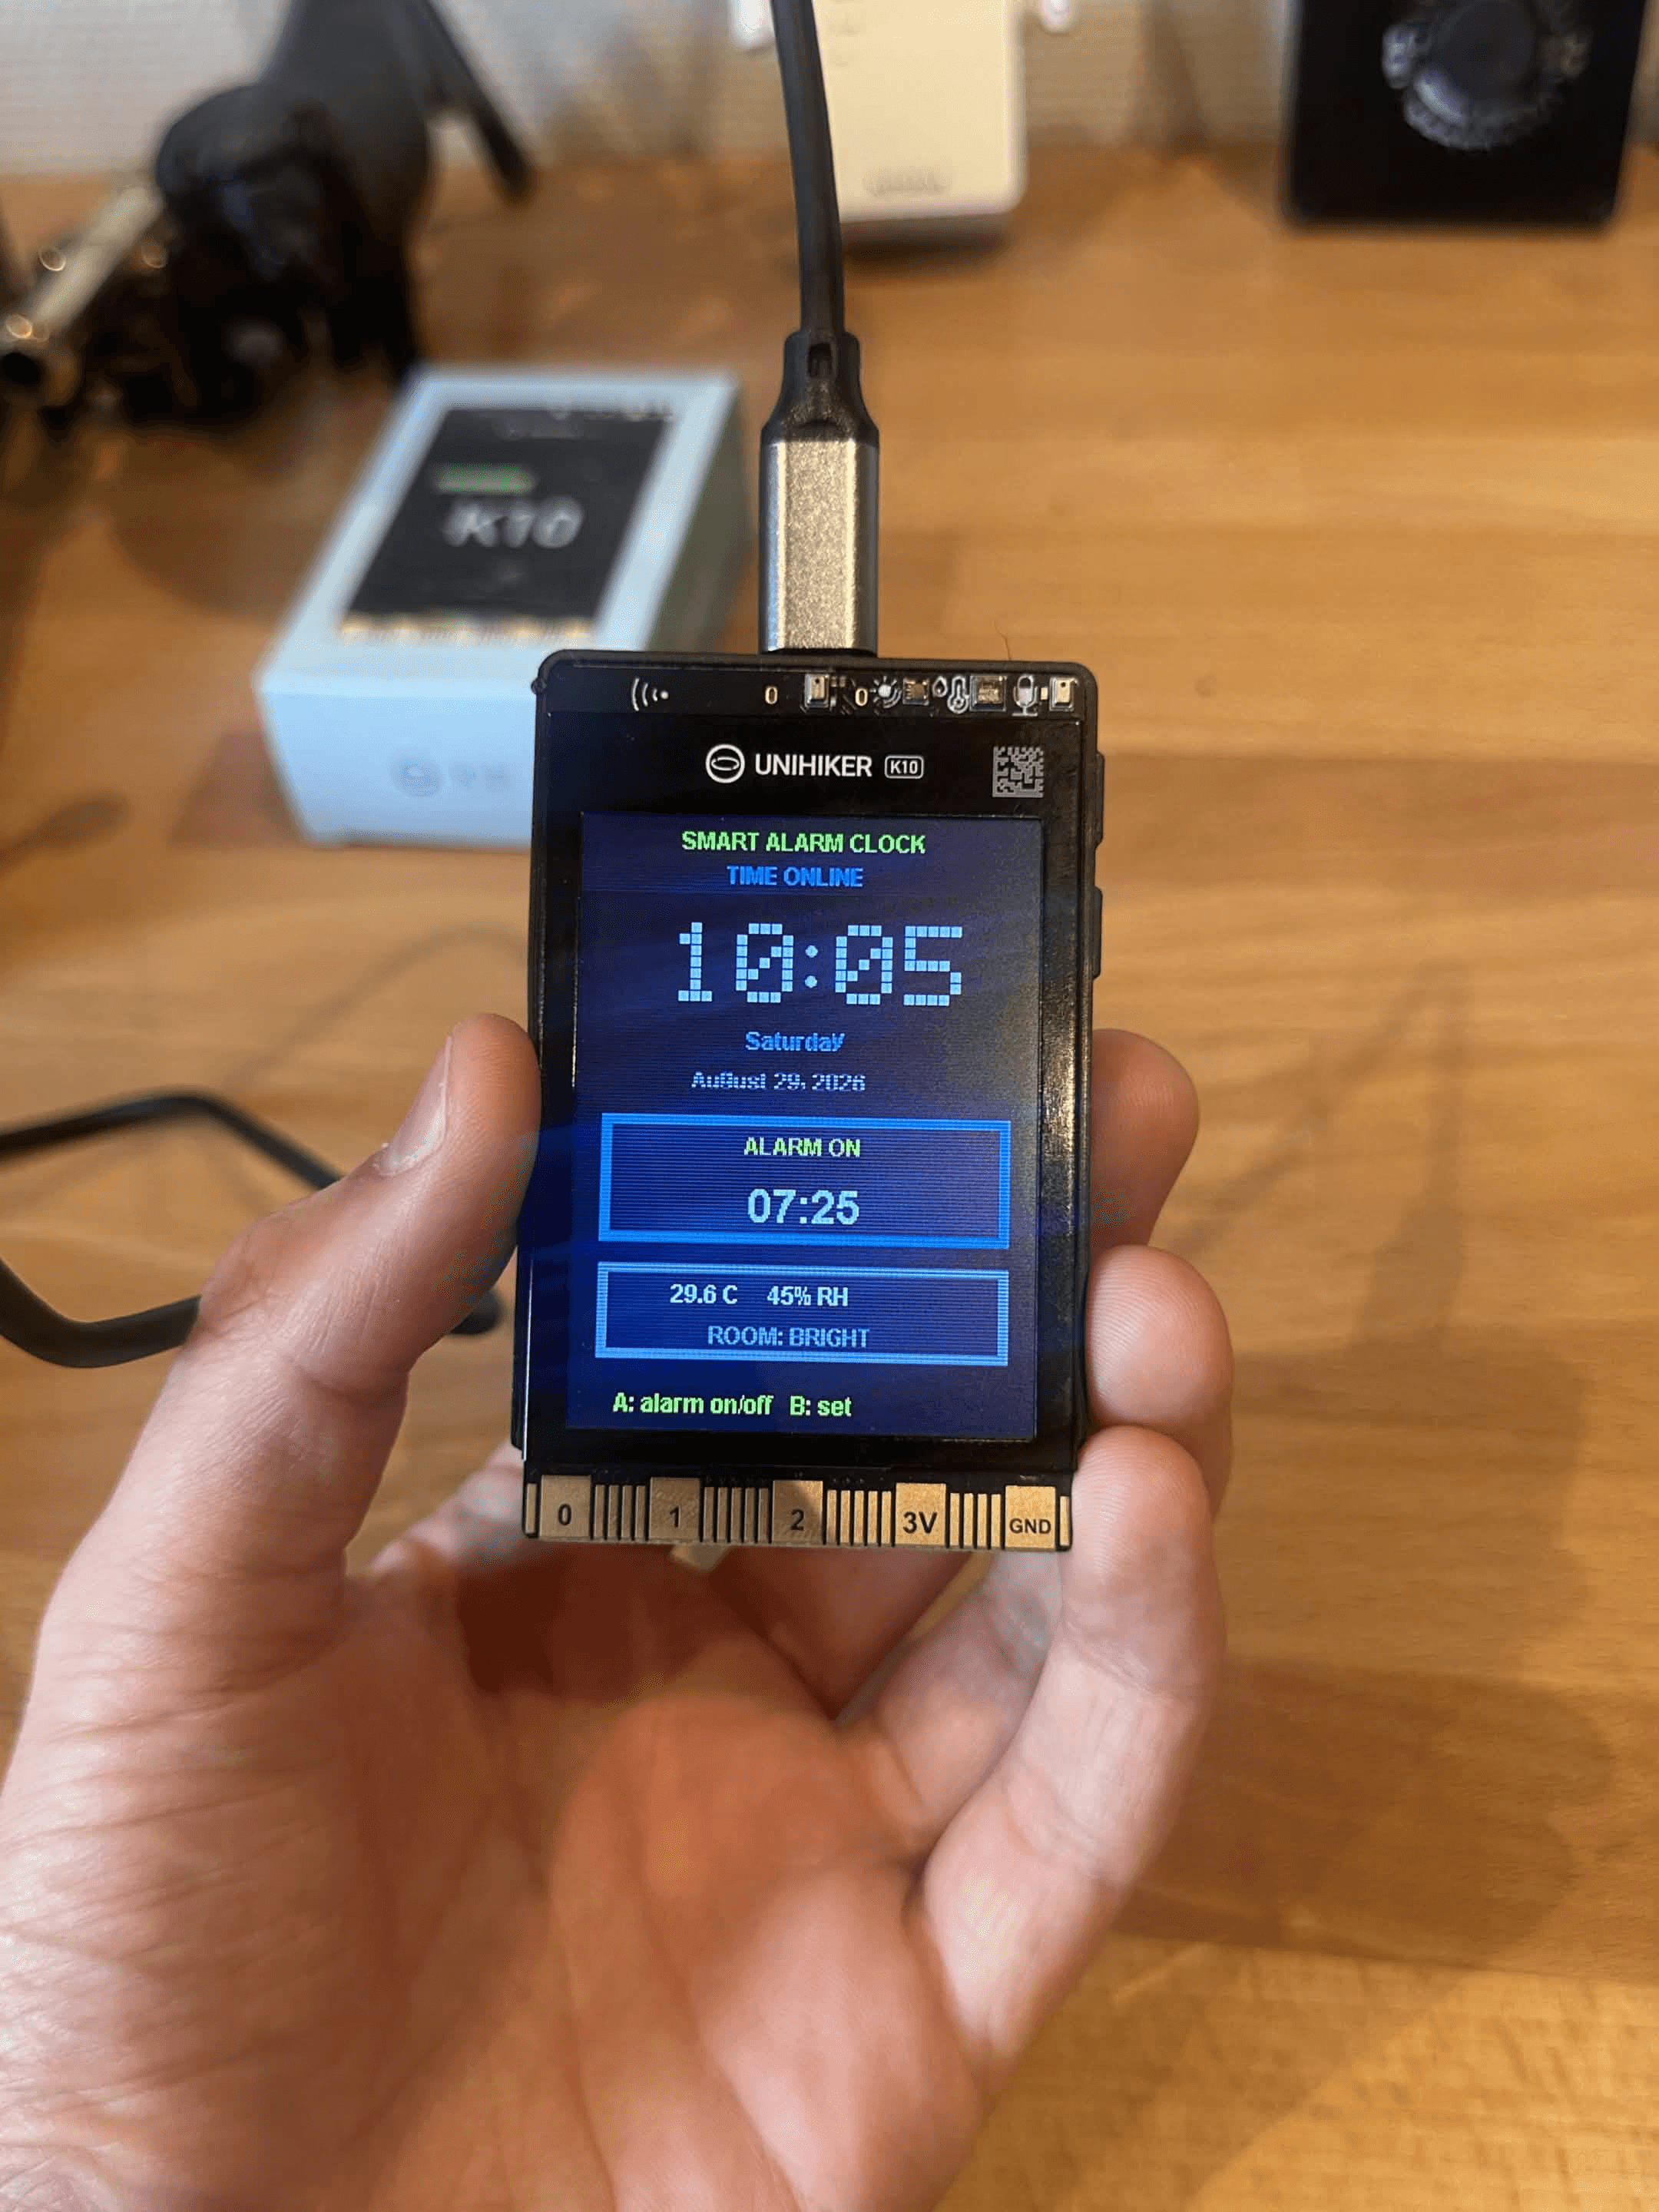
3. Smart Alarm Clock
The alarm clock is much simpler than the AI projects, but it turned the K10 into a genuinely useful desk device. The screen shows the current time, the two buttons adjust the alarm, and the speaker and RGB lights go off when it is time to wake up. No computer is needed once the project has been uploaded.
I kept the interface intentionally simple. The current time is large enough to read from across the desk, while the alarm setting is smaller and clearly separated. The buttons make adjustments directly on the device, which is important because reconnecting it to a computer every time would make the clock pointless as an everyday object.
Getting the correct time was more annoying than I expected. The K10 synchronizes with an online time server, but my first time-zone setting was wrong and moved the clock several hours. I had to apply the Norwegian time zone and daylight-saving rules correctly instead of just hard-coding an offset.
Using network time also means the clock can recover correctly after losing power. It does not need me to enter the current time again after every restart. Wi-Fi is required for that synchronization, although the clock can continue counting once it has the correct time. This is a small feature, but it is what separates a useful clock from a display that only works during one demonstration.
The first version also flickered because I kept clearing and redrawing the entire screen. Updating it only when the minute changed fixed the problem and instantly made the clock feel more polished. This was a good reminder that getting the code to run is only half the job; small details such as refresh behavior and button handling decide whether the result is pleasant to use.
4. PC Temperature Monitor
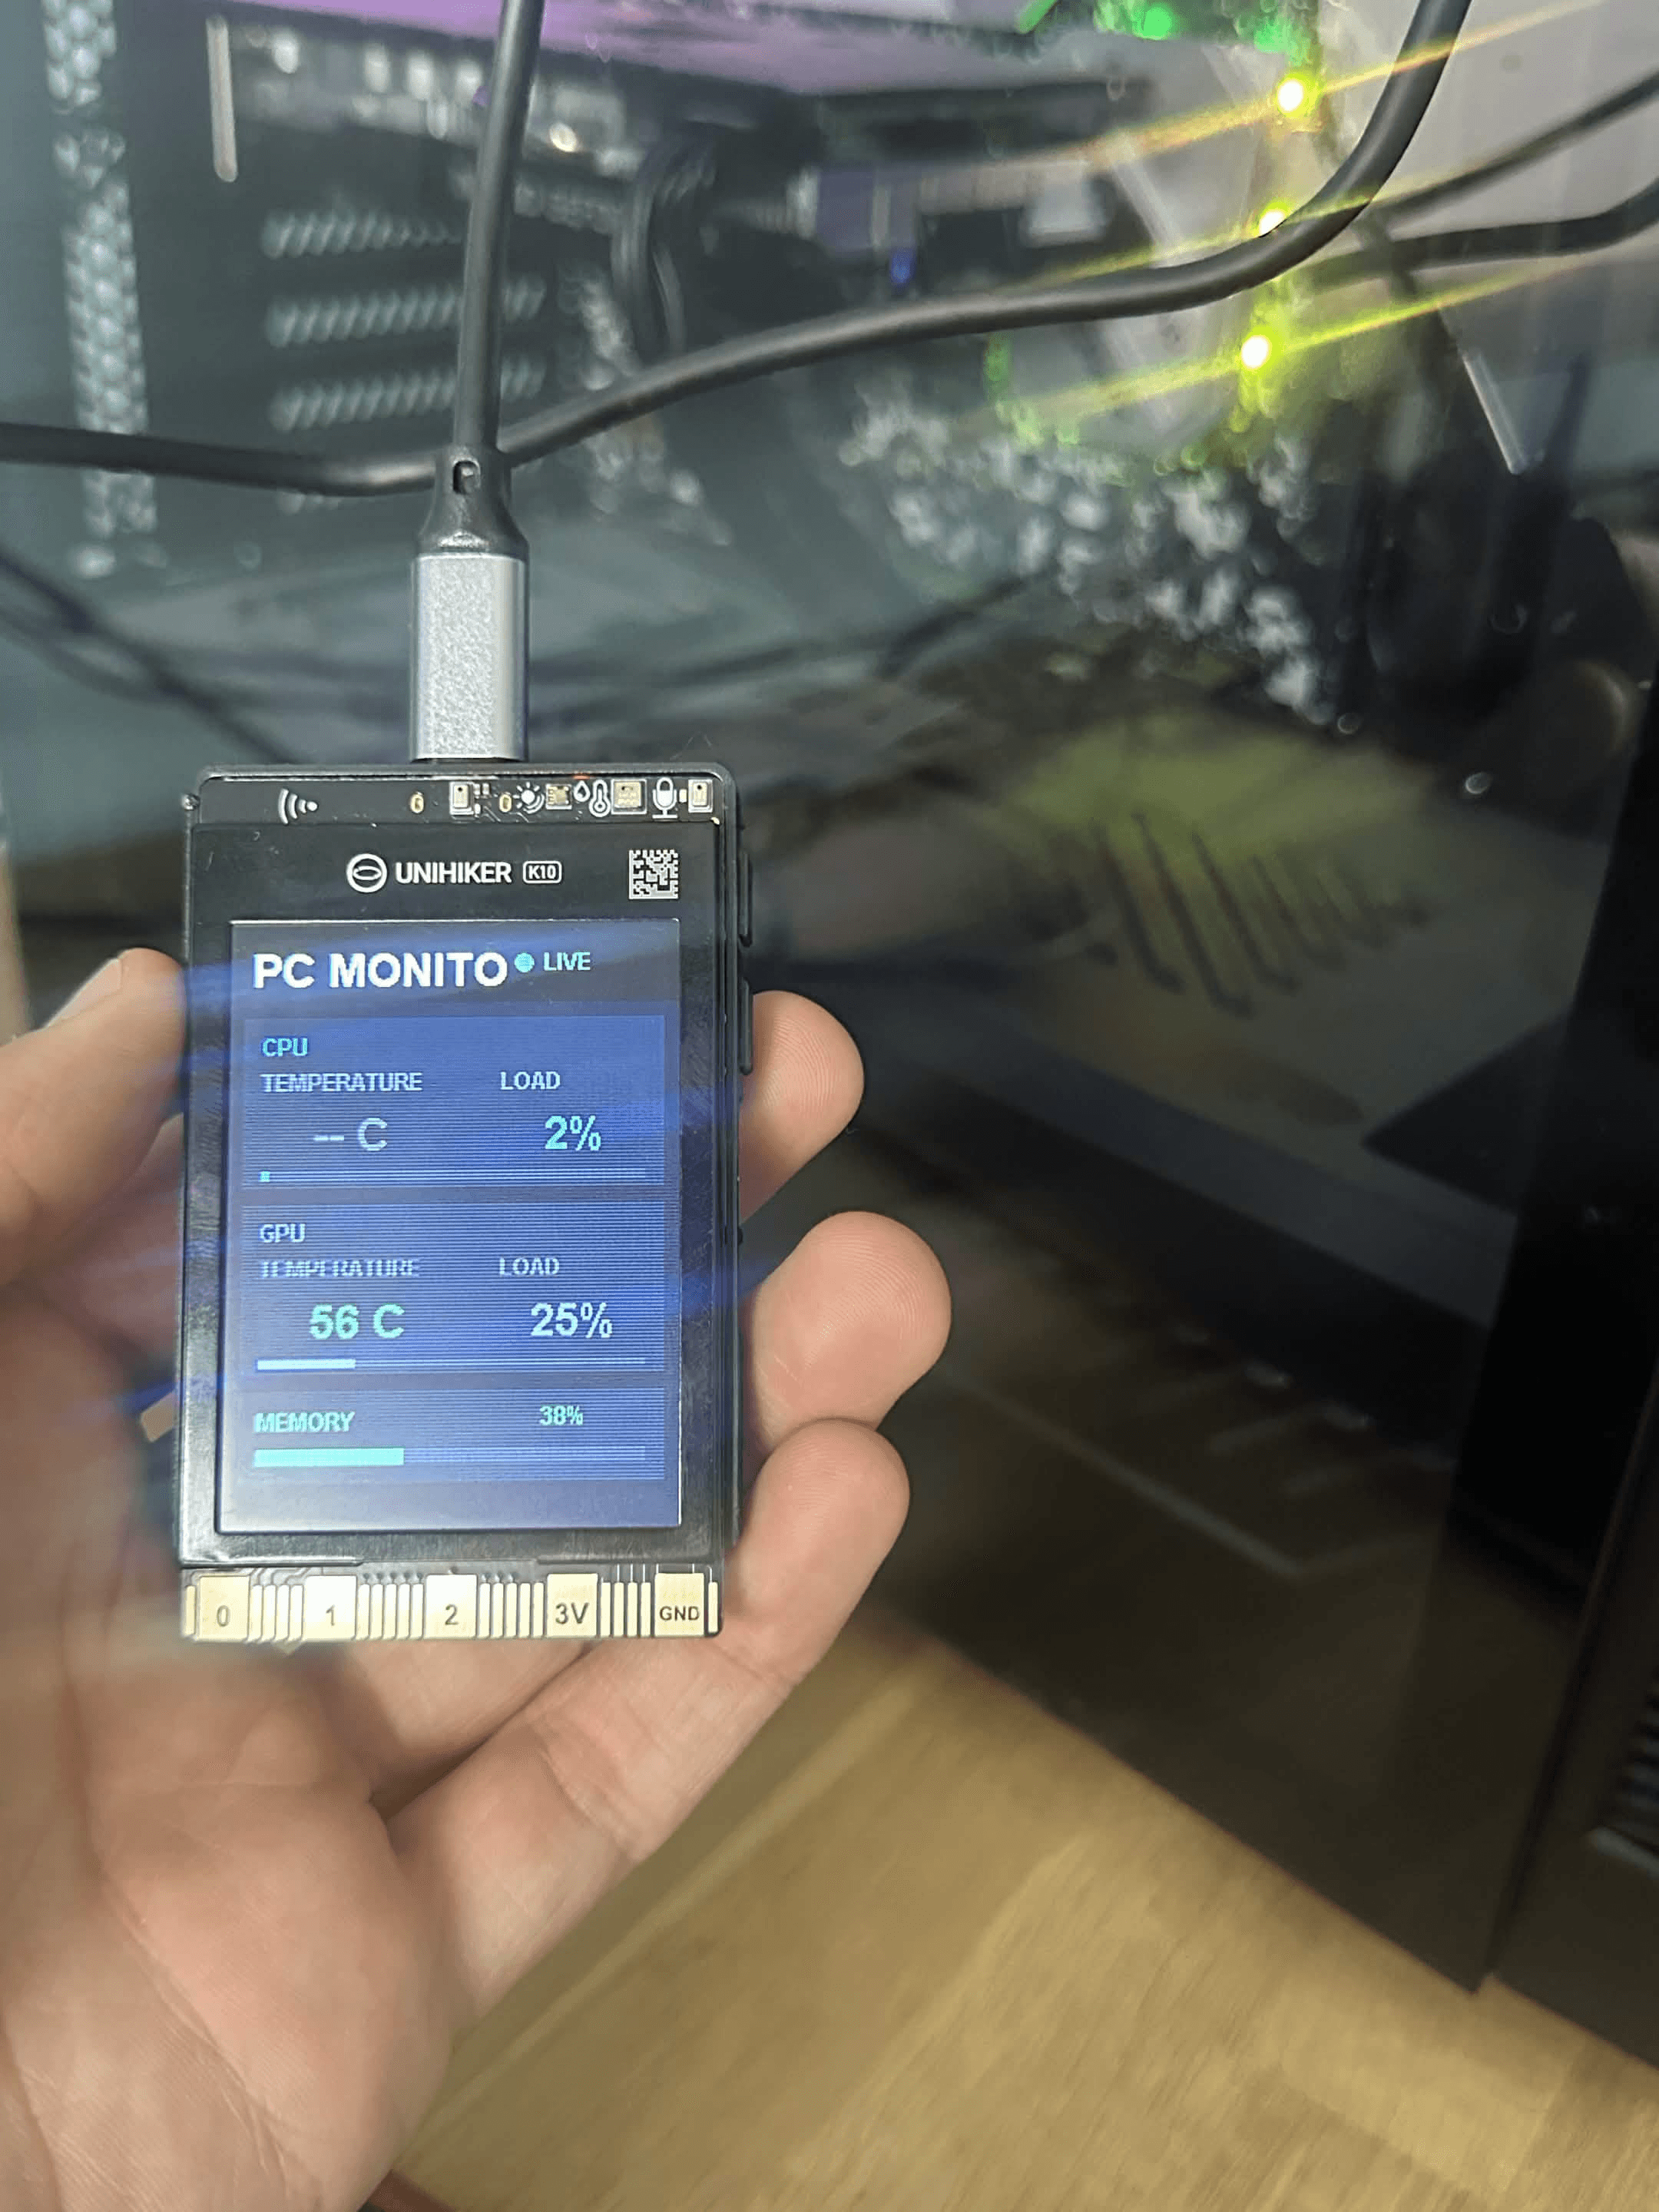
The PC monitor gave my K10 a permanent place in the setup. I used LibreHardwareMonitor on the PC and made the K10 request its data over my local Wi-Fi network. My dashboard shows CPU temperature and load, GPU temperature and load, and memory usage without covering anything on the main monitor. The colors also make high temperatures easy to notice at a glance.
This is the kind of information I normally check in a monitoring window, but leaving that software open takes up valuable space. The K10 moves the same essential numbers onto a separate screen. I do not need every voltage, clock speed and fan sensor visible at once. CPU, GPU and memory data are enough to tell me whether the PC is behaving normally while gaming or testing hardware.
This was one of the harder projects to troubleshoot. Both devices had to be on the same network, the monitoring server had to stay open and Windows Firewall had to allow the connection. At one point, the page worked on the PC but not on the K10 because the service was only available to the local machine. Testing the address from my phone helped me realize the network was the problem, not the K10 interface.
That troubleshooting order saved time. If the monitoring address cannot open on another device, changing fonts or request code on the K10 will not solve anything. I first confirmed the correct local IP address, then checked which address the service was listening on and finally allowed the connection through the firewall. Only after the phone could reach it did I return to the K10.
Once connected, the board reads the JSON data, finds the sensors I chose and turns the messy hardware list into a clean dashboard. LibreHardwareMonitor still needs to run in the background, so it is not a completely standalone device. I think that is a fair tradeoff for having live PC temperatures on a tiny wireless screen.
The data structure contains far more information than can fit on a 2.8-inch display, so choosing what not to show was part of the project. Large temperature values and short labels worked better than squeezing the full sensor names onto the screen. I also used a reasonable update interval to keep the dashboard responsive without constantly redrawing it or flooding the network with requests.
5. Setup Stream Deck
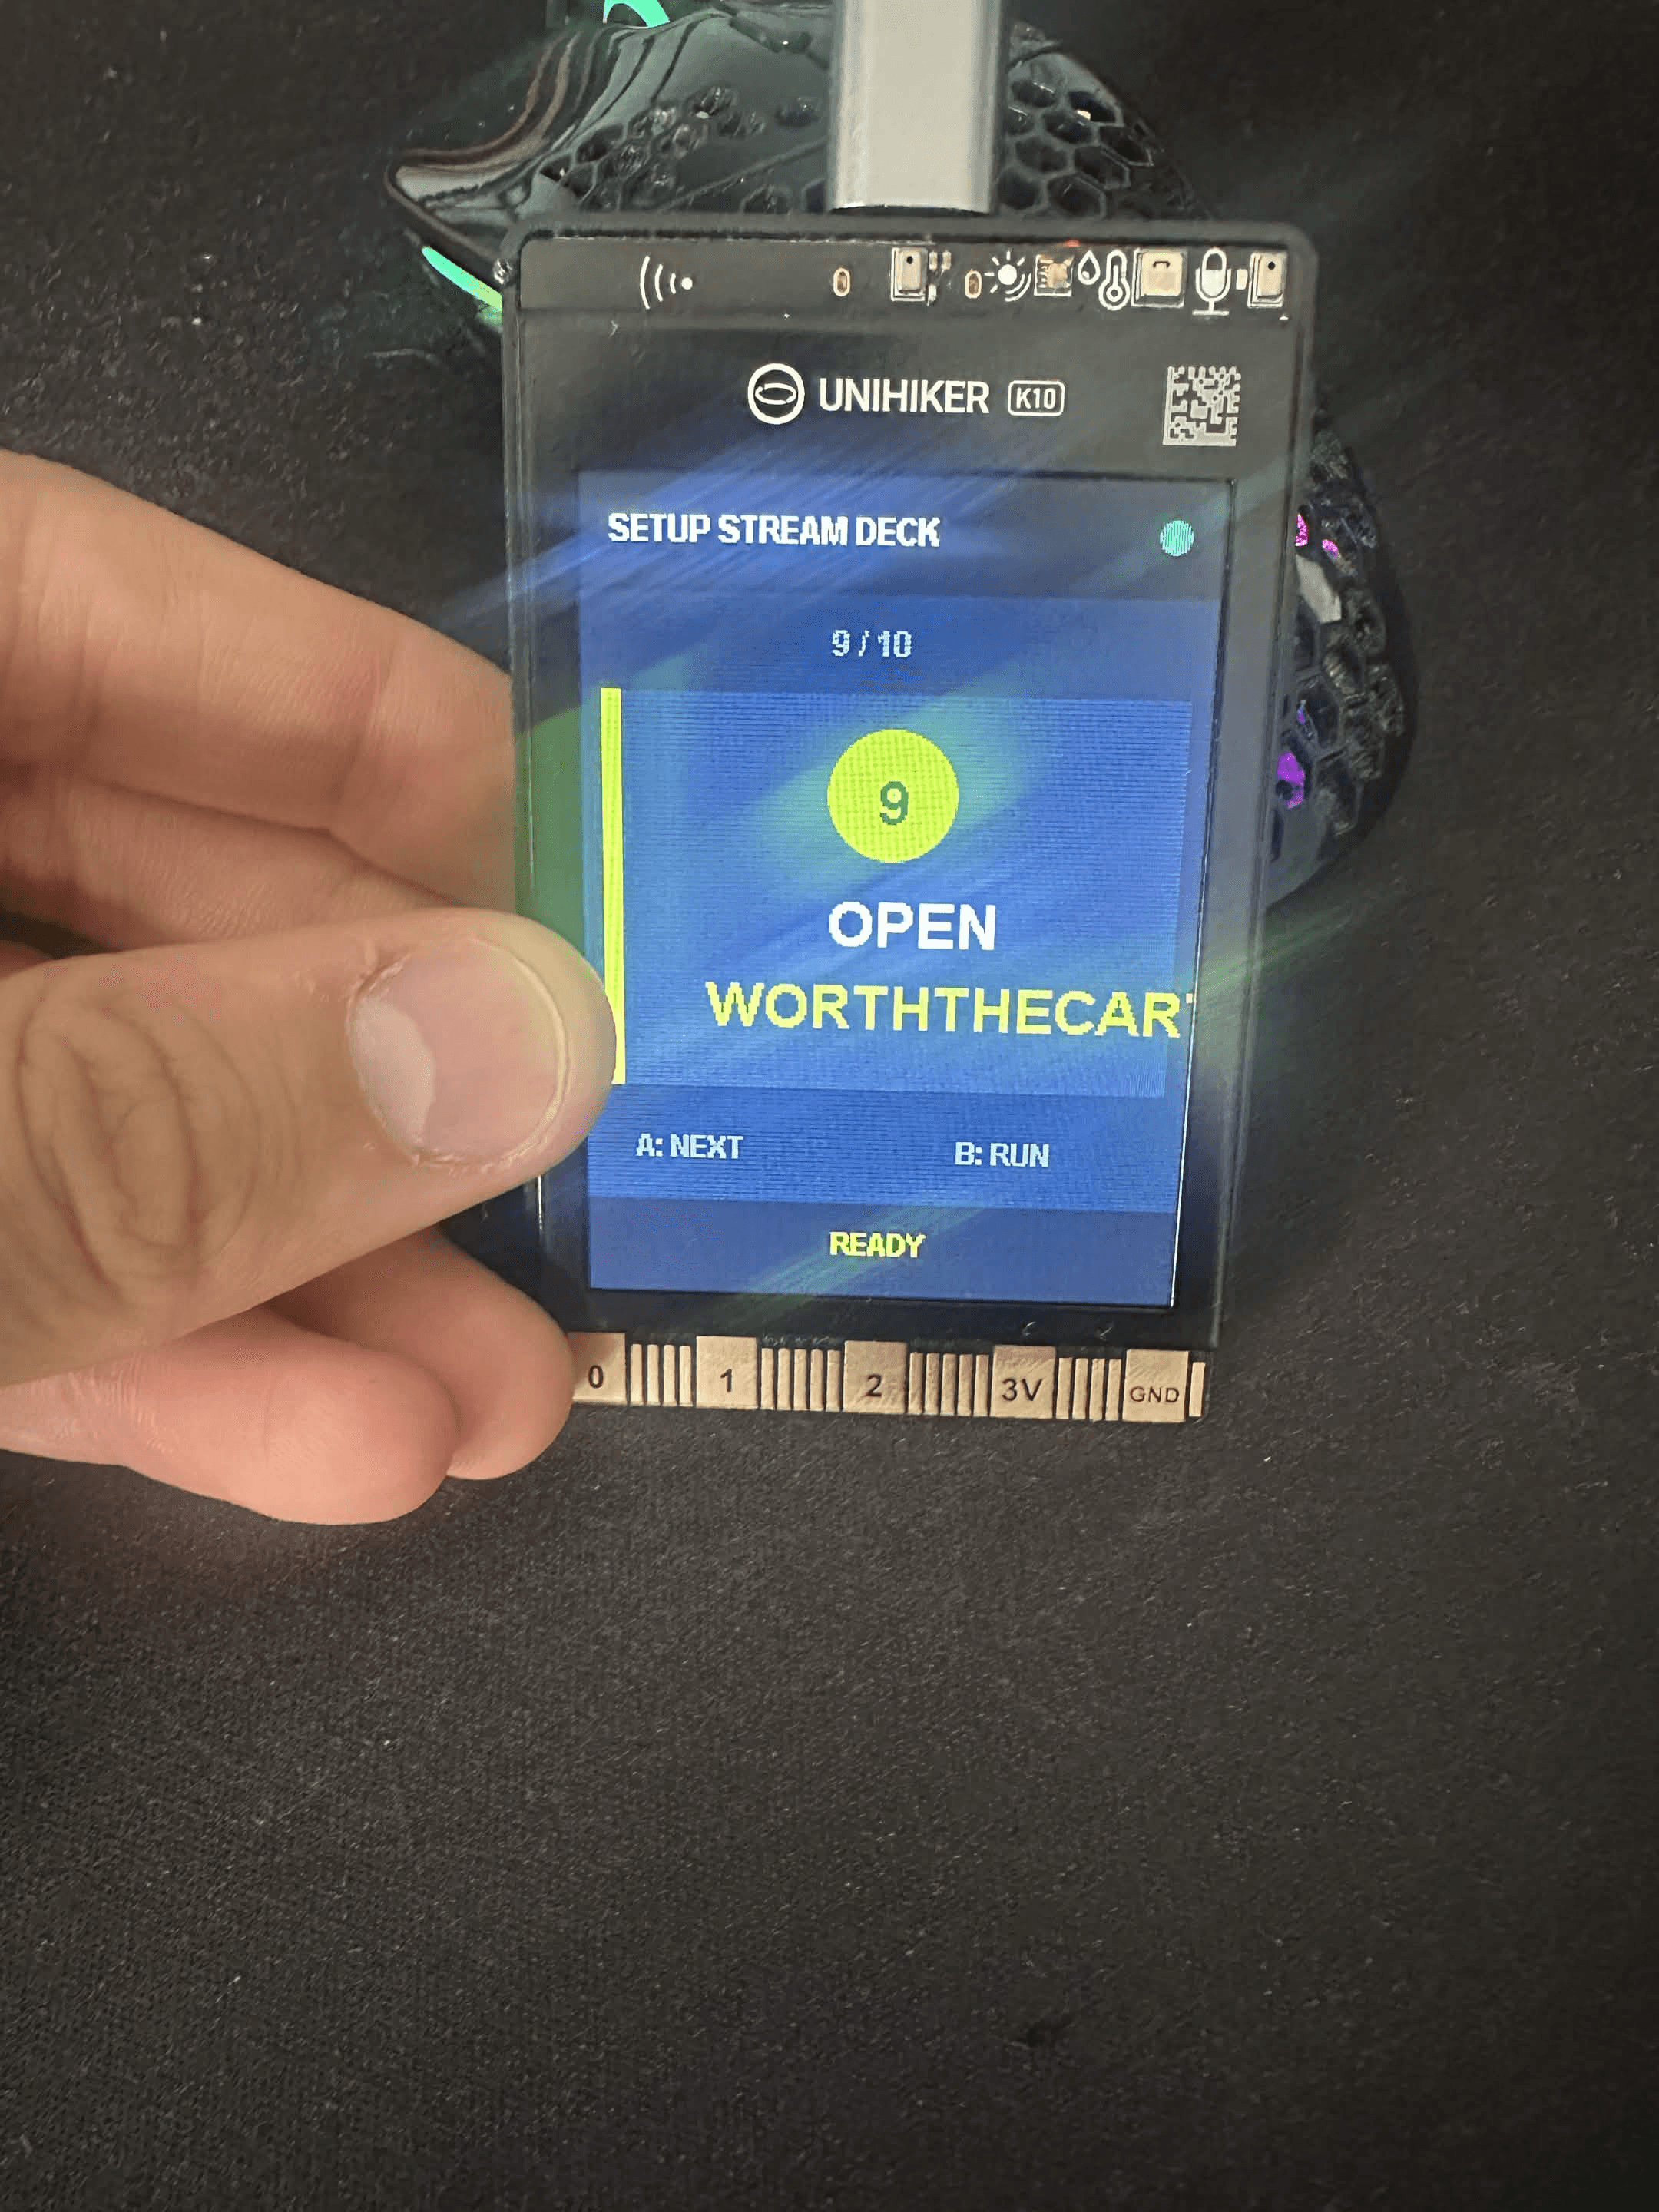
For the stream deck, one button moves through a menu and the other runs the selected command. Mine can control play and pause, volume, mute, next and previous track, and open Spotify, OBS, Discord or the WorthTheCart website. The screen always shows the selected action, so two buttons can control far more than two shortcuts.
A two-button stream deck sounds limited, but the display changes how those buttons can be used. One button acts like navigation, while the other acts like confirmation. I always see the command before sending it, so there is less chance of opening OBS when I meant to pause a song. Short confirmation messages then show that the PC received the request.
The K10 sends each command over Wi-Fi to a small PowerShell server on my PC. The board handles the menu and physical input, while Windows performs the actual action. That makes the whole setup easy to customize. I could replace my shortcuts with editing tools, games, smart-home controls or server commands without changing the K10 itself.
This also keeps the K10 code relatively focused. It does not need to understand how Windows launches an application or changes the system volume. It only sends a known command to the receiver. The PowerShell side translates that command into the correct action, which makes it easier to add or change shortcuts later.
It is not as plug-and-play as buying a USB macro pad. The receiver must be running, the PC's local IP must be correct and the firewall must allow the connection. I would also keep a command server like this inside a trusted home network. What I liked was being able to redesign the menu whenever my setup changed instead of being locked into one layout.
I would not expose the receiver directly to the public internet, especially when it can launch programs or run commands. Inside my own network, it is an interesting experiment and a useful controller. A commercial stream deck will be easier and more polished, but building this one taught me far more about how the interface and PC communication actually work.
6. Smart TikTok Filming Assistant
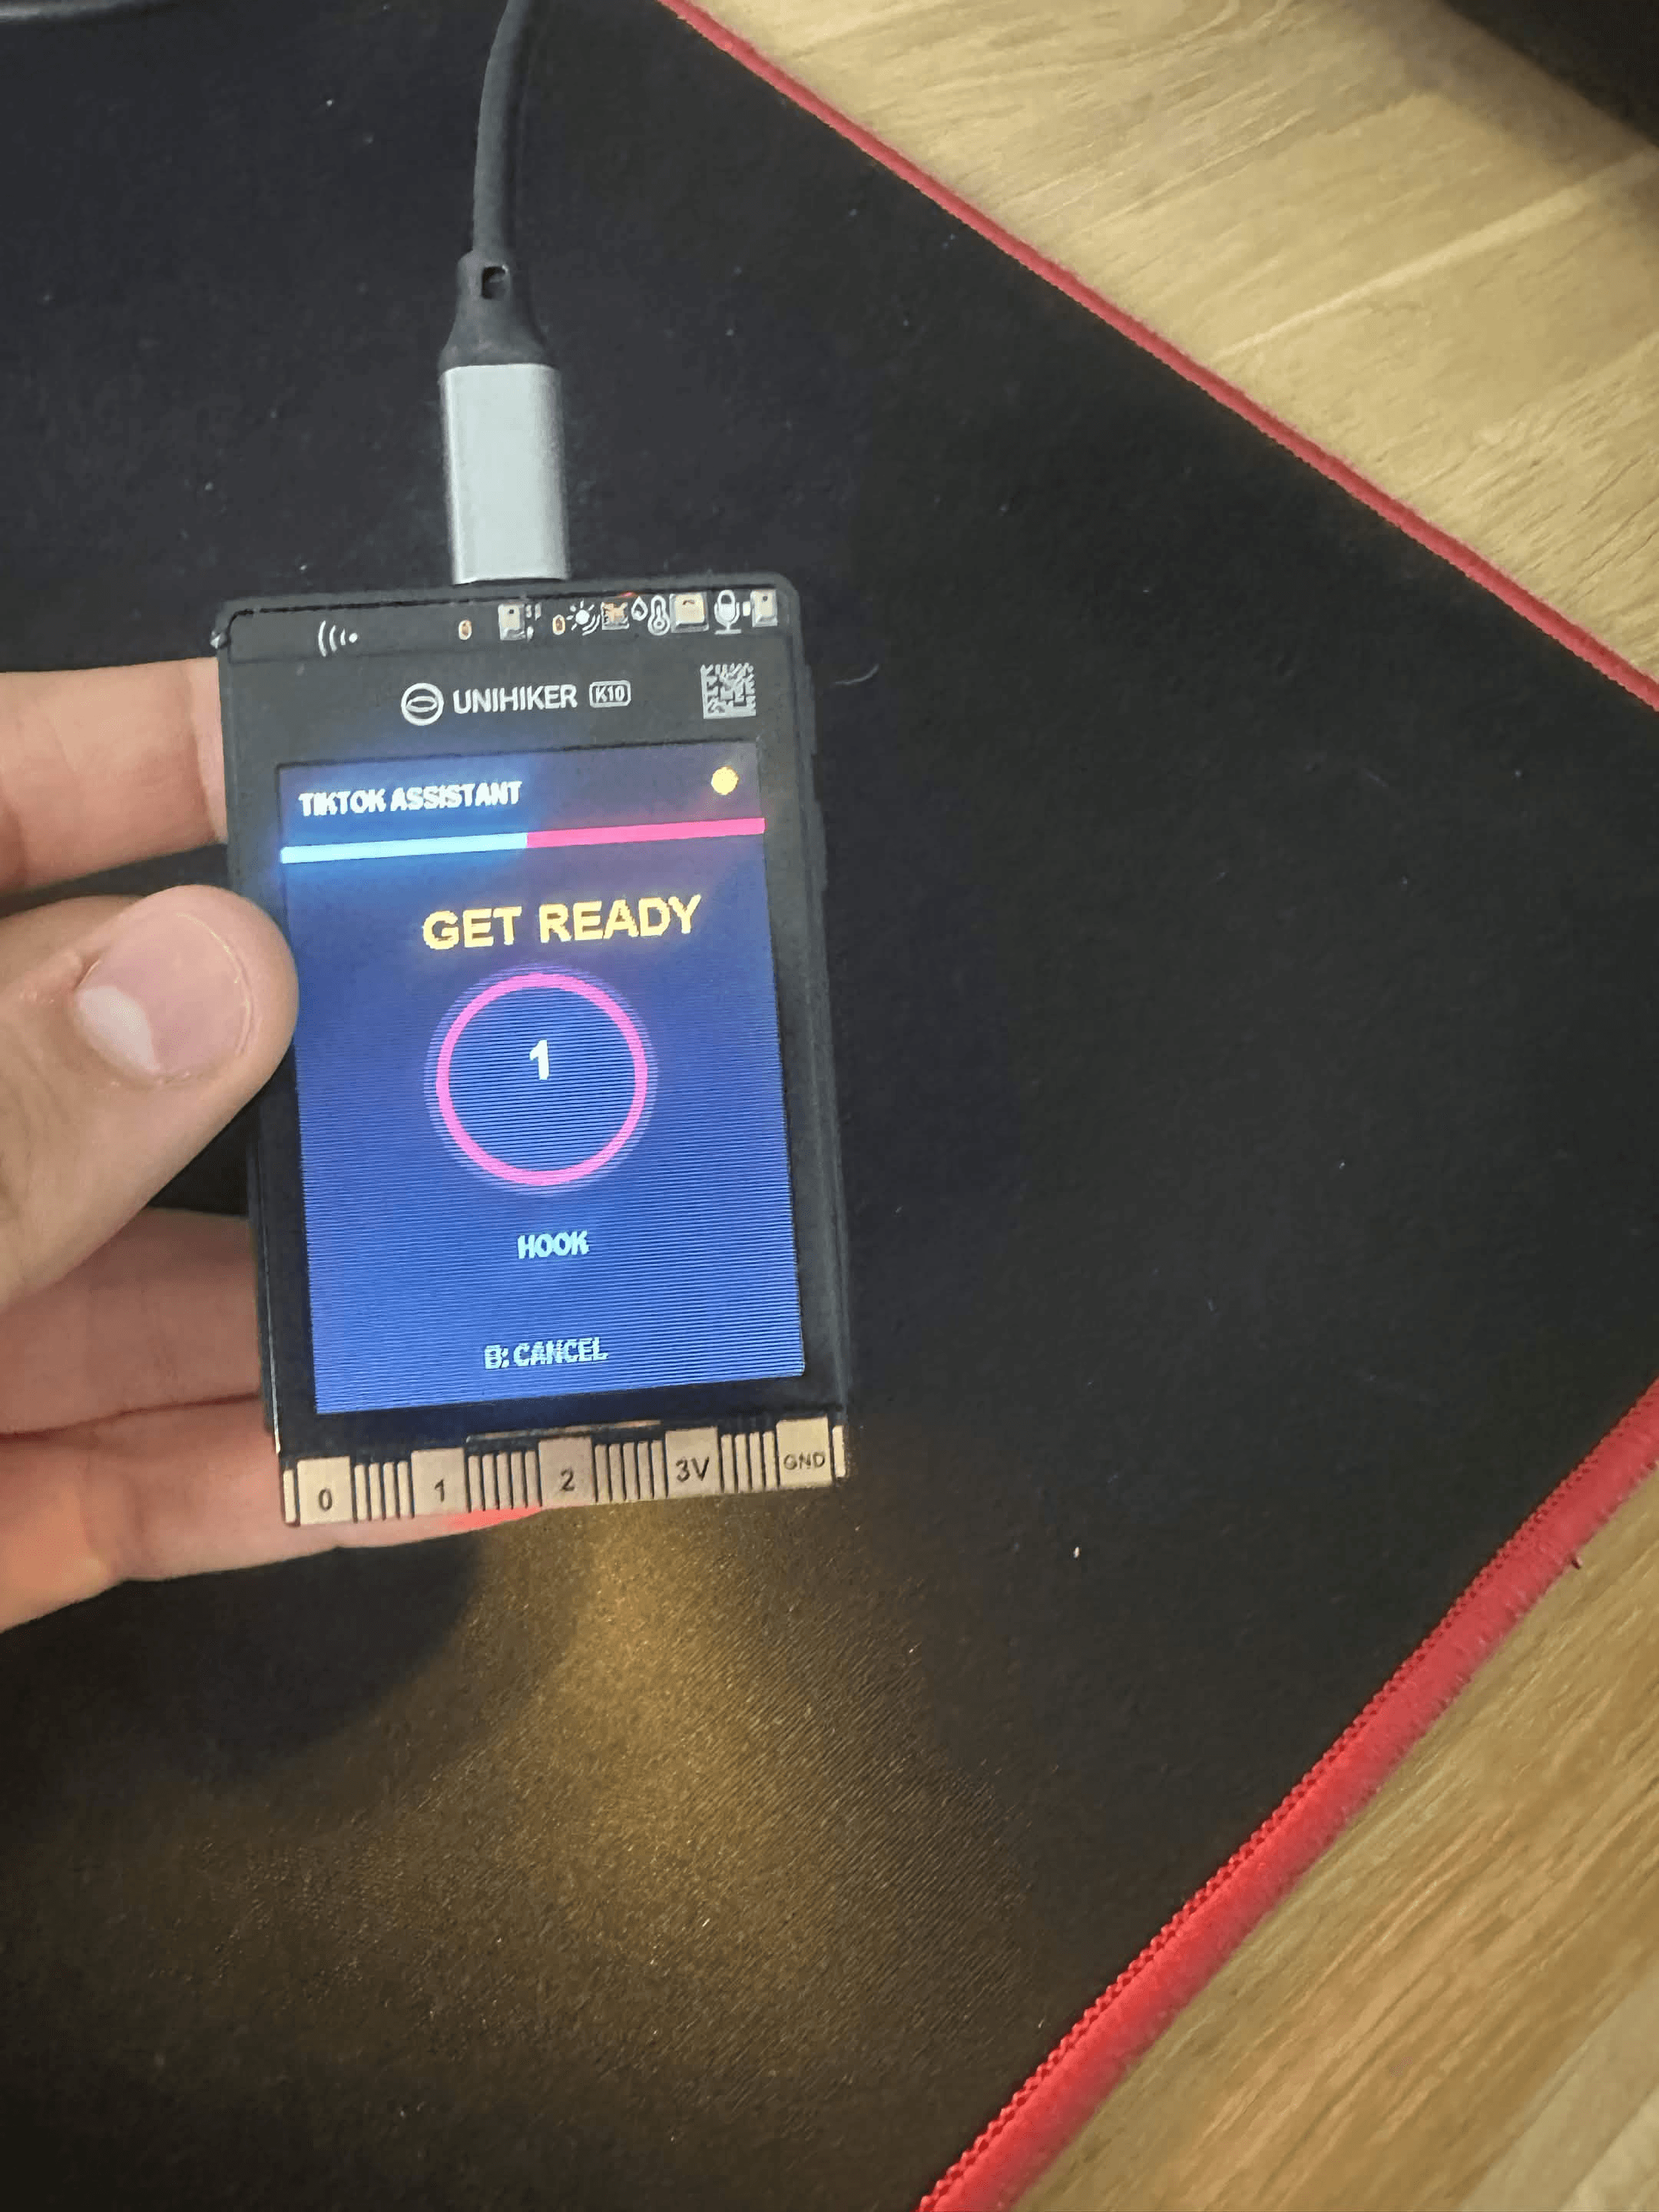
The TikTok filming assistant was the most personal project because I built it around the way I make videos for WorthTheCart. My phone still records everything; the K10 sits beside it as a small director, prompt screen and timer. It divides a review into nine shots: hook, product shot, key feature, close-up, demonstration, best part, honest downside, final verdict and call to action. That stops me from forgetting an important clip or checking a long script on the phone I am using to film.
The nine steps are not meant to write the entire video for me. Each prompt is short enough to glance at while setting up the next shot. I still decide what I want to say and how the product should be shown, but the K10 makes sure I capture the basic structure before taking the setup apart. Anyone who has finished editing and then realized one close-up is missing will understand why that matters.
For each shot, the K10 displays a short prompt, counts down for three seconds and then starts the recording timer. The RGB lights show the current state, while the microphone works as a basic audio meter. I can accept a clip, repeat it or move to the next prompt using the physical controls.
The countdown gives me enough time to move my hands away from the board and look back at the phone. During recording, I do not have to keep reading the display because the lights provide a quick visual status. If a clip goes wrong, repeating the same step is faster than going backward through a long list or restarting the complete sequence.
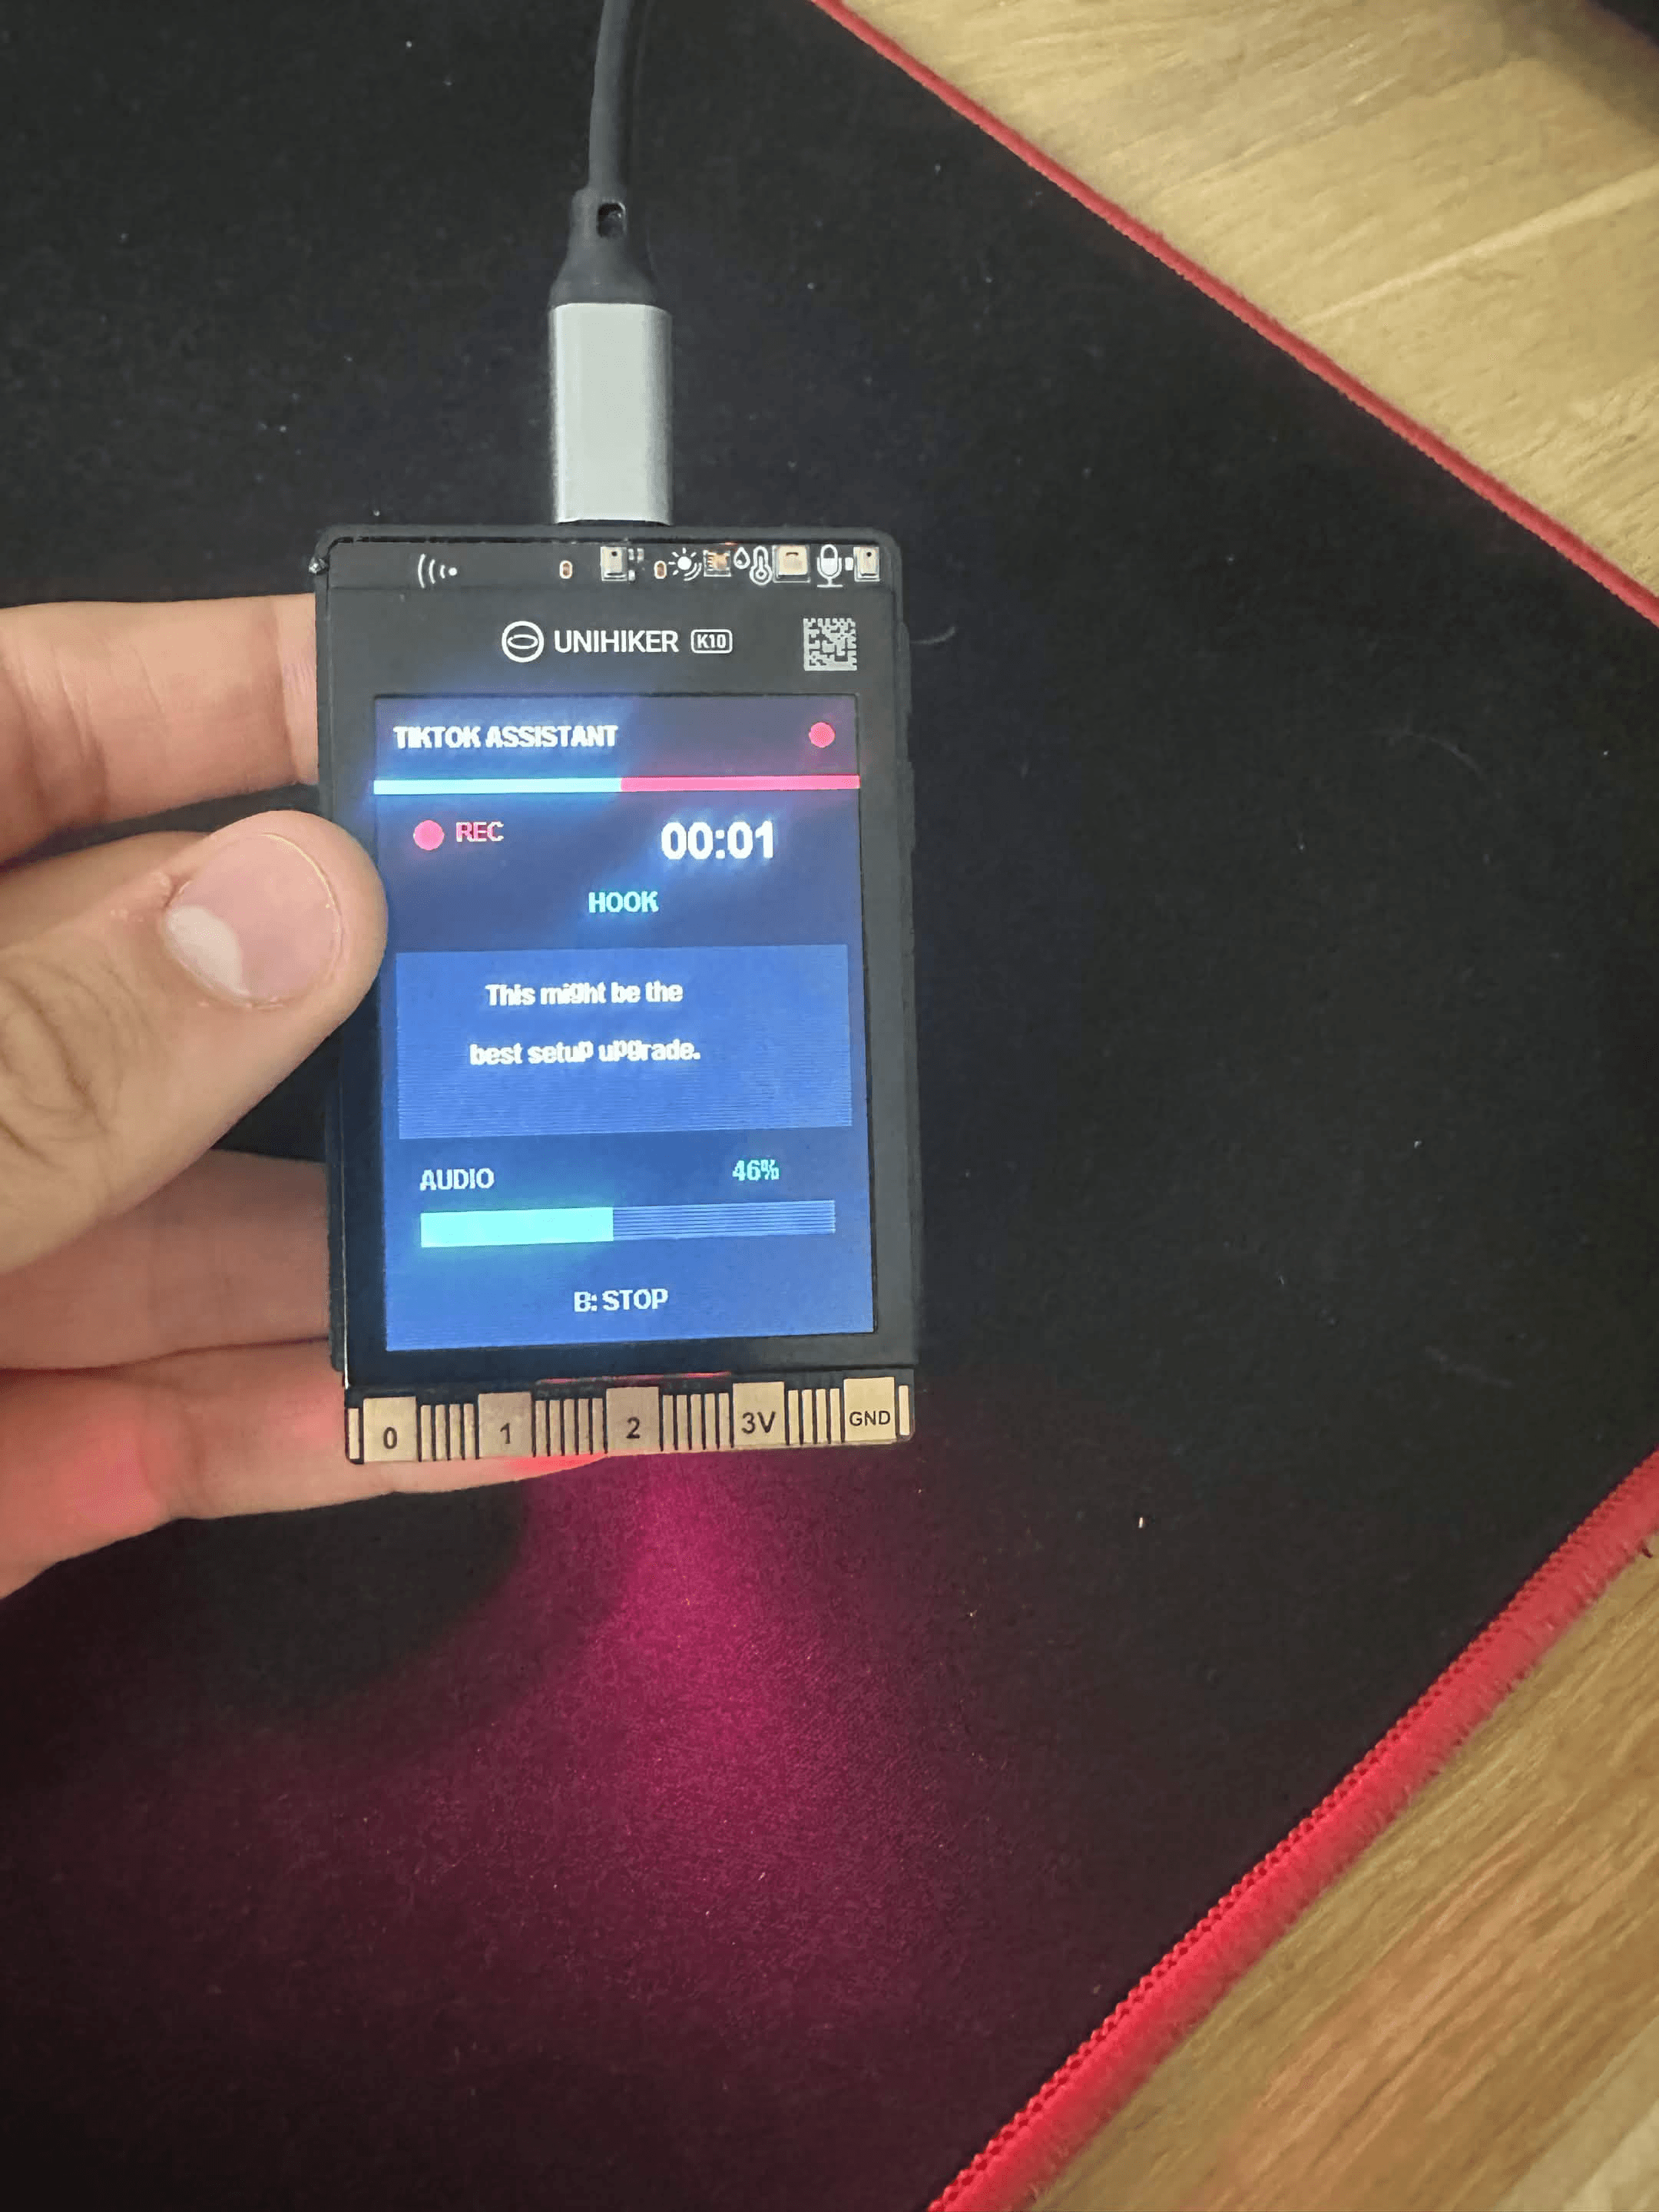
This build used more of the onboard hardware than anything else I tried, and the full sequence runs locally without Wi-Fi. It is also the best example of why I enjoy maker products. I doubt I could buy a filming tool designed around my exact nine-shot WorthTheCart process, but I could build one and change the prompts whenever my videos evolve. It may not use the K10's most advanced AI feature, but it is probably the project that will save me the most time.
I can also make a different version for another type of video. A PC-build slideshow, product unboxing and tutorial do not need the same sequence of shots. Changing the prompts in code is more work than editing a note on my phone, but the result is a dedicated tool that stays visible and does not interrupt the device doing the recording.
What These Projects Reveal About the K10
The six projects pushed the K10 in very different directions. The follower counter and PC monitor became network dashboards, rock paper scissors used the camera and AI, the alarm clock worked on its own, and the stream deck controlled a Windows PC. The filming assistant was built around a problem that was completely personal to me. That variety says much more about the board than its specification sheet does.
Not every project needs every component, and that is part of the appeal. The alarm clock did not need the camera, while the PC monitor had no reason to use AI. I never felt forced to build around one headline feature. The K10 was able to take a supporting role and simply provide the screen, input or connection that a particular idea needed.
I also spent most of my time deciding how each project should work, not wiring basic parts together. There was still plenty of troubleshooting. I dealt with firewall settings, changing web data, the wrong time zone, screen flicker and inconsistent camera recognition. Those problems were sometimes frustrating, but they were part of building the actual idea rather than trying to make a pile of components communicate.
This distinction is important for beginners. The board does not remove problem-solving, and I would not describe every ambitious project as plug-and-play. What it does remove is a large amount of repetitive setup. When something failed, I could normally focus on the network request, interface or program logic instead of questioning whether I had connected the display and sensors correctly.
A beginner can start with one button and a few blocks in Mind+, while a more experienced user can create local services, parse live data and design interfaces in code. You will eventually find the limits of the processor, memory or software, but every focused project I tried could be adjusted to fit the board.
Is the UNIHIKER K10 Worth $28.90?
DFRobot listed the K10 for $28.90 when I wrote this review, and I think that price is excellent. You get the color display, 2MP camera, microphone, speaker, sensors, accelerometer, RGB lights, Wi-Fi, Bluetooth and ESP32-S3 on one board. Buying those parts separately would cost more and add a lot of wiring and mounting work.
More importantly, I could finish one idea and upload a completely different one without rebuilding the hardware. At this price, I also would not feel bad about leaving the K10 permanently set up as a follower counter or PC monitor. Beginners can experiment with AI without buying a large robotics kit, and schools or clubs could reasonably purchase several boards.
There are cheaper ESP32 boards, so the K10 is not automatically the best value if you already own a display, camera and sensor collection. The value is strongest for someone starting from nothing or anyone who wants a compact all-in-one device. I would happily pay the difference to avoid rebuilding the same basic display and controls for every small idea.
Shipping and taxes may raise the total depending on your country, so check the official DFRobot product page before ordering. As long as the price stays close to $30, it is very hard to complain about the value.
Who Should Buy It?
The K10 is a great first board if you are more excited by a screen, camera and interactive projects than a bare microcontroller. You can start with blocks in Mind+, get the buttons and sensors working immediately, and move into written code when you are ready. Students get several areas to explore without needing a new hardware kit for every lesson.
It also makes sense for experienced makers who want to prototype quickly. The built-in hardware saves time, and the low price means you can leave a successful project running instead of dismantling it to recover expensive parts.
Content creators may enjoy it even more. The screen, camera and RGB lights make the results easy to show in photos and short videos. In my case, the board also became part of the filming process instead of only being the product I was filming.
It could also fit naturally into a gaming setup or small home lab. A server-status display, notification panel, network monitor or smart control screen all match the hardware well. The K10 is best when the job is focused and the important information can be understood on one small screen.
Do not buy it if you want a polished gadget that works without programming or debugging. It is also the wrong tool for a desktop browser, large AI models, advanced video processing or Linux apps. For those jobs, buy a more powerful single-board computer. The K10 is for people who want to make the finished device themselves.
Pros and Cons
Pros | Cons |
|---|---|
Excellent value at $28.90 | No protective case included |
Color screen, camera, microphone and speaker are built in | Display space is limited for complex interfaces |
Wi-Fi and Bluetooth support connected projects | Only 2.4GHz Wi-Fi is supported |
Useful onboard sensors and RGB feedback | Two buttons can restrict more complicated controls |
Beginner-friendly Mind+ block programming | Advanced projects still require manual code and debugging |
Supports written code and MicroPython as your skills improve | Not powerful enough for large AI models or Linux software |
Local AI makes camera and voice projects accessible | Speech and language features are more limited than cloud assistants |
Compact enough for a permanent desk gadget | Third-party web projects can break when services change |
Expansion ports and microSD support future projects | A stand or 3D-printed enclosure greatly improves daily use |
Final Verdict
Most of the disadvantages come directly from the price and size. A larger touchscreen, faster processor and included enclosure would be nice, but they would also turn the K10 into a much more expensive product. I think DFRobot made sensible compromises to keep it affordable.
The UNIHIKER K10 is one of the most enjoyable boards I have tested because every project becomes visible almost immediately. Upload the code and the board can show live information, react to a button, recognize a hand or guide a filming session. That is far more satisfying than watching the same program print text inside a terminal.
Before testing it, I expected to build two or three examples and spend most of the review discussing the hardware list. Instead, the projects became the most important part of the article. Every time one worked, another use for the screen, buttons or Wi-Fi came to mind. That is exactly the reaction I want from a maker product.
It is not flawless. I strongly prefer using it with a case, the non-touch display limits complicated interfaces, and Wi-Fi projects can be affected by firewalls or changes to third-party services. The AI features are also small embedded models, not replacements for powerful cloud AI. I ran into every one of those limitations during testing, but none of them stopped me from enjoying the board.
Mind+ is friendly at the beginning, although its manual editor becomes less comfortable as a project grows. Two buttons also require clever menu design, and 2.4GHz-only Wi-Fi may be inconvenient on some networks. These are genuine compromises rather than complaints added to make the review look balanced. I noticed them because I went beyond the first demo and tried to make tools I would actually use.
What sold me was being able to turn the same $28.90 device into six completely different tools without adding much hardware. Some were fun experiments, while the follower counter, PC monitor and filming assistant are things I can genuinely keep using. The K10 made me want to start another project after the review was finished. For a maker product, I cannot give it a much better compliment than that.
If you only want one finished gadget, buying that gadget will usually be easier. If you want to understand how it works, change it whenever you like and then turn the same hardware into something completely different, the K10 is easy to recommend. I finished this review with more project ideas than I had when I started, which is why it earns such a high score.
Category | Score |
|---|---|
Features | 9.5/10 |
Ease of use | 9.5/10 |
Software and documentation | 9.2/10 |
Project flexibility | 9.8/10 |
Value for money | 10/10 |
Overall | 9.6/10 |
Frequently Asked Questions
Is the UNIHIKER K10 good for beginners?
Yes. Mind+ lets you begin with blocks, and the built-in screen, lights, buttons and sensors give you an immediate result. You can move into networking, AI and written code later. More ambitious projects still require debugging, but the K10 is much easier to start with than a bare board.
Does the K10 need Wi-Fi to work?
No. Buttons, sensors, stored images, camera recognition, timers and my filming assistant can all work offline after the program has been uploaded. You only need Wi-Fi for live internet data, time synchronization or communication with another device.
Can the K10 run AI without the cloud?
Yes, for focused tasks such as image recognition, motion detection and speech commands. These use small models designed for embedded hardware. The K10 cannot run the kind of large generative model used by ChatGPT, so local projects need a clearly defined recognition task.
Can the K10 display a website or iframe?
Not like a normal browser. It can request data from a web service and draw its own interface, but it cannot render a complete modern webpage or iframe. My follower counter retrieves the statistics and recreates the important information on the K10's screen.
Does the UNIHIKER K10 include a case?
No. The standard package contains the exposed board and a USB-C cable. You can use it as it arrives, but a 3D-printed case or stand adds protection and makes it much easier to keep on a desk. Make sure the case does not block the camera, microphone, speaker, sensors, buttons or ports.
Where Can I Download Mind+ and Buy the K10?
Download Mind+ from the official Mind+ website. You can check current availability and pricing on the official DFRobot UNIHIKER K10 product page. It was listed for $28.90 when I wrote this review, but shipping and taxes depend on your country.
Popular Posts
Keep reading

